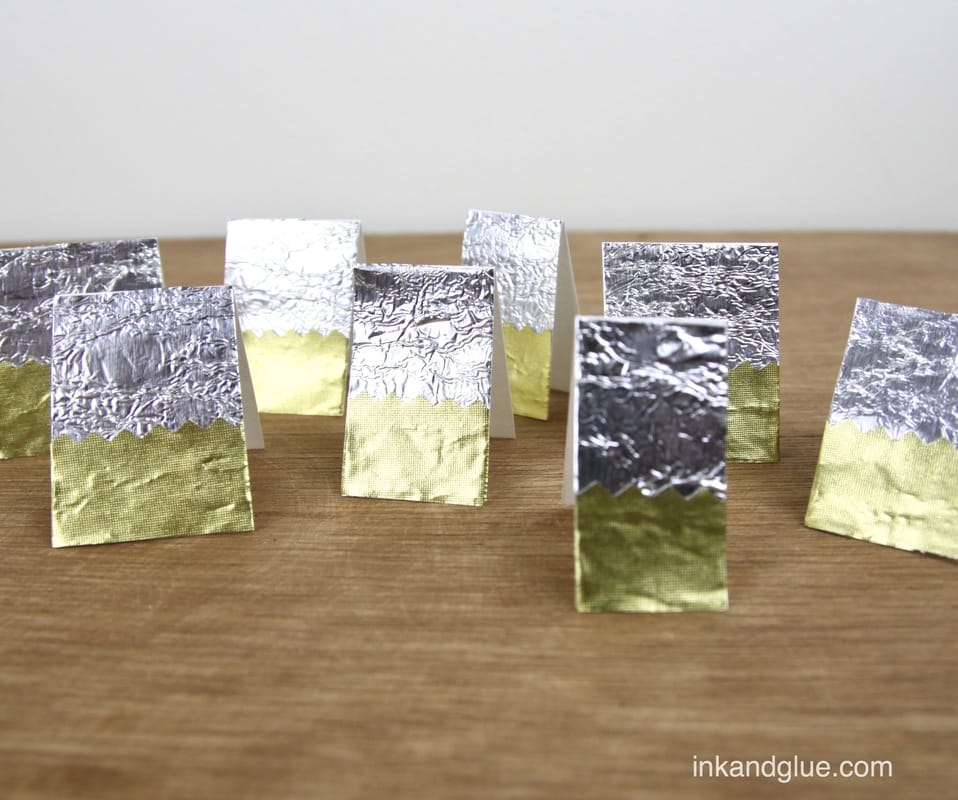
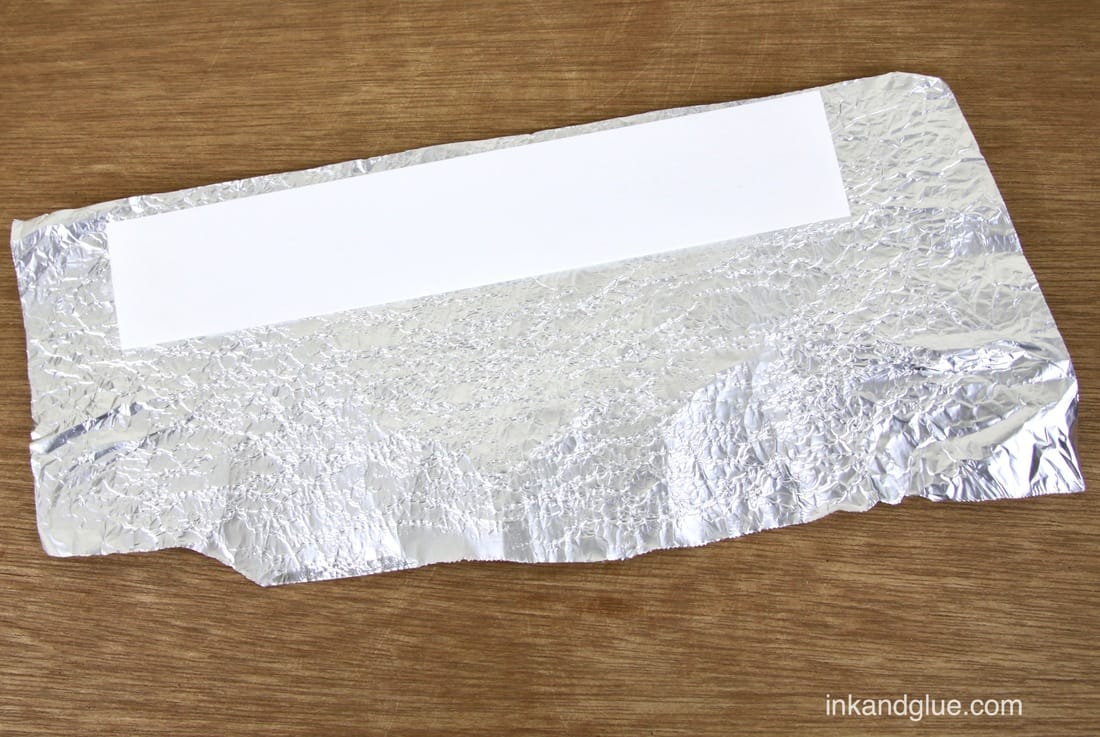
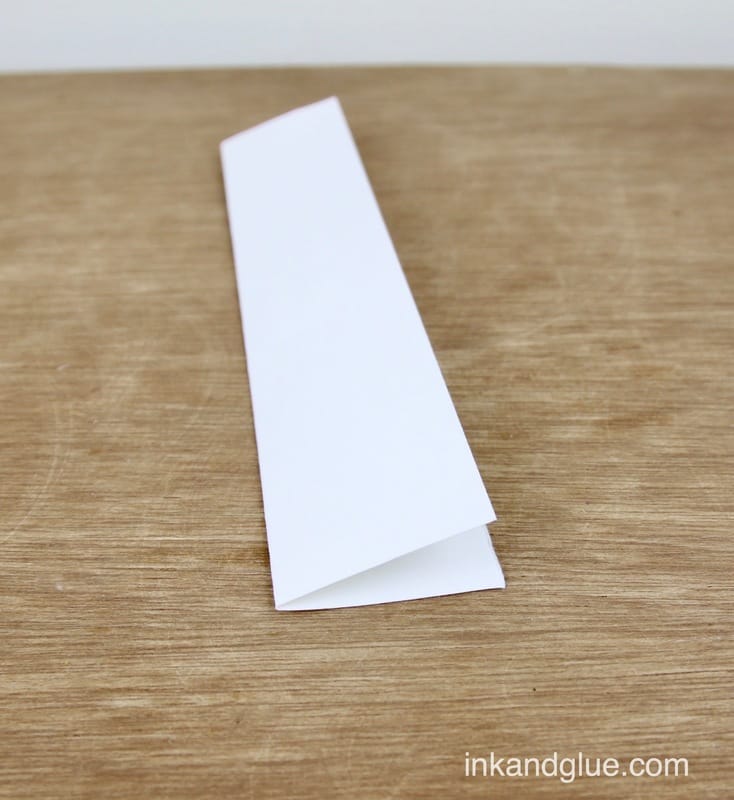
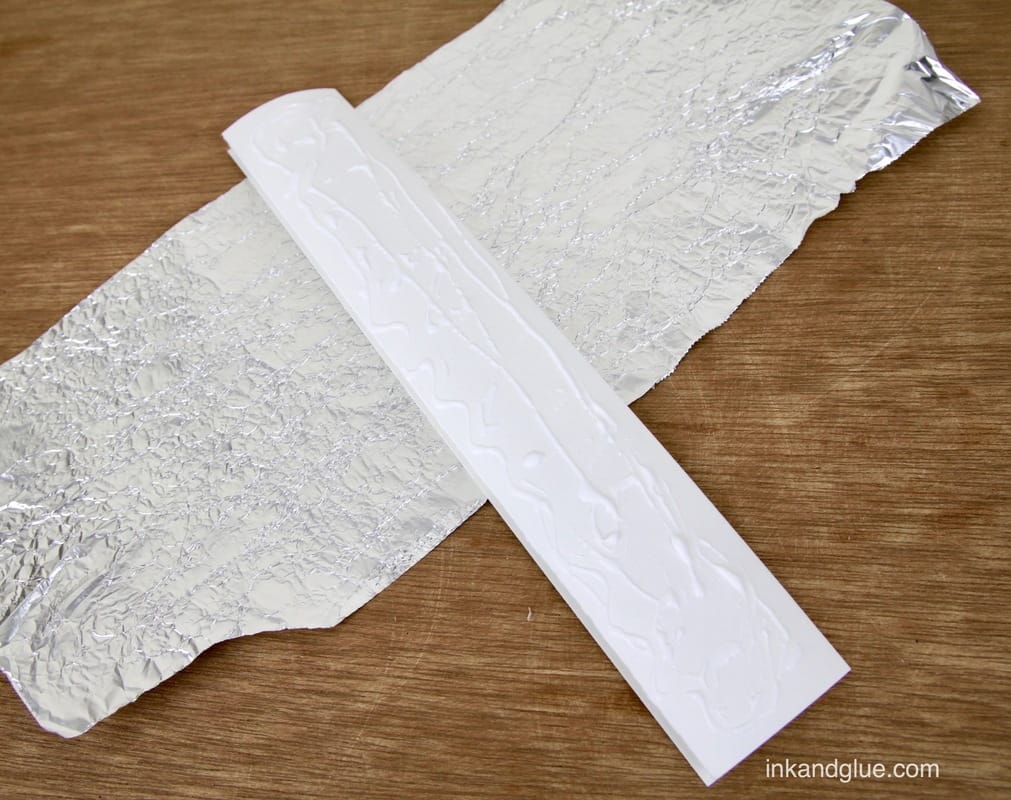
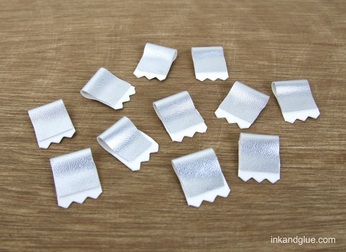
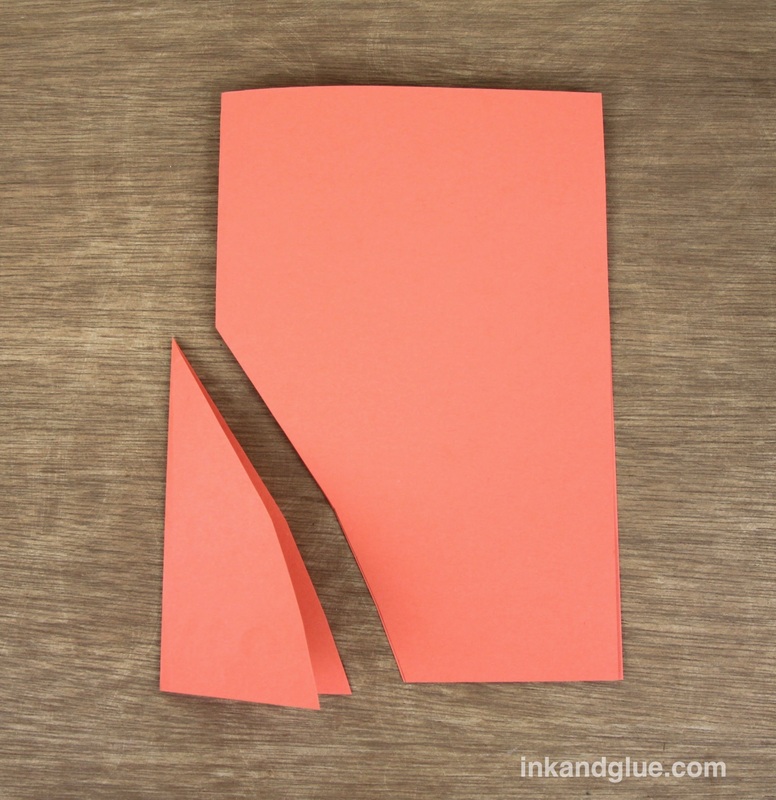
 I have been in the depths of Christmas prep, which (naturally) includes wrapping presents. I try to be thrifty with wrapping gifts, because the paper etc. will end up being thrown away or recycled in one way or another anyway—it feels wasteful to invest actual money into it. Instead of gift tags or stickers, I like to tape simple little cards to each gift. Here's how I make a whole bunch of little cards in a row. Mine are decorated with aluminum foil and gold metallic paper, but of course you can use any paper (or wrapping paper) you choose. First, fold a 4-inch-wide (or so) strip of plain white drawing paper in half like you're making one really tall, narrow card. Apply glue to one side of the folded strip, and press it onto a piece of aluminum foil. (I first crumpled up and smoothed the foil to give it some texture.)
 Trim the excess foil from the paper.  The front will look like this. Ooh, shiny! 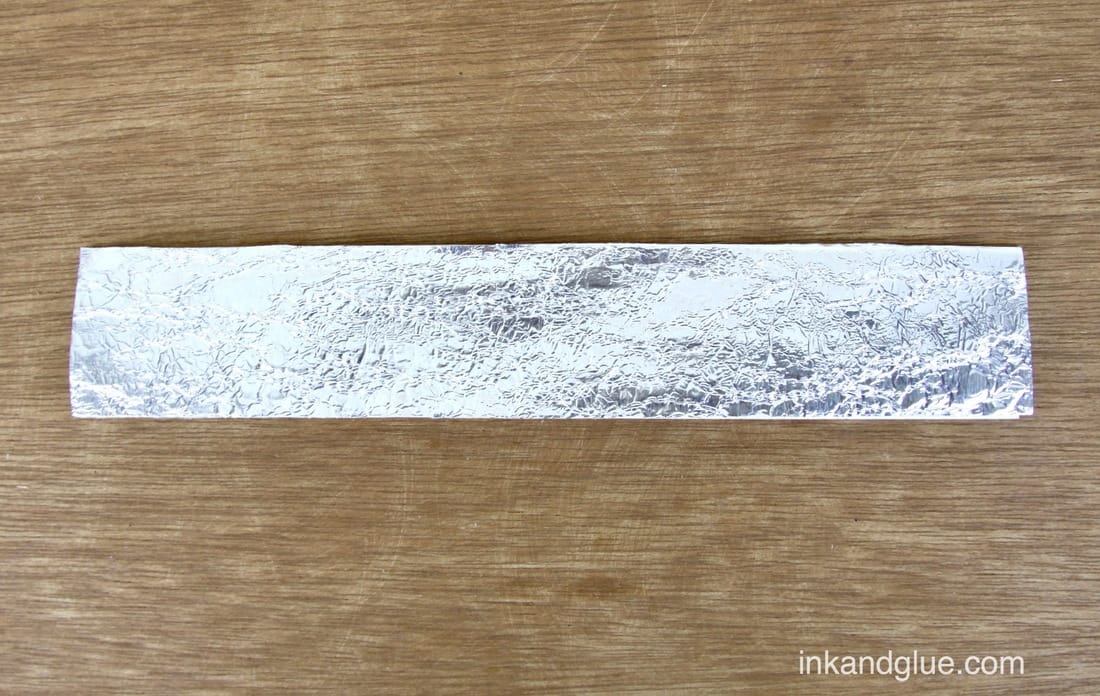 Apply glue to a second strip of decorative paper, then smooth it onto the be-foiled paper. Trim the edges as you did the first go-round. 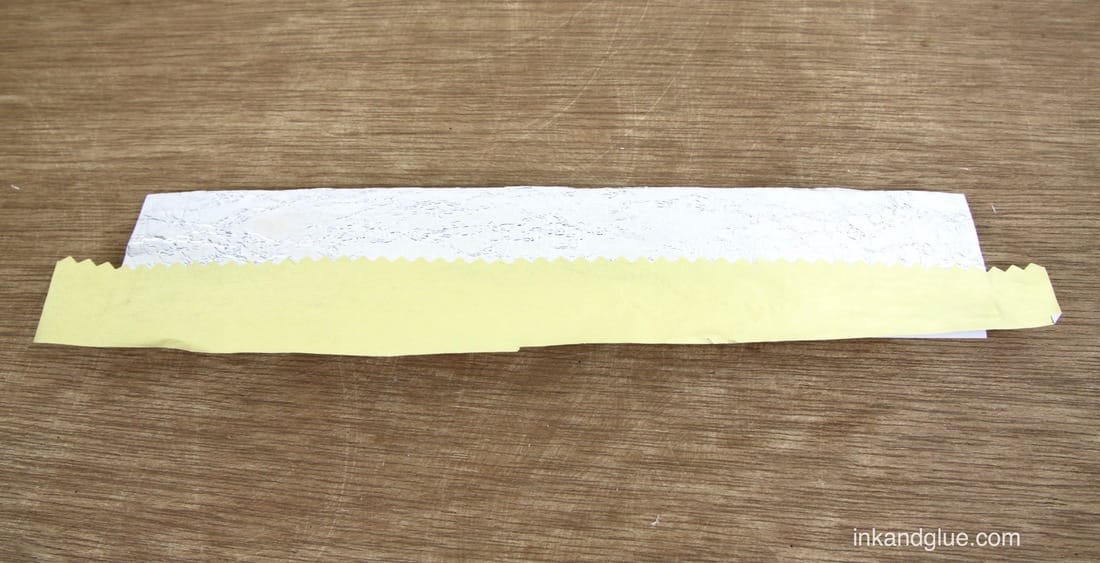 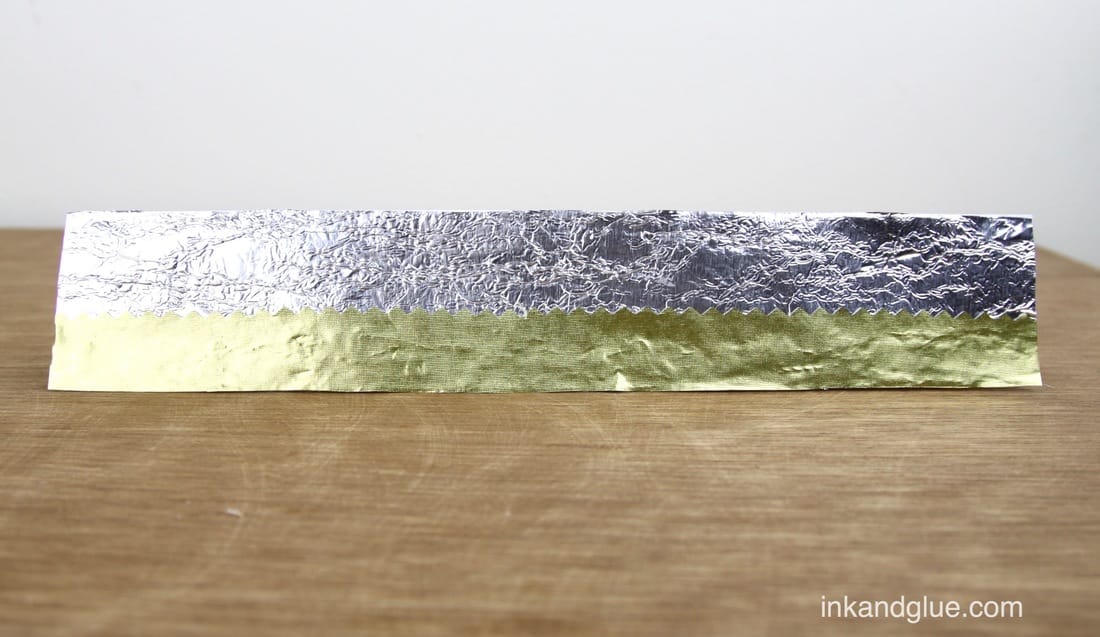 Let the glue dry, and then cut the strip-card into a bunch of little guys—eight, in this instance. 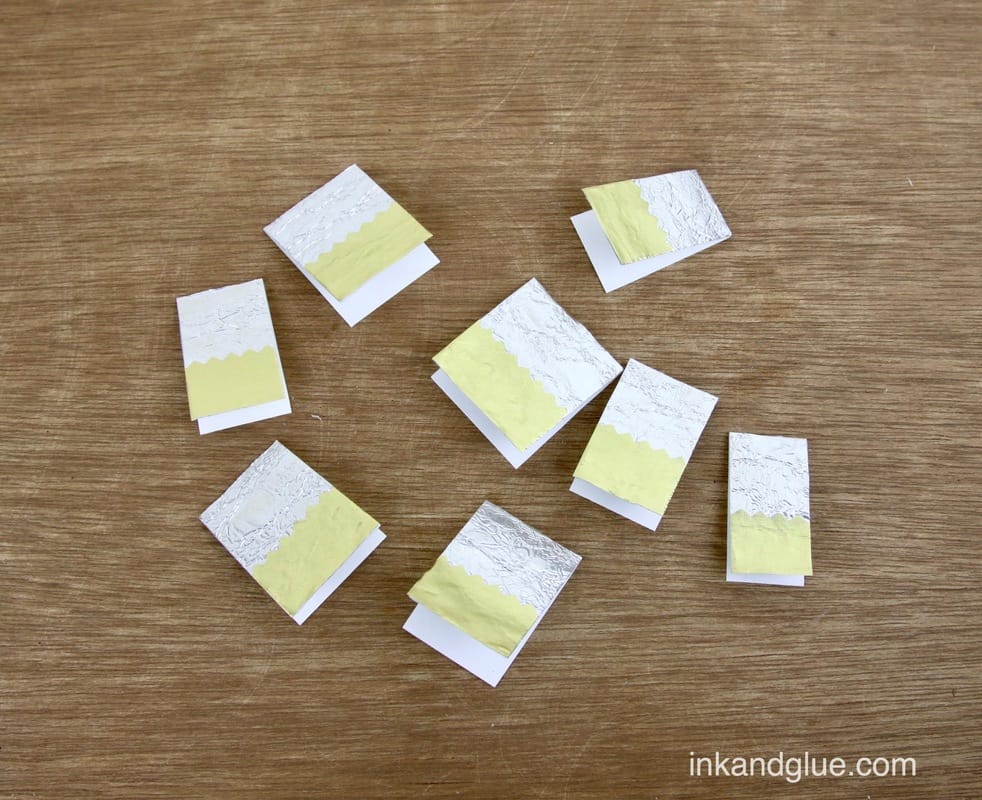 So easy! I hope your holidays are going easily and smoothly, too.
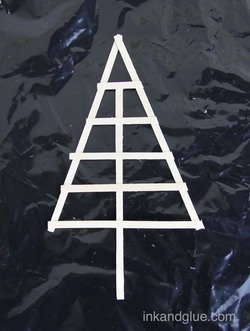
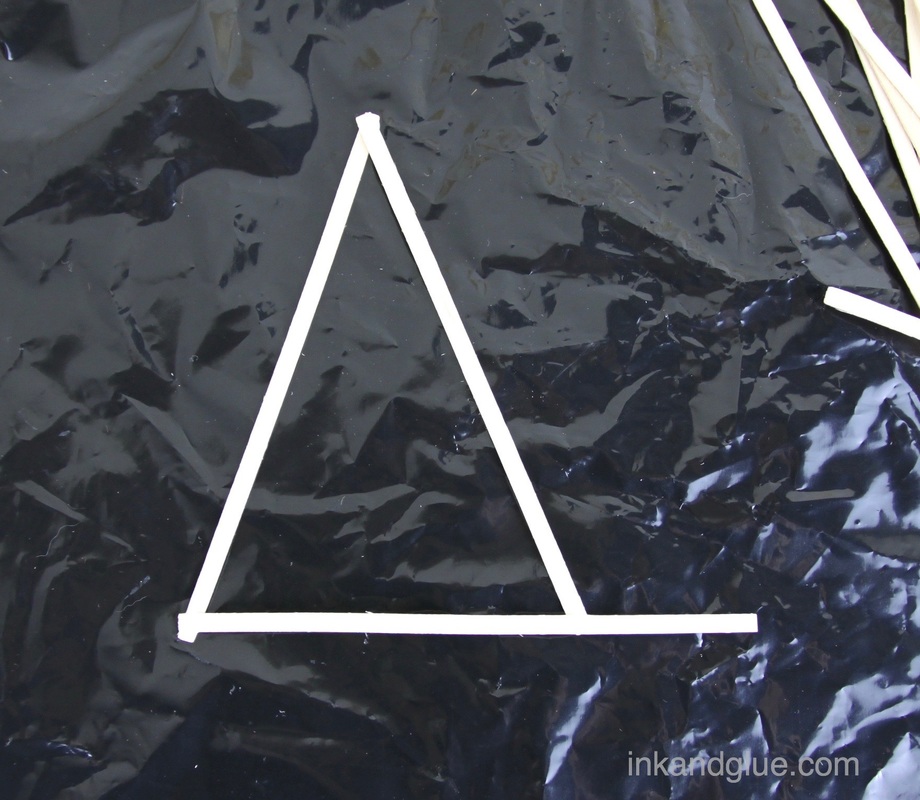
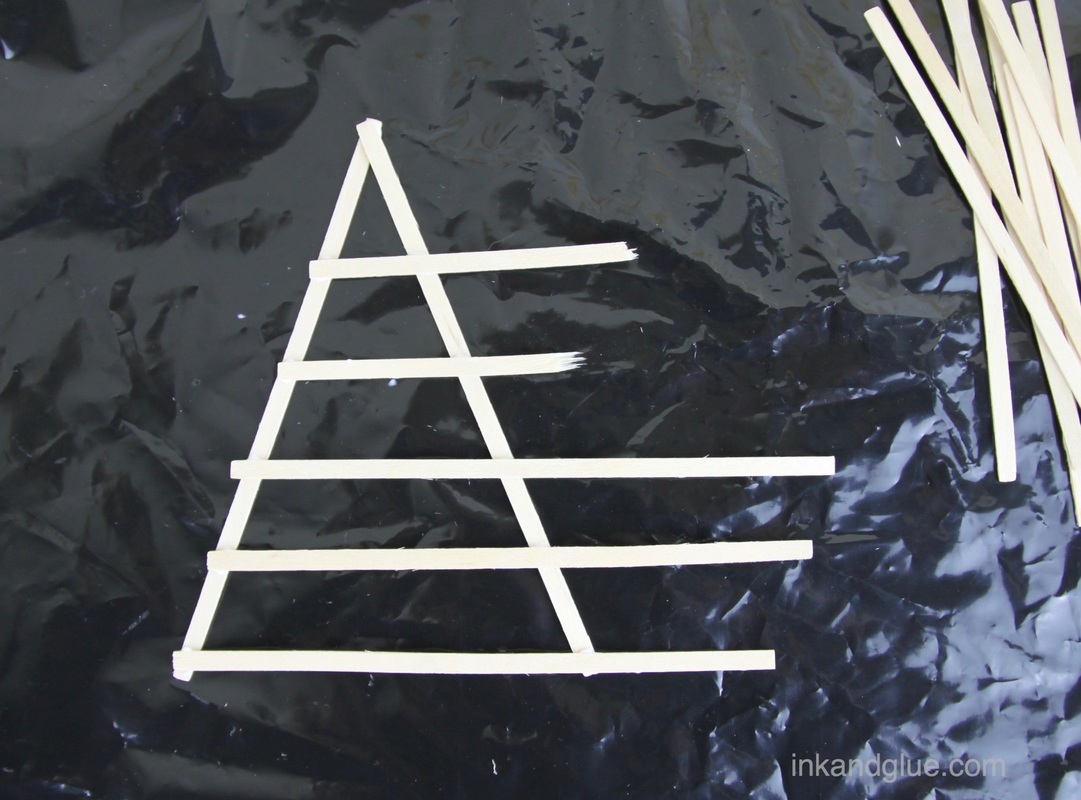
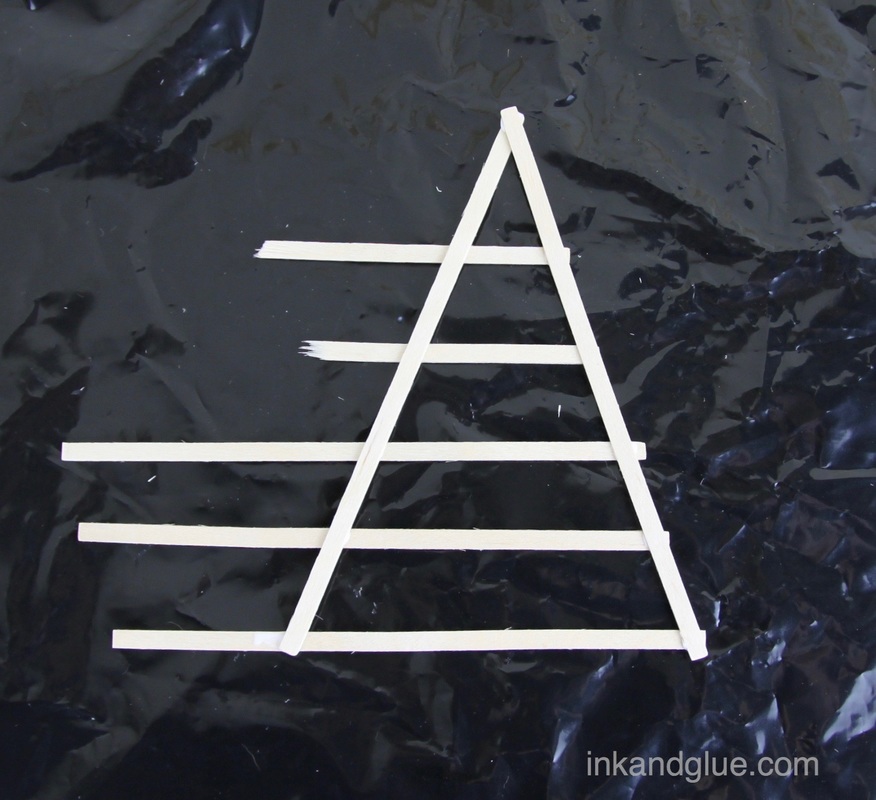
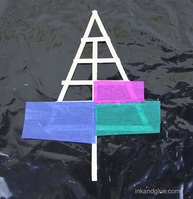
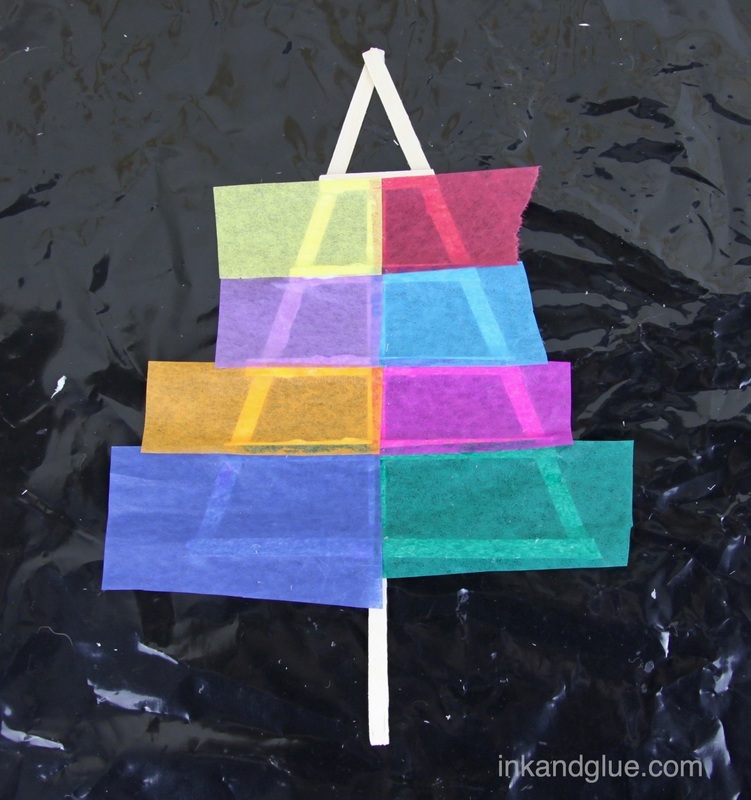
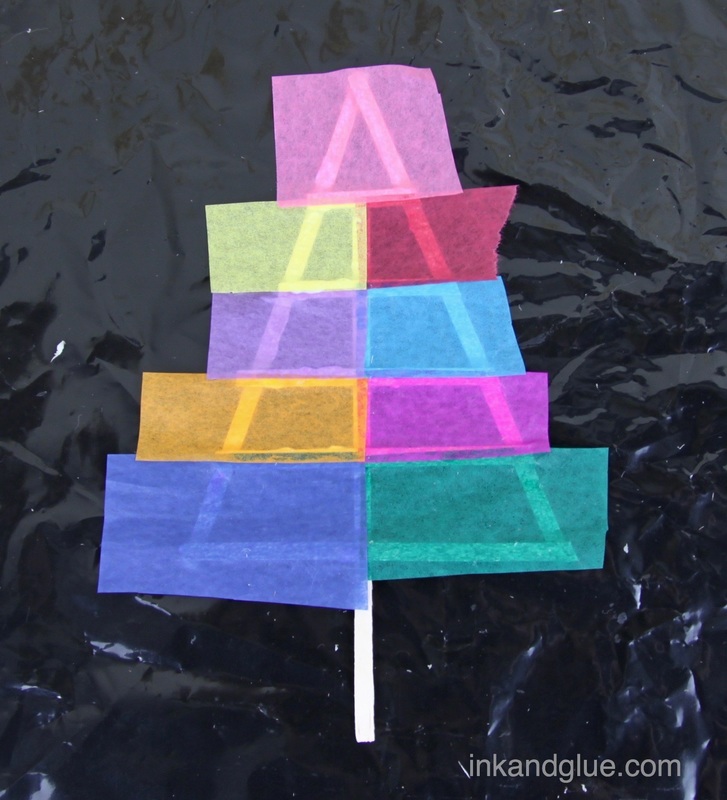
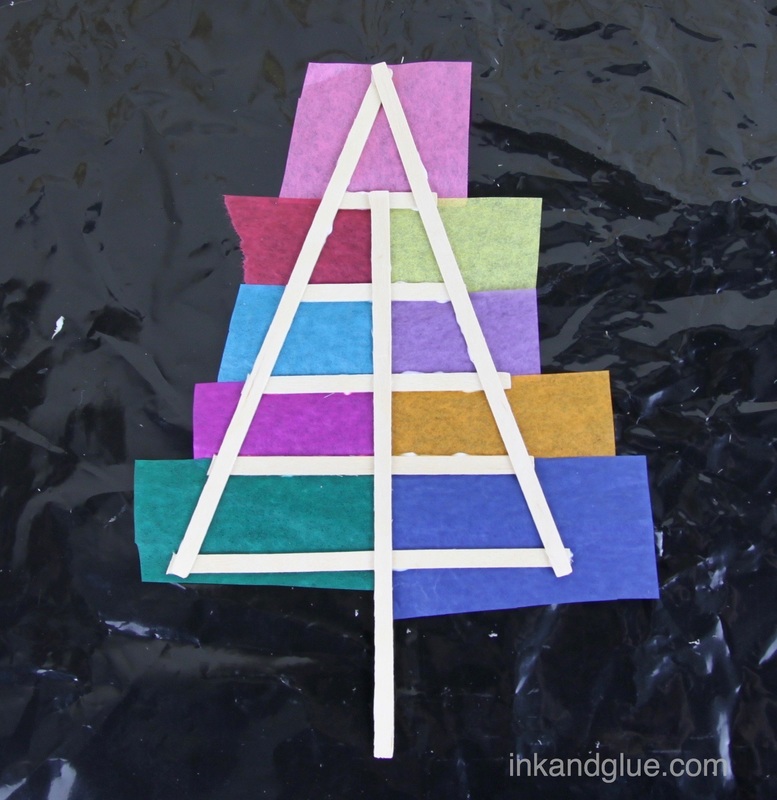
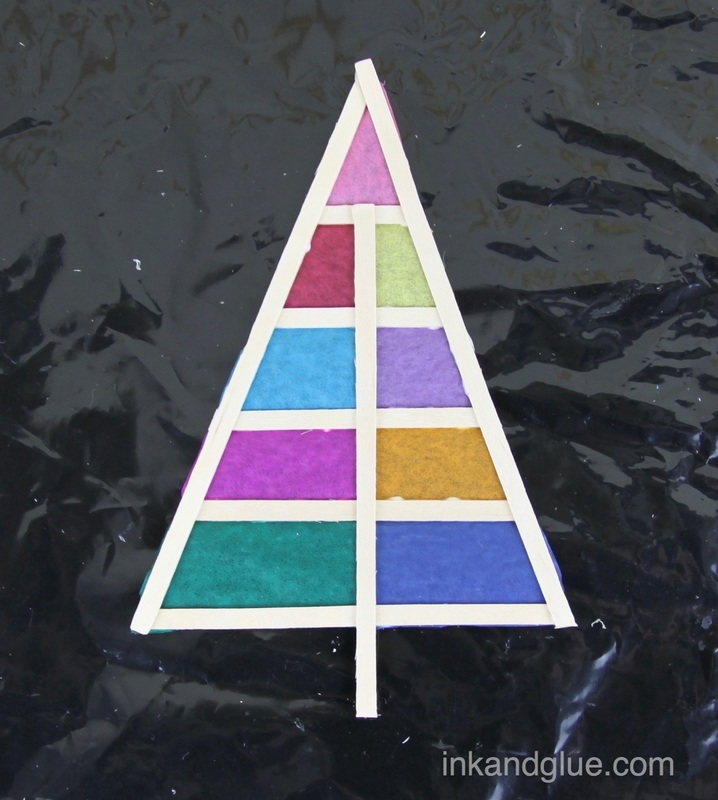
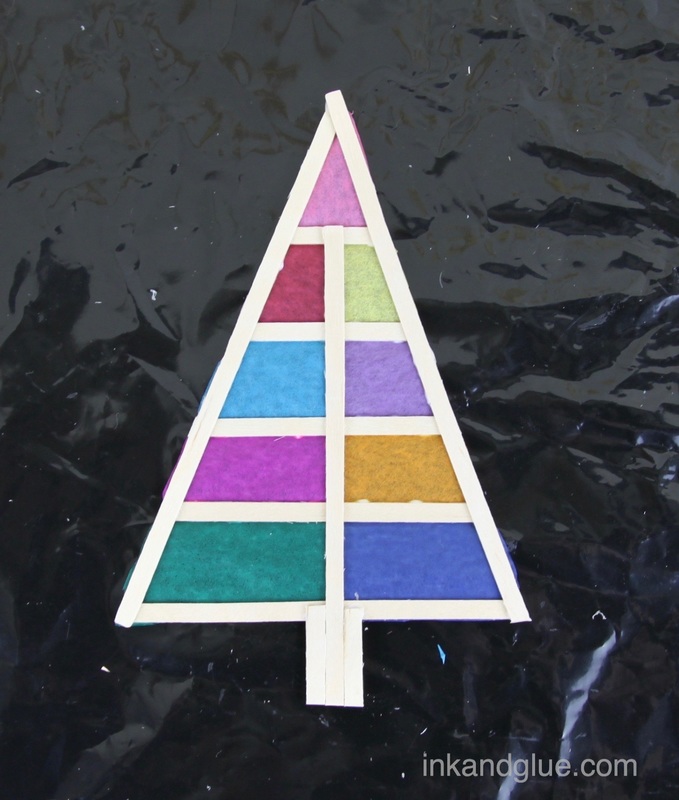
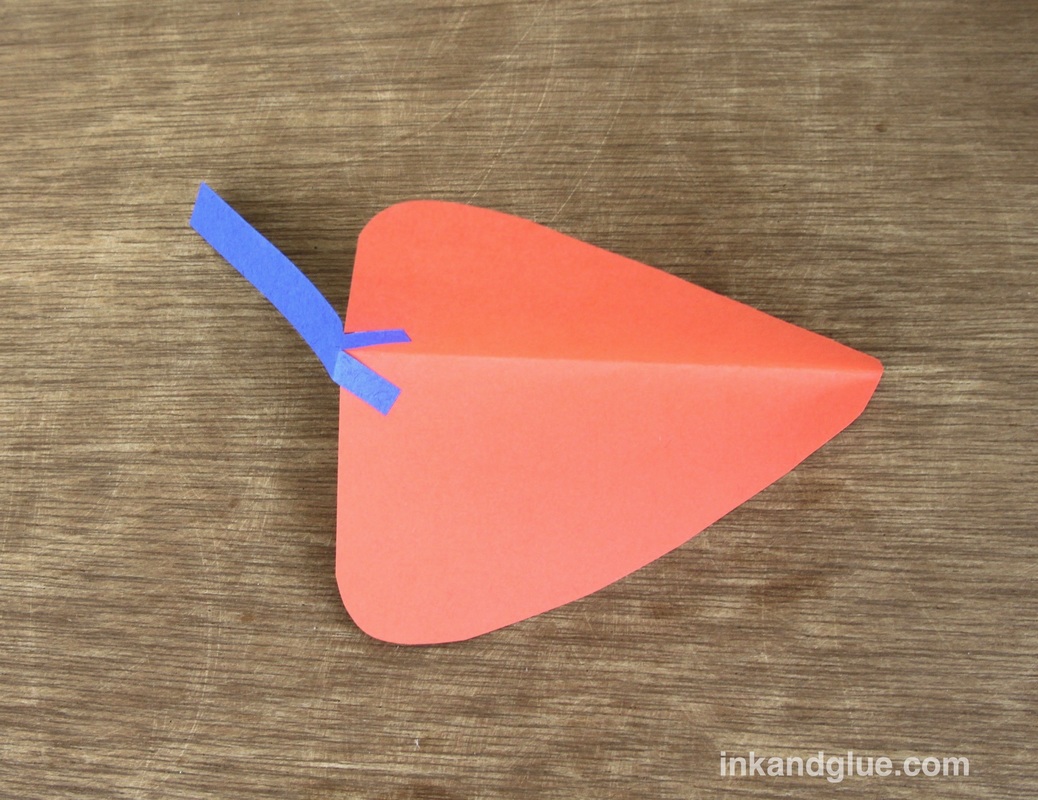
xo 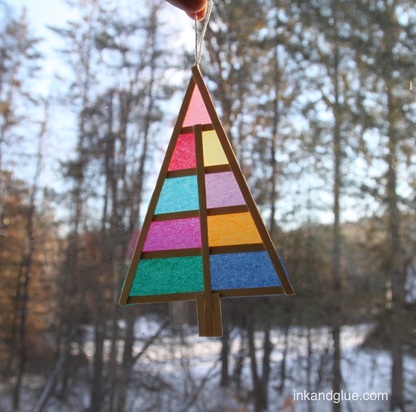 Ok, I admit — this ornament/sun catcher is not made of stained glass. It is made of tissue paper, and wooden coffee stirrers. Isn't it grand? I love colorful holiday decorations; anything other than the usual green and red is alright with me. You may feel differently, and if so, feel free to customize the colors of your tree to your liking. To make one, gather a few coffee stirrers. I probably didn't need to borrow quite so many; I think I ended up using 7 or so. 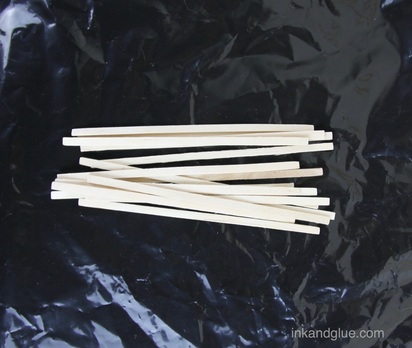 Lay three of the stirrers in a triangle shape on a piece of plastic or waxed paper. With tacky glue, adhere the three stirrers together at the corners. Then, glue several more stirrers, evenly spaced, parallel to the skinny side of the triangle as shown. Break the sticks in half for the shorter pieces, to save wood.
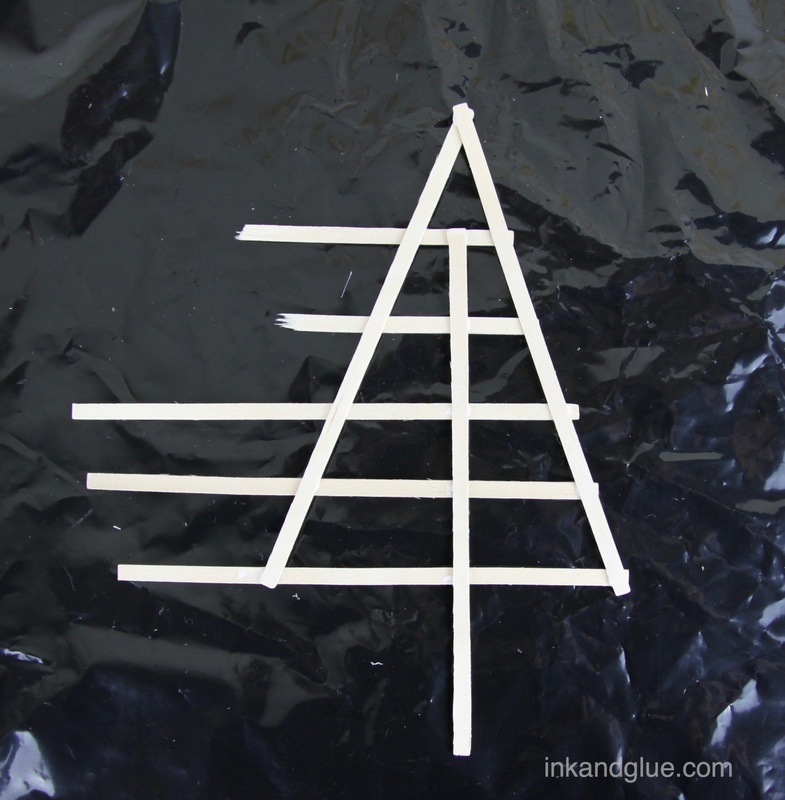
Once the glue is dry enough, flip over your stirrer set-up. Glue a stirrer to the center of the inner lines, as shown.
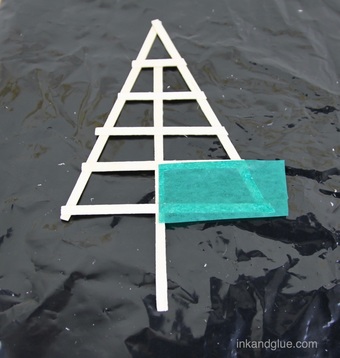
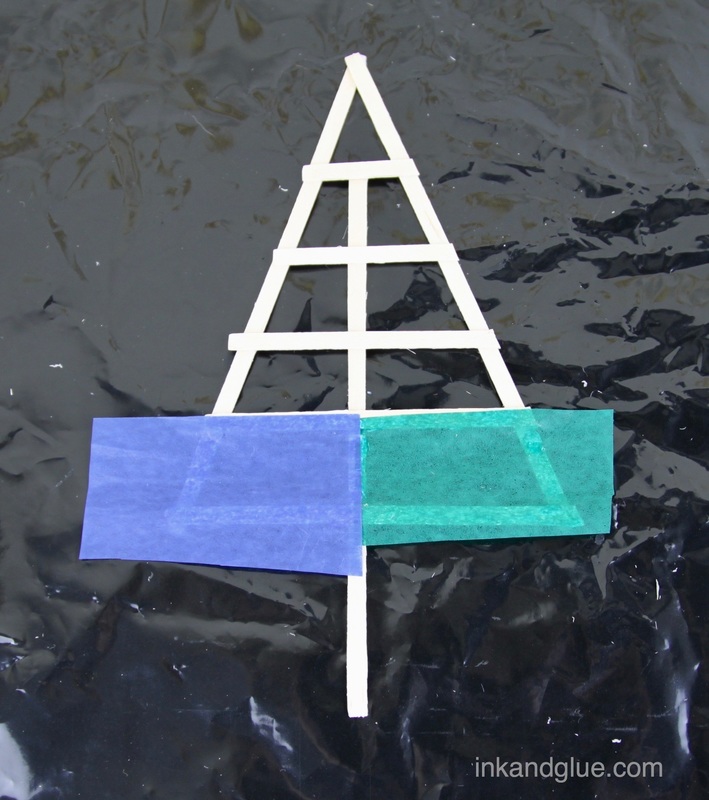
 Use strong scissors to trim the excess lengths of the stirrers. Now it's time to add color! Choose a scrap of colored tissue paper and trim it into a rectangle or strip that's basically the same width as the space where you'll be gIuing it, plus a little extra. Don't worry about getting the paper the perfect size; just making it the right width will be enough. Align the paper over the stirrers so its interior edges won't need trimming further down the line. Spread a thin amount of glue onto the stirrer window, then smooth on the paper piece. Do the same with a second color, again lining up the interior edges neatly.
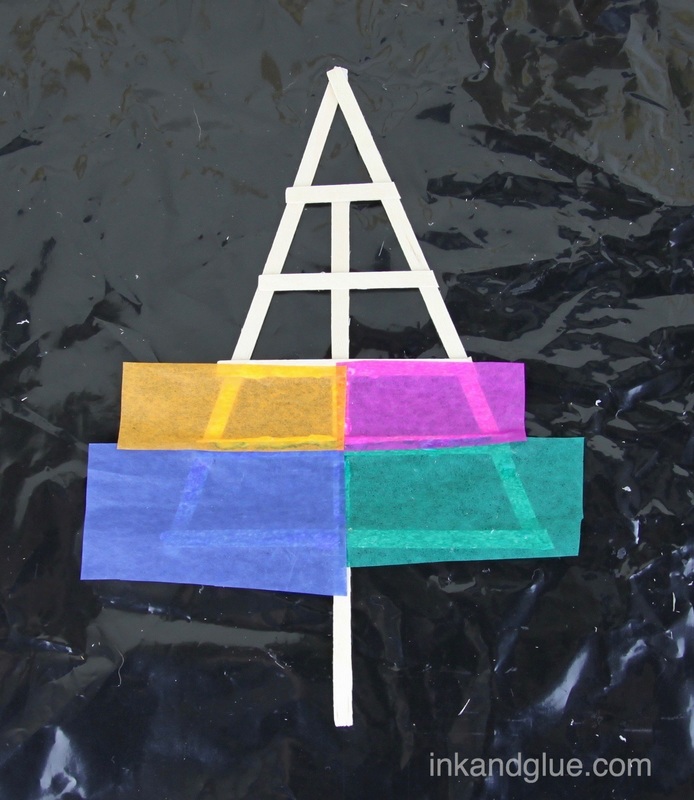
Keep adding trimmed pieces of paper to the windows, as shown.
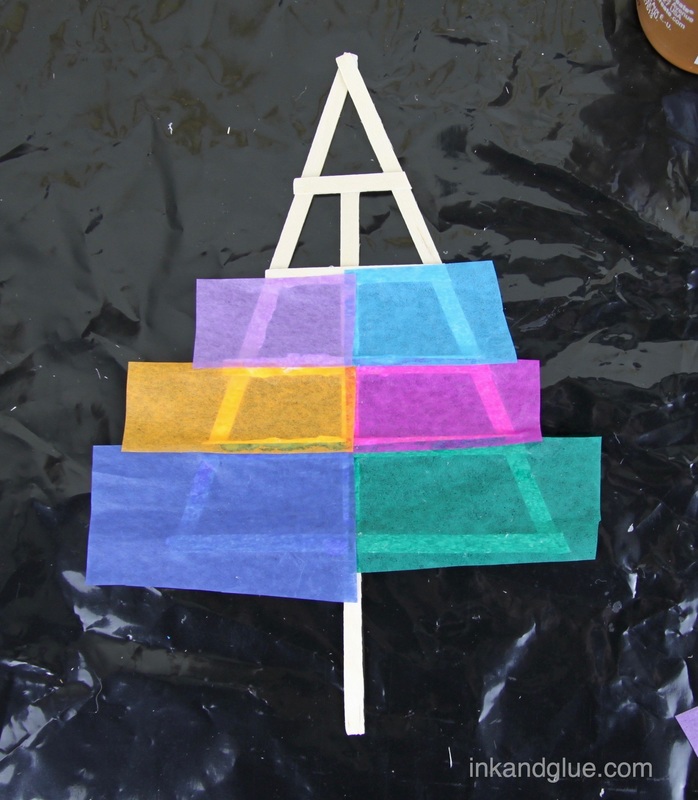
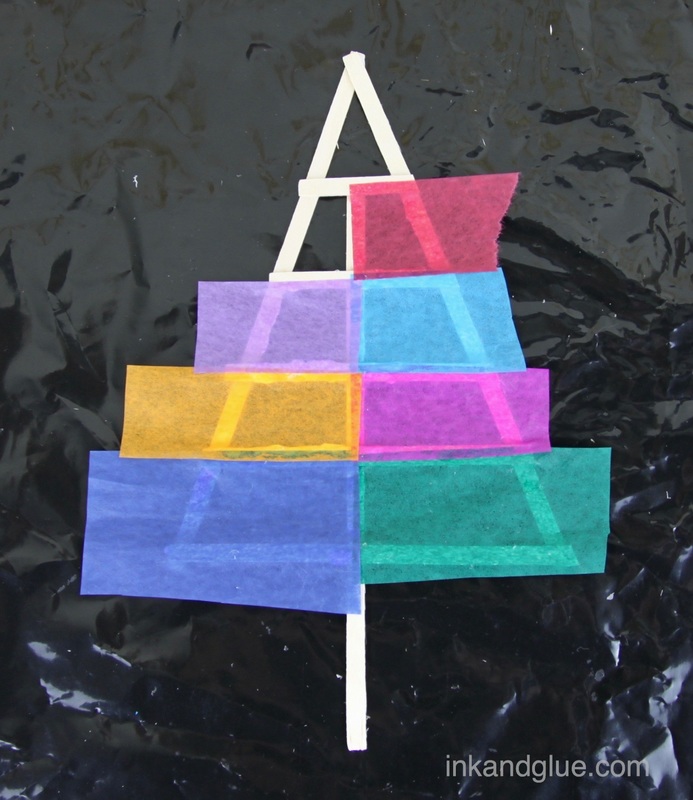
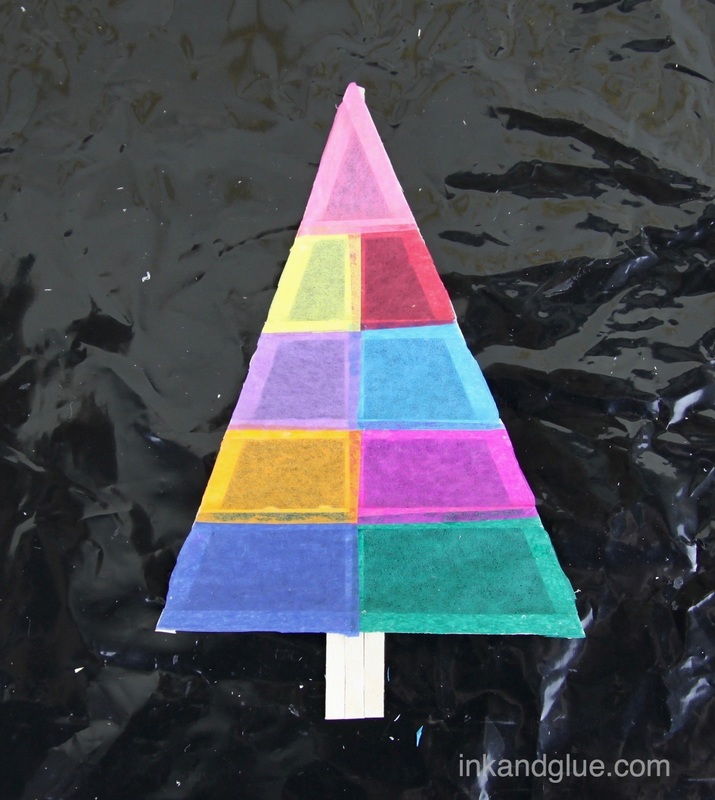
After you glue on the last piece of paper, flip the tree over.
This part's totally optional, but I made my trunk wider by cutting and gluing two lengths of stirrer to fit against the center one in the tree. Here's a shot of both sides of my tree, at this point of the process (i.e. almost finished!).
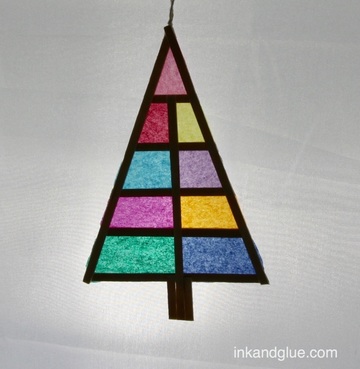
Tie a simple loop in a piece of string, and trim the ends so you have about a quarter-inch of excess from the knot. With the tree paper-side up, put a little glue on the (paper-covered) stirrers at the very top point of the tree, and press the knot ends onto the glue. 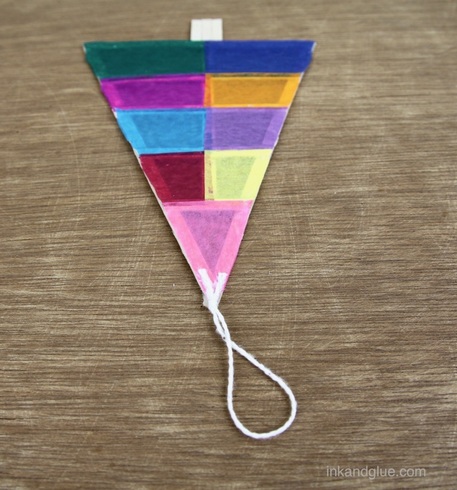
xo!
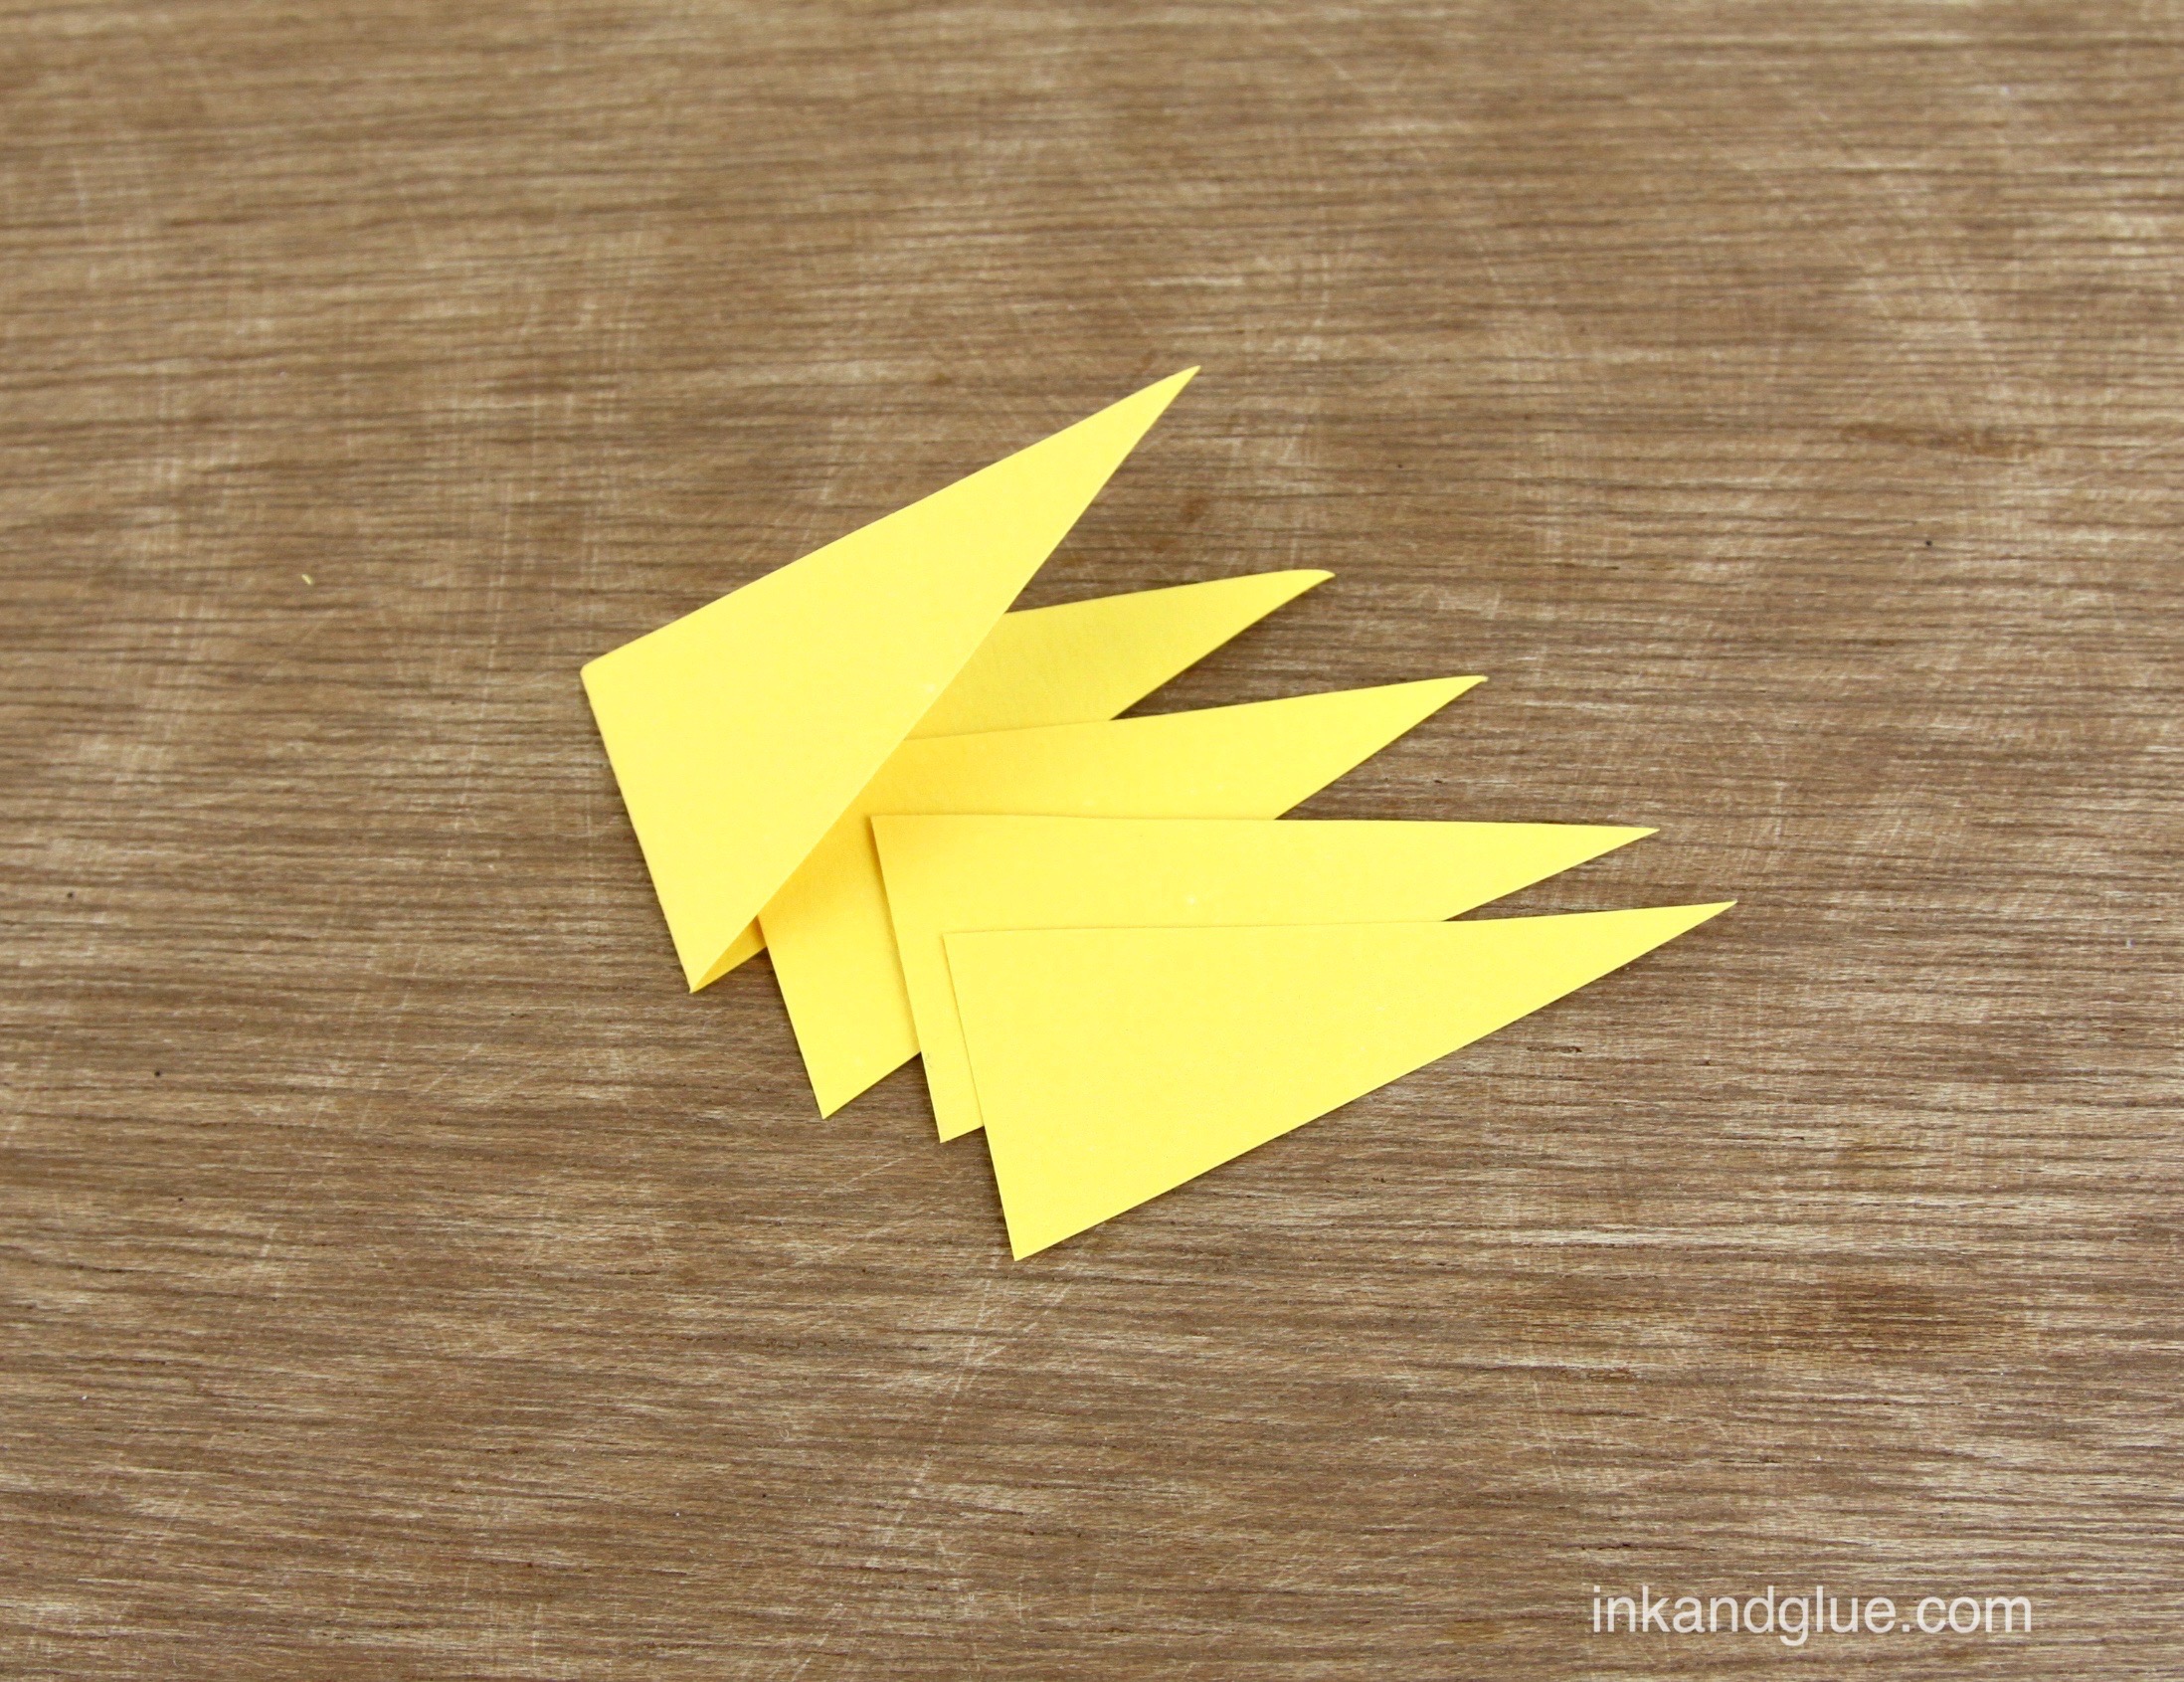
 Here's another simple project — made with just construction paper, string, and staples — that you can take in many different directions. Use blue and white paper and six-pointed stars for a Hanukkah garland; use silver and gold paper for a more luxe Christmas look; use totally different shapes and make a garland of flowers; and of course, intersperse your stars with other shapes or items, such as pom-pom beads or sandwiched circle stickers. To make my simple yellow star version, first cut a five-inch-wide rectangle from a sheet of construction paper, and fold it in half the long way. Then, cut the folded strip into triangles. Half the triangles will have a folded part (and will be one long diamond shaped piece, if you were to unfold it), and half of the triangles will actually be two stand-alone triangles. 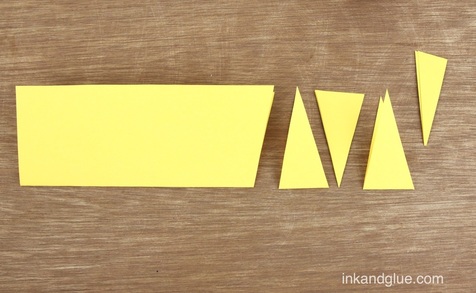 Sort through your collection of triangles and assemble sandwiches of five points. That means you'll have two folded pieces and one single piece in the middle, or one folded piece with three singles in the middle.
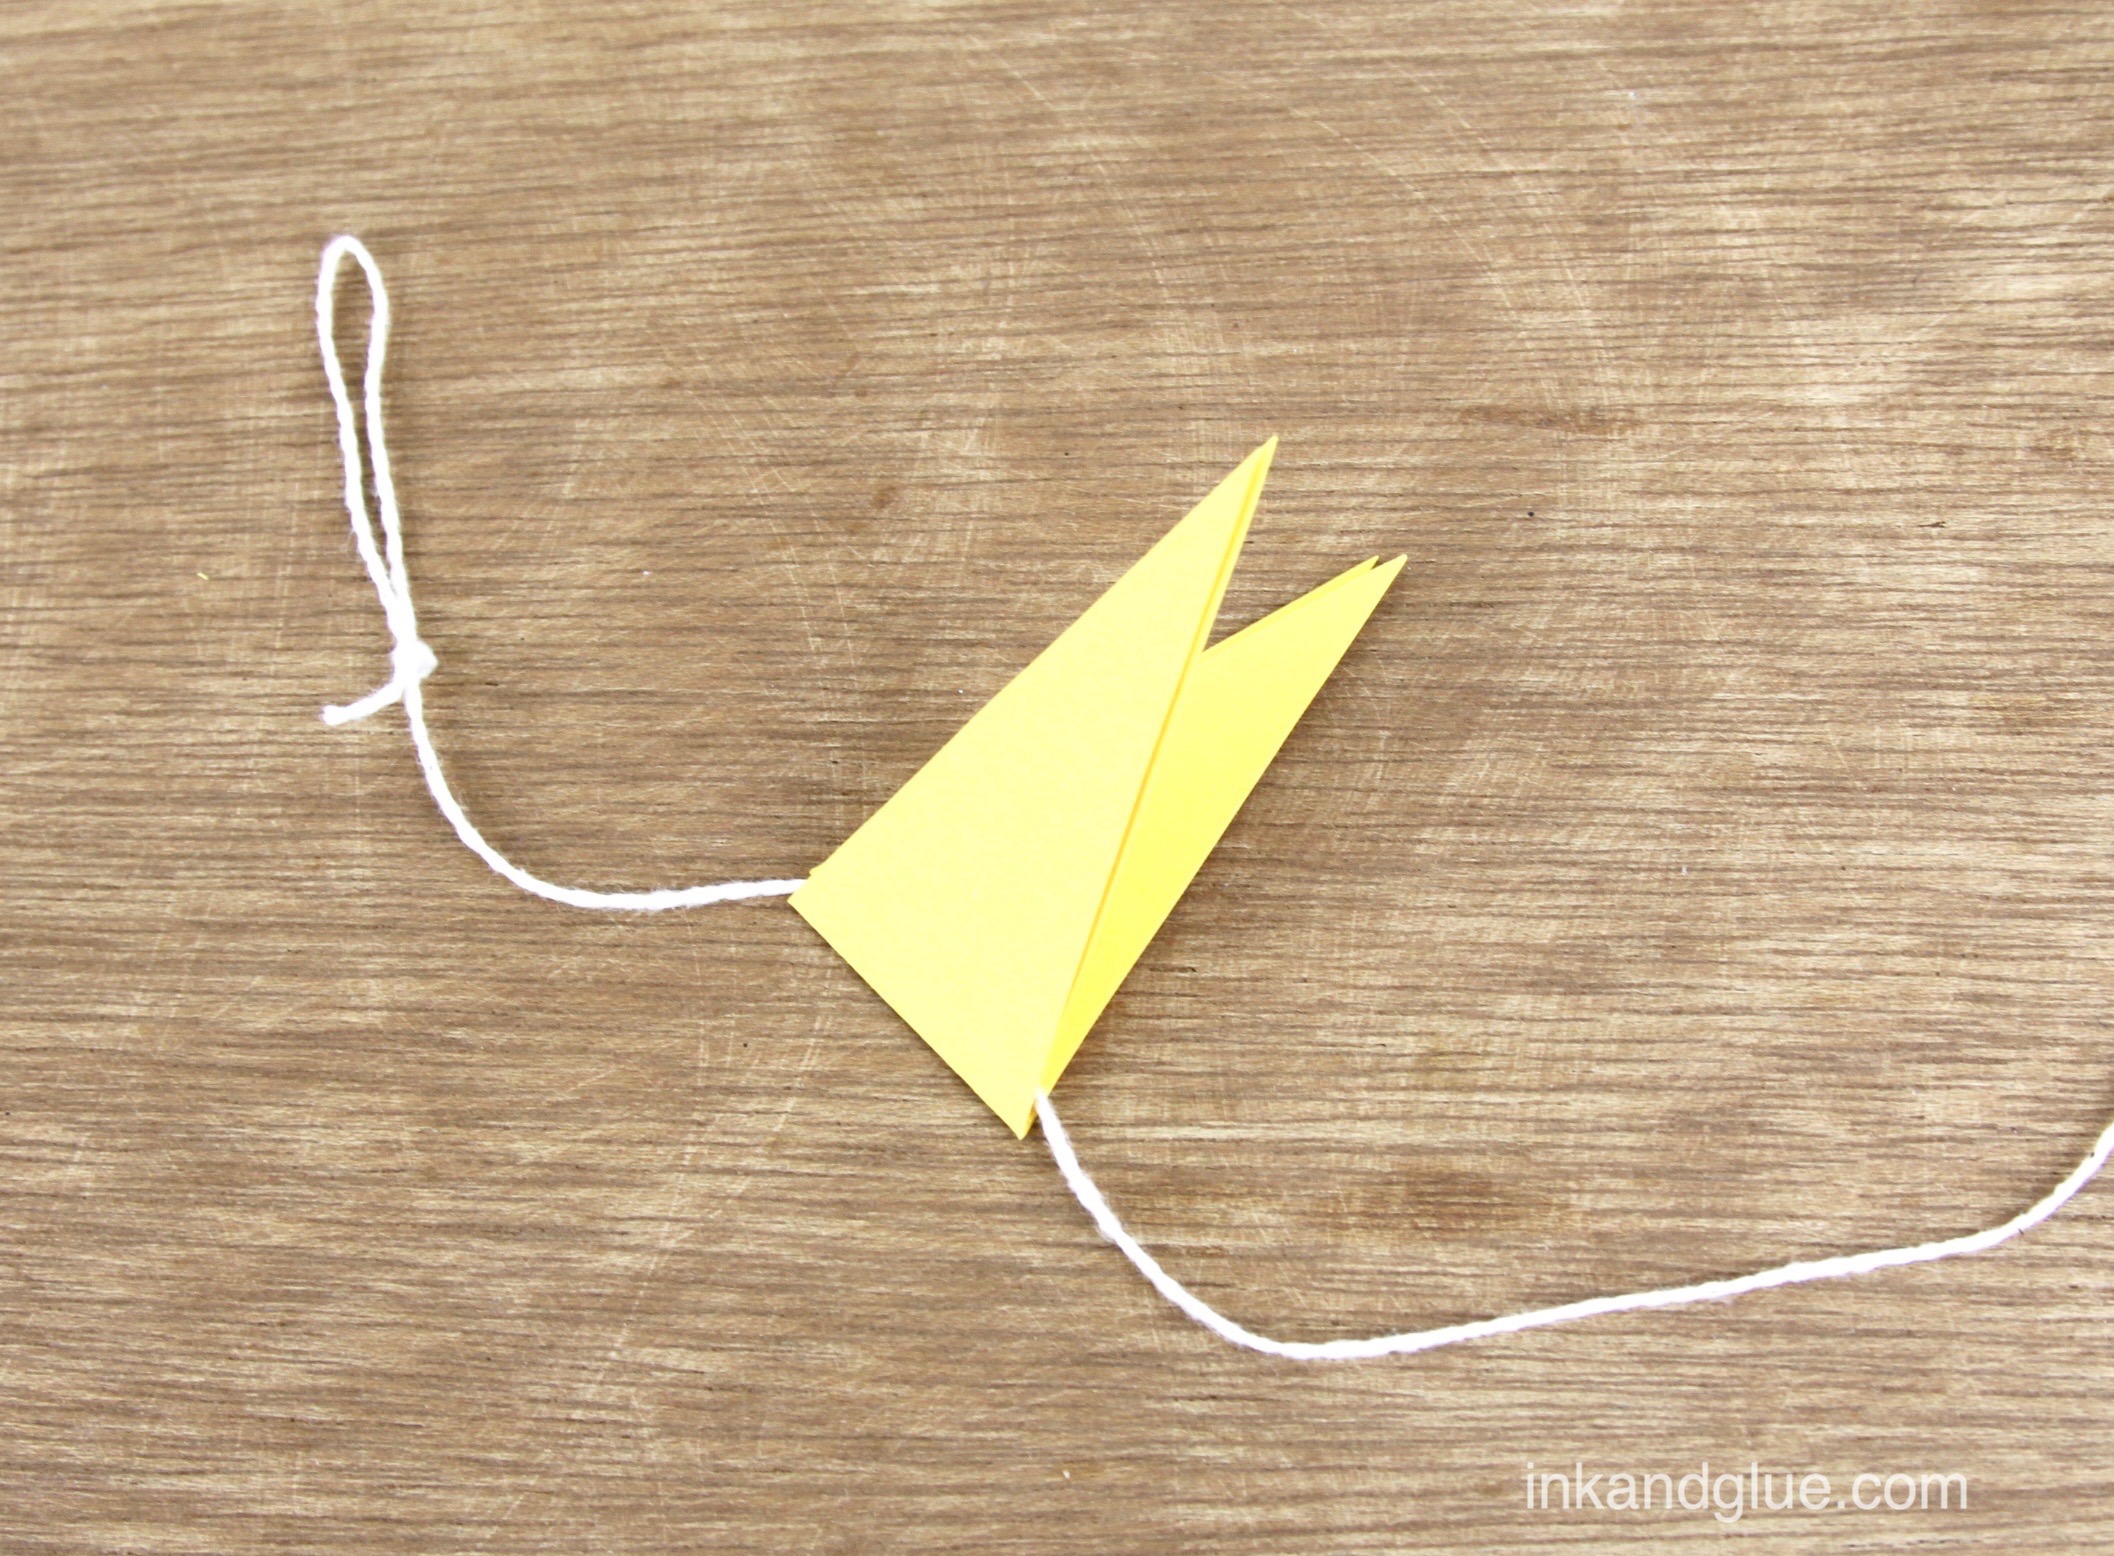
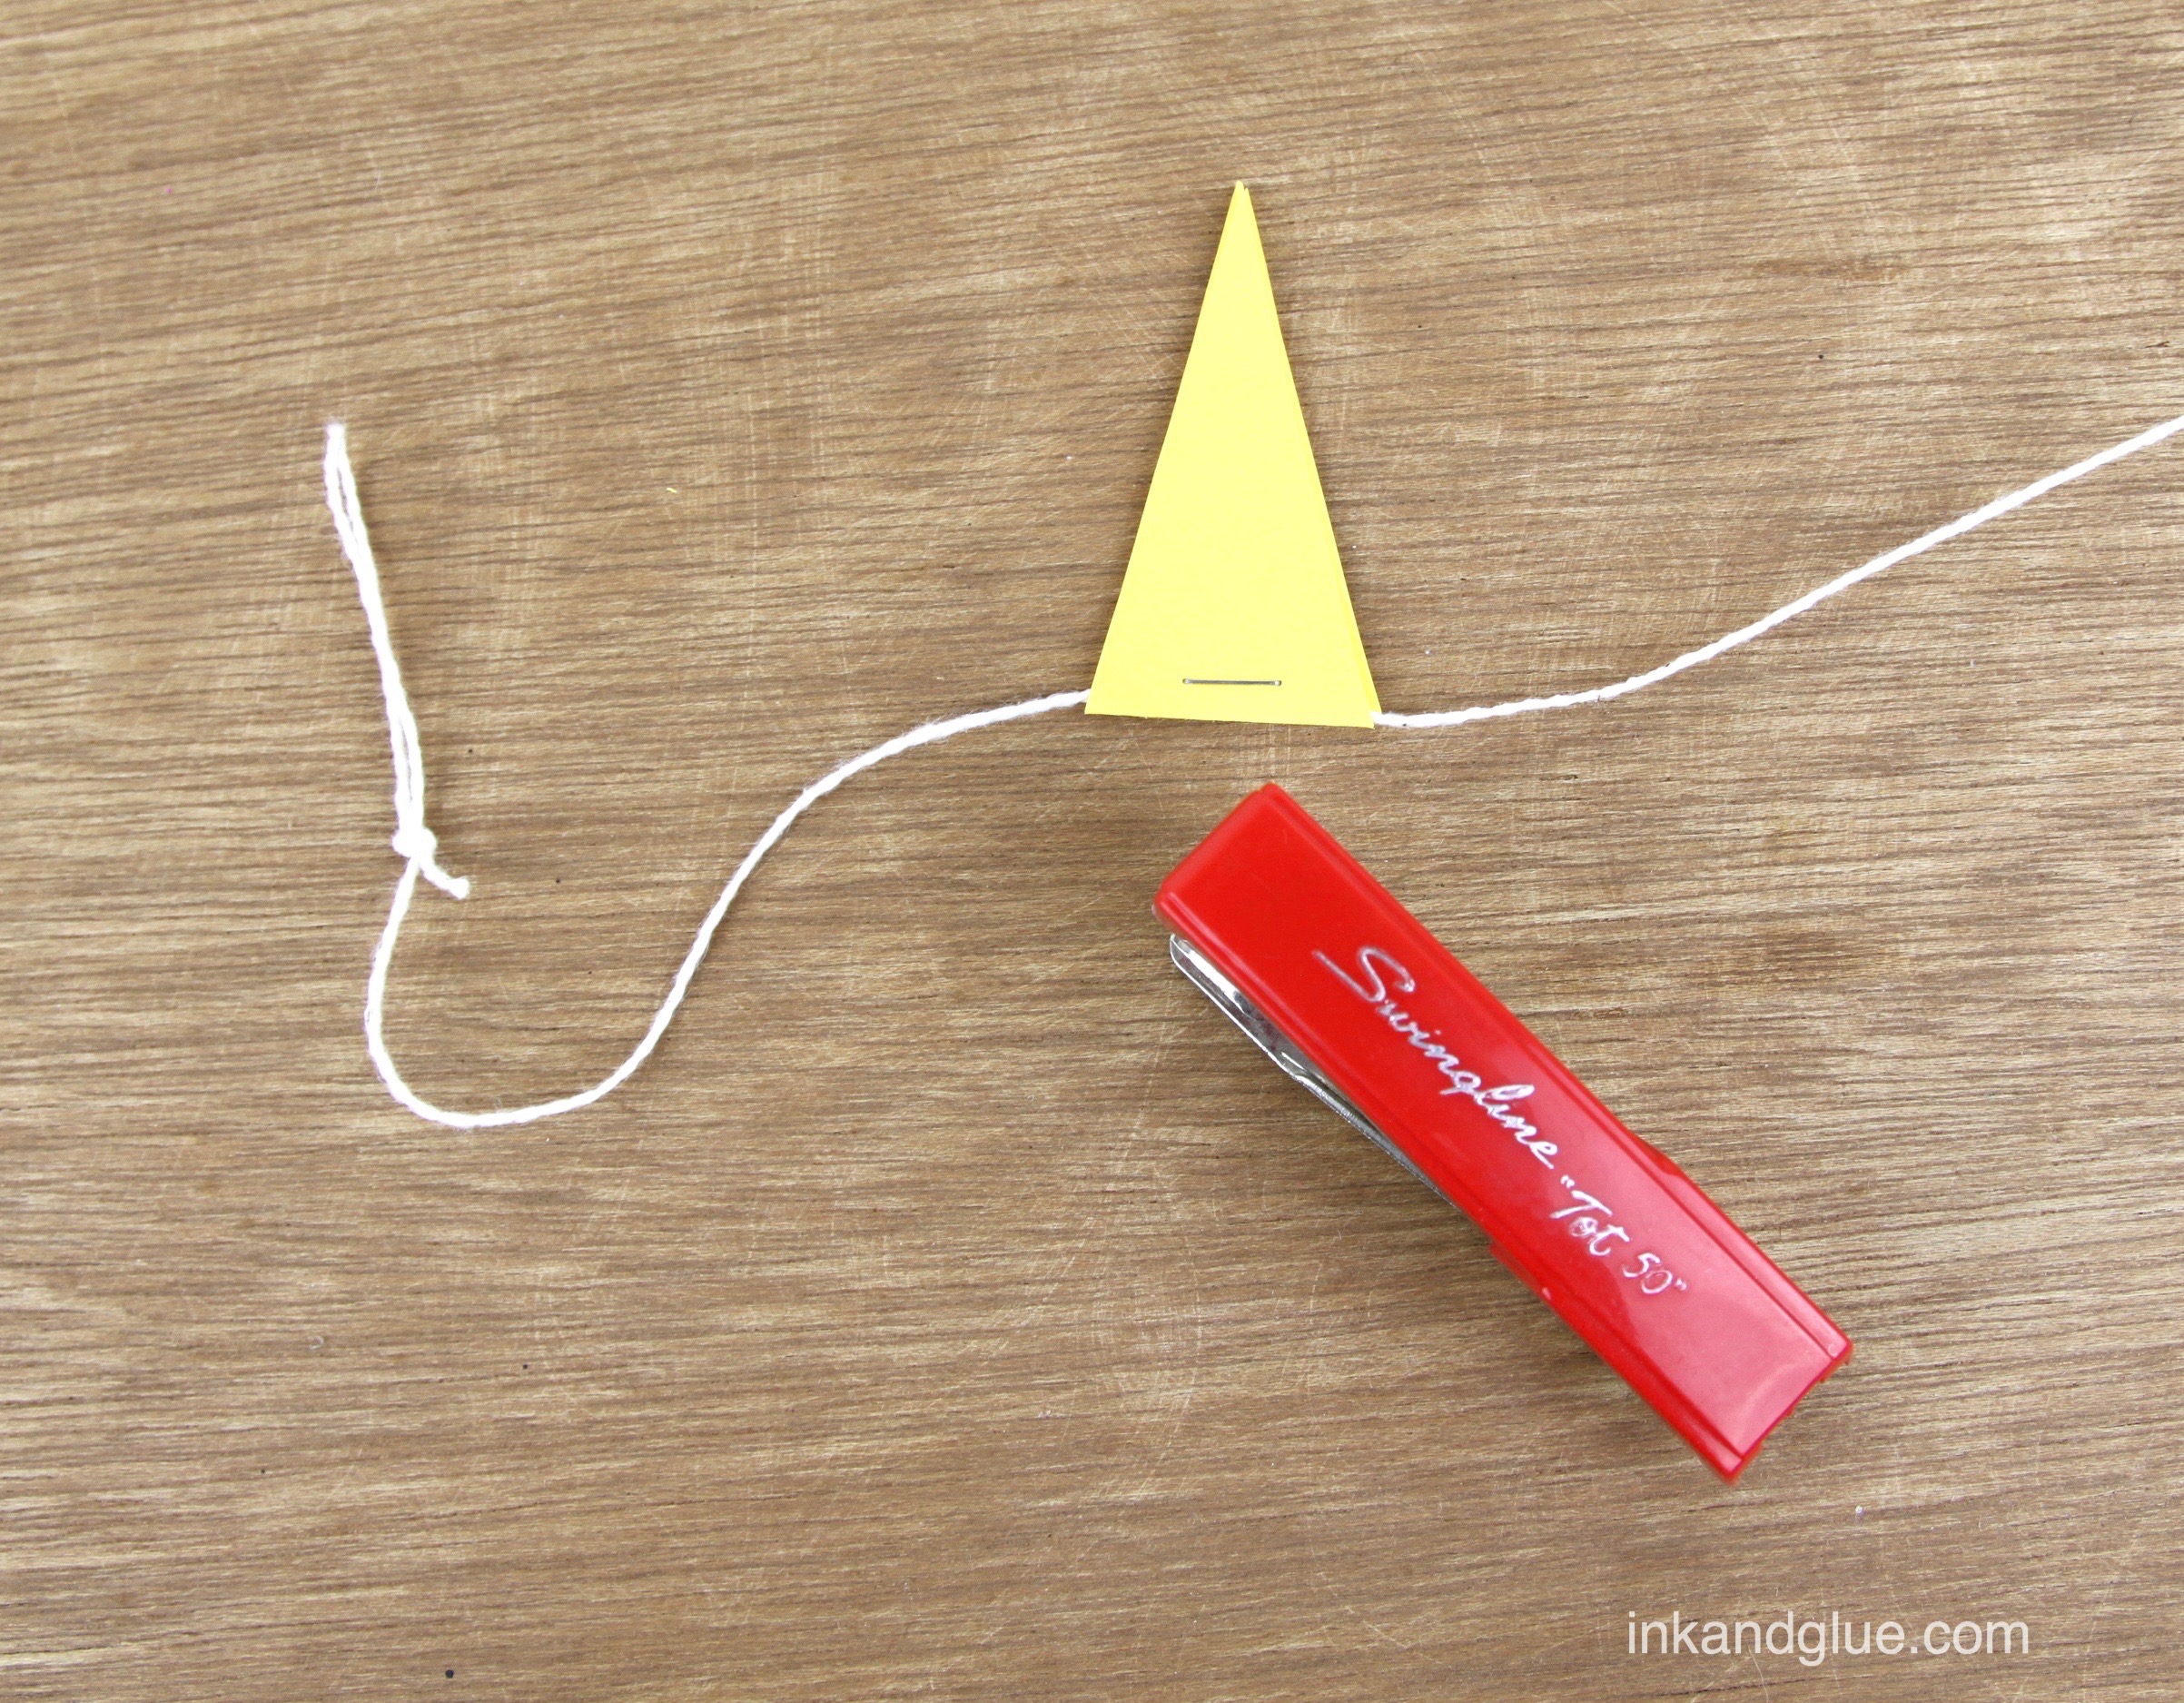
Tie a loop around the end of a ball of string. I used basic cotton twine. A few inches down from the loop, fold a five-point sandwich around the string, with the string tucked into the folded part. Staple the paper very close to the fold. (Note: I am using a very tiny pocket stapler, which might be giving you false clues as to the scale of this thing.)
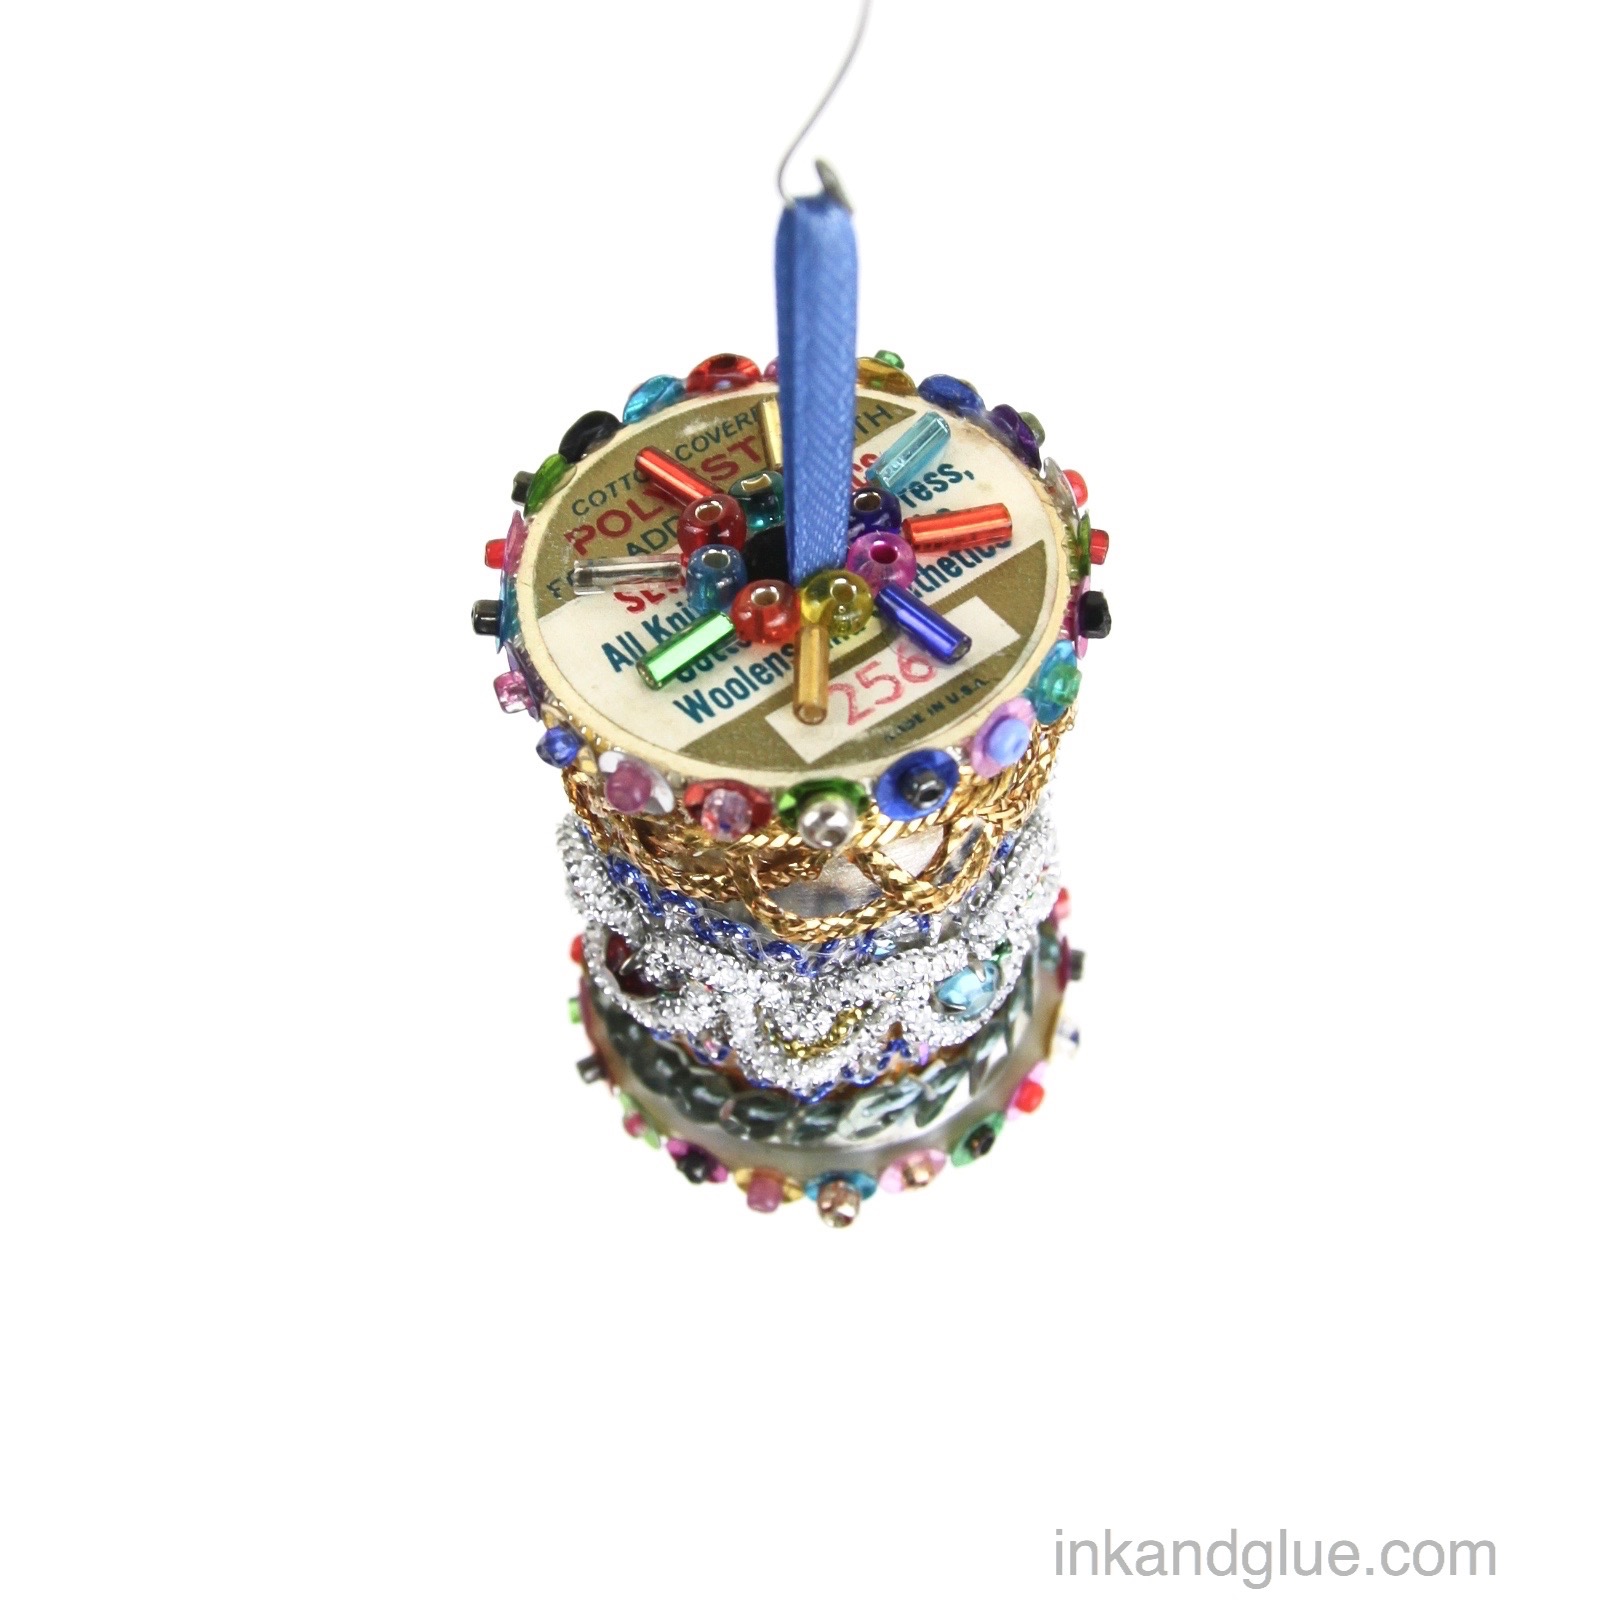
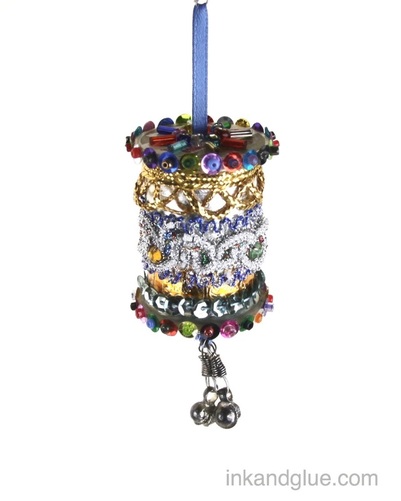
Add a whole bunch of these five-point sandwiches, spaced evenly apart, to the string until your garland is as long and as full as you'd like. Cut the string, leaving several inches free, and tie another loop for hanging at the end. When you're ready, make the sandwiches into stars by folding the two outer triangles all the way open, and the next two triangles to about 90 degrees, to make them roughly star-shaped. Adjust your fold angles as you please. 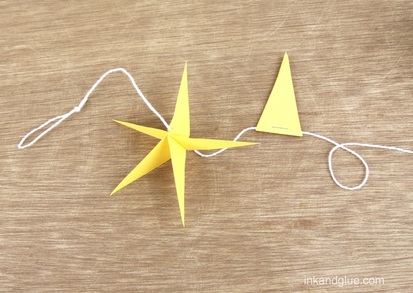 This is so easy. Really. This garland took me maybe half an hour to make, and I kept pausing to take photos of it.  I hope you try this one. It's fun, and pretty much foolproof! xo! 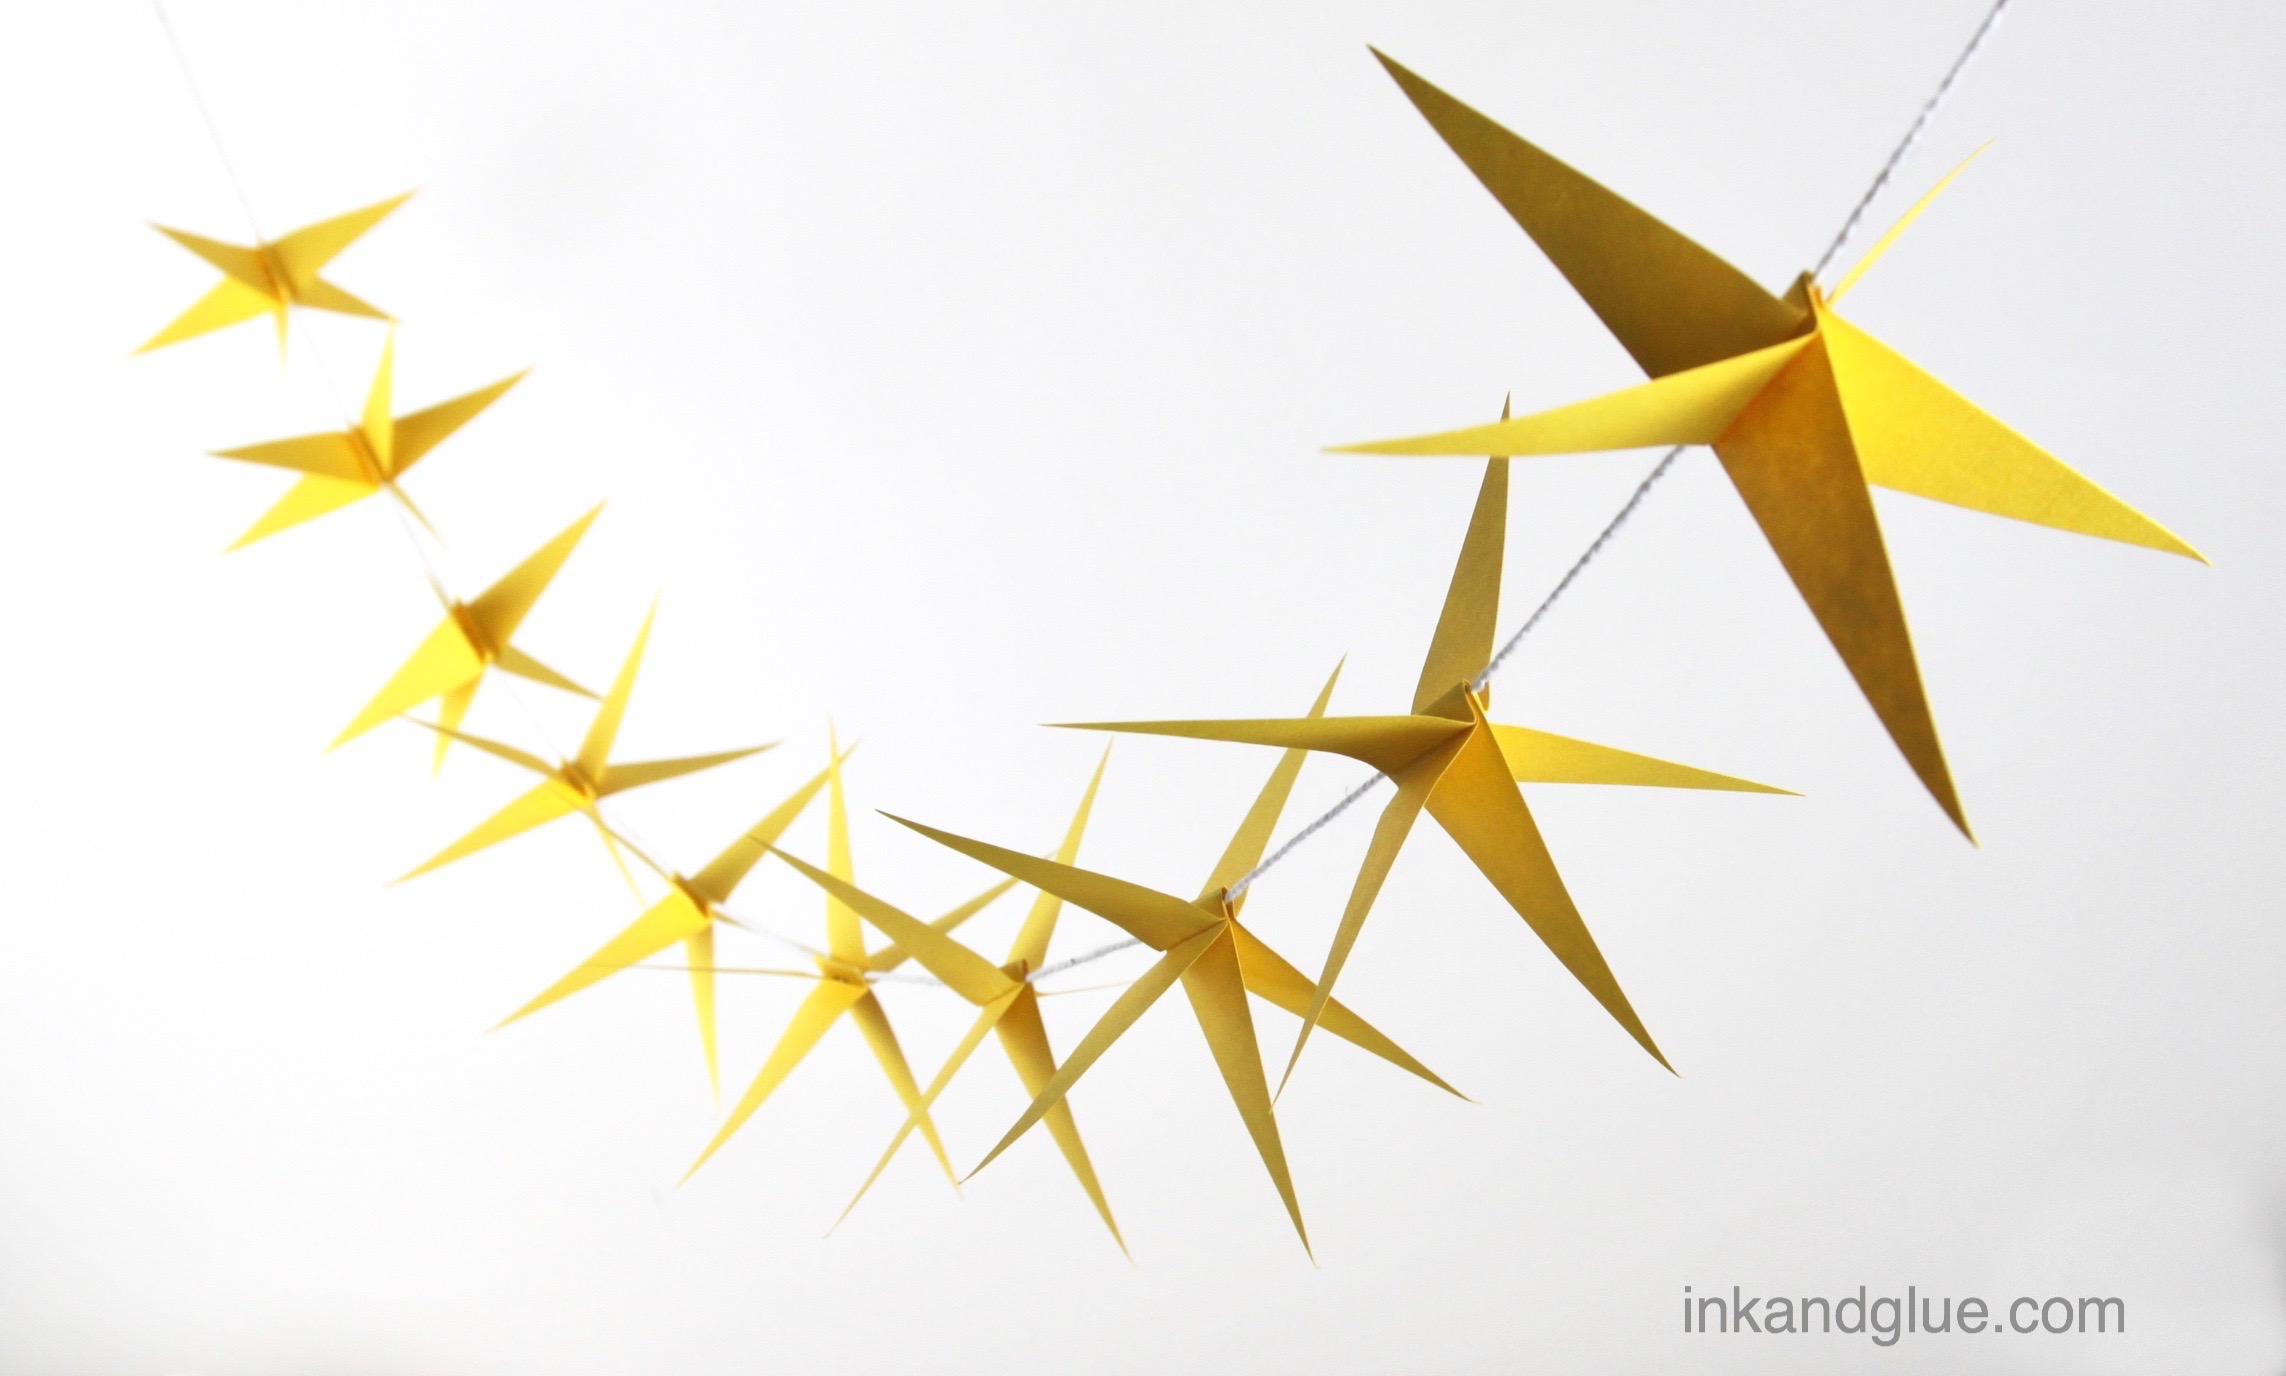 As I teased yesterday, I made a spool ornament inspired by the previous post's scan from a 1967 magazine. I quite like how it turned out! I had an old-ish empty spool made of a silvery plastic, a box of mixed beads and sequins, and some old lengths of metallic trims. Use whatever you have! 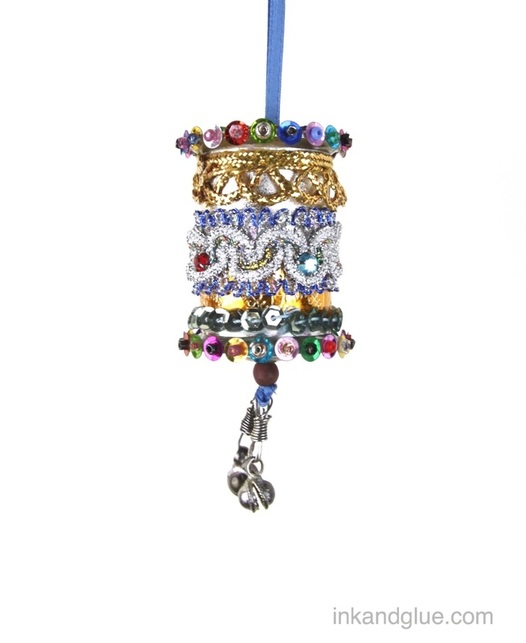 I don't have any detailed how-to directions for you, because 95% of the craft is "glue shiny/sparkly/colorful things to an empty thread spool." And I bet you already know how to glue a thing to another thing.
That's it! It's a fun project to do in a group, if you have enough fripperies and bits and bobs lying around. The project can take as long or as short as you want it to. It's very adaptable to multiple ages! Just the way I like it.
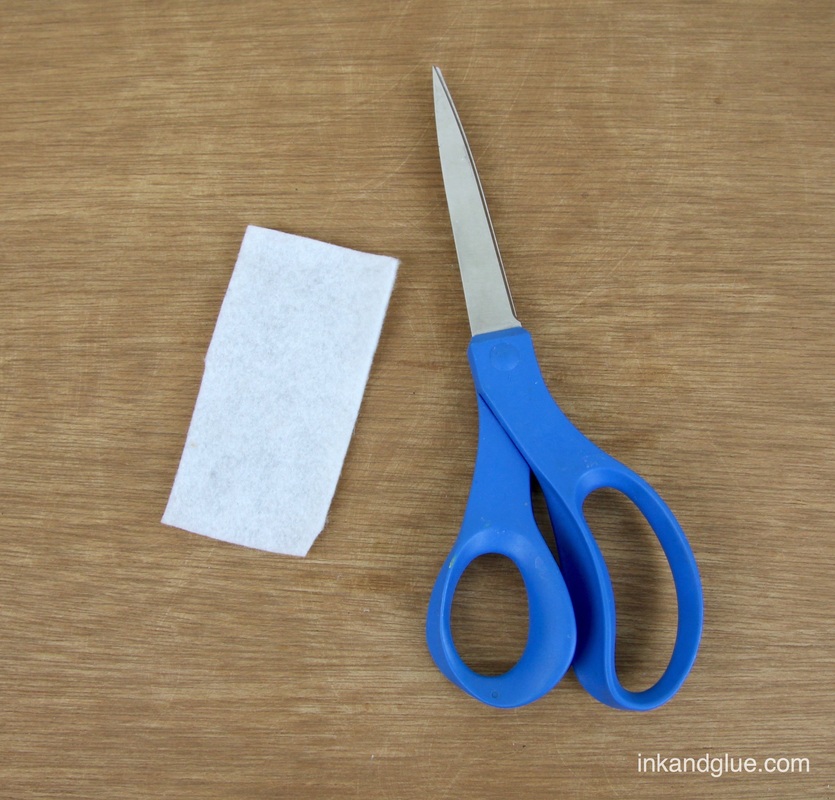
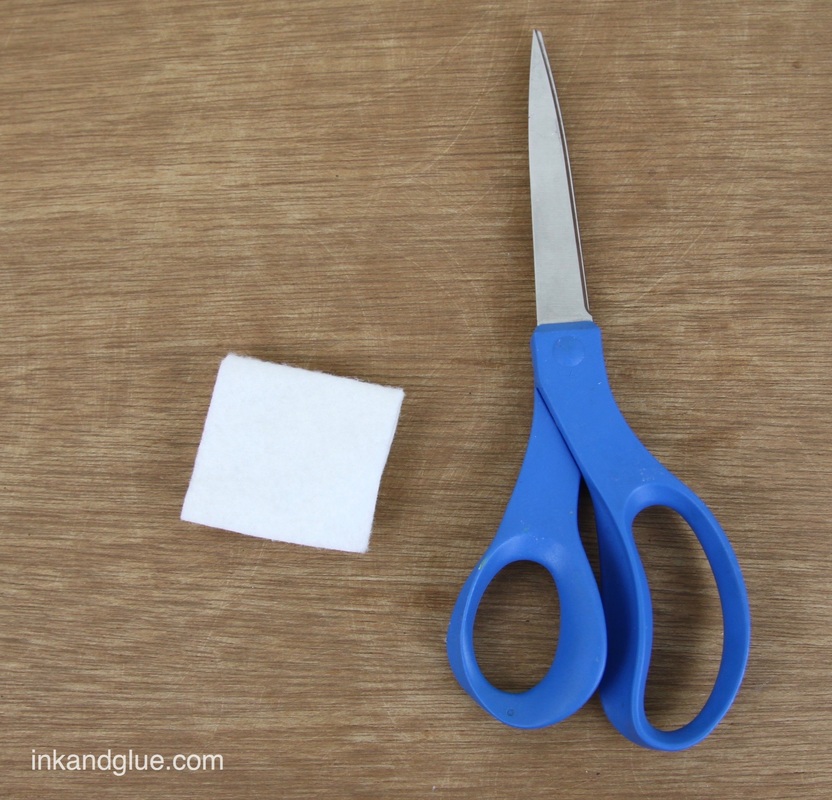
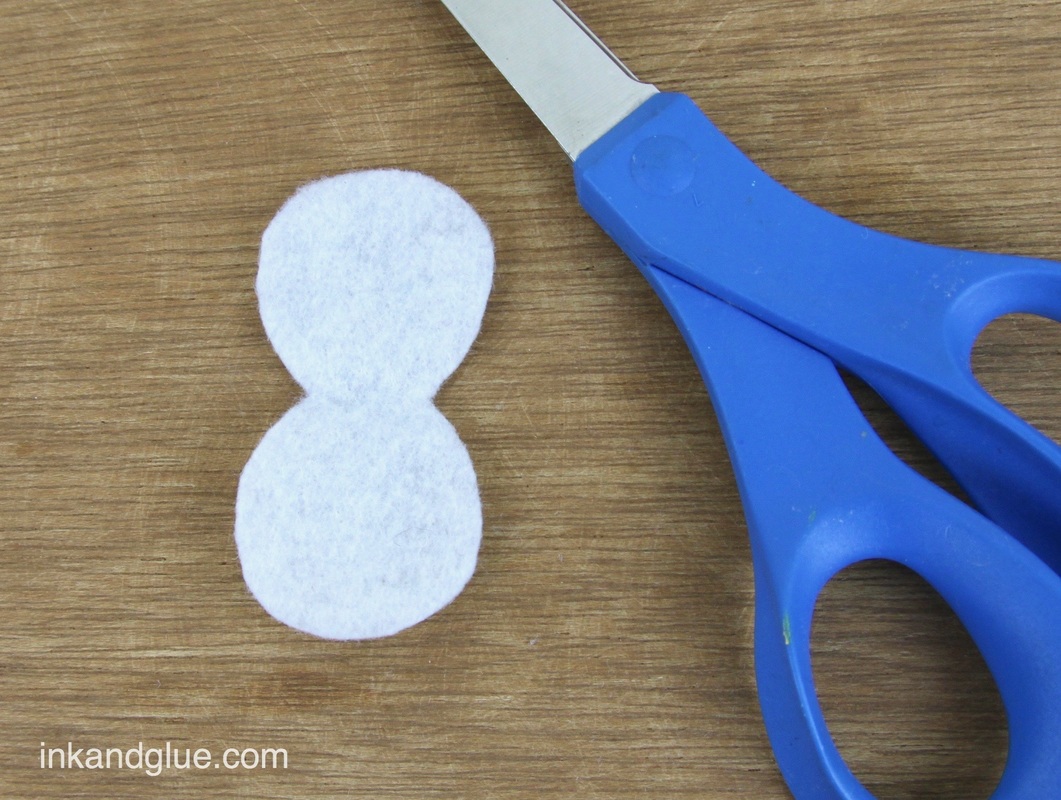
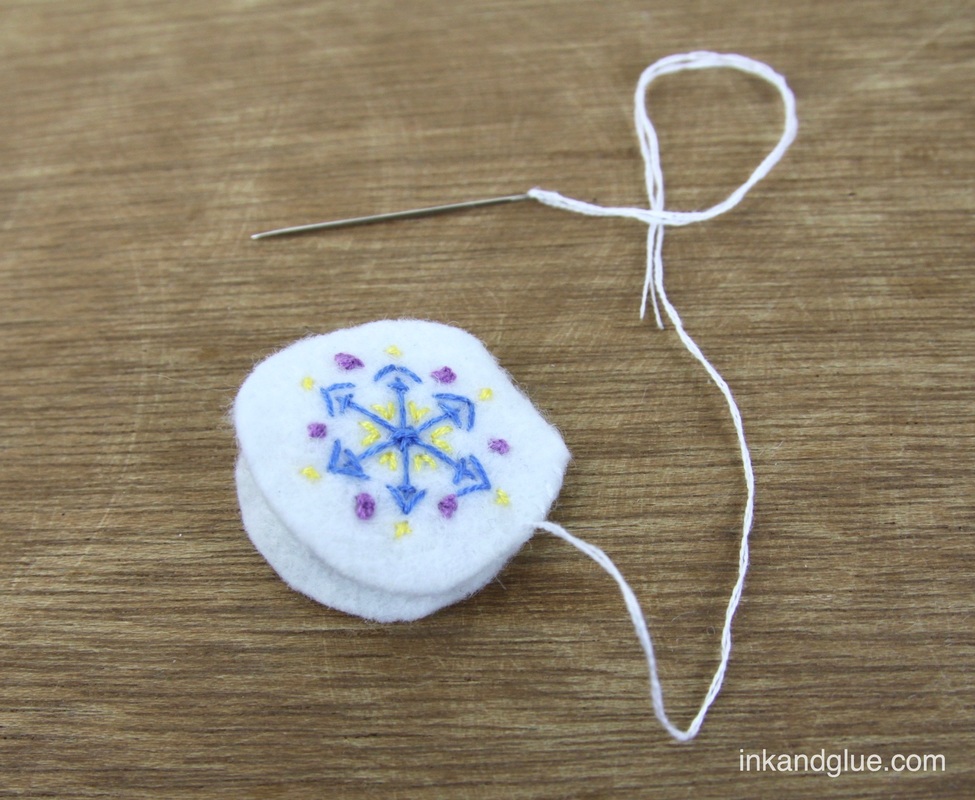
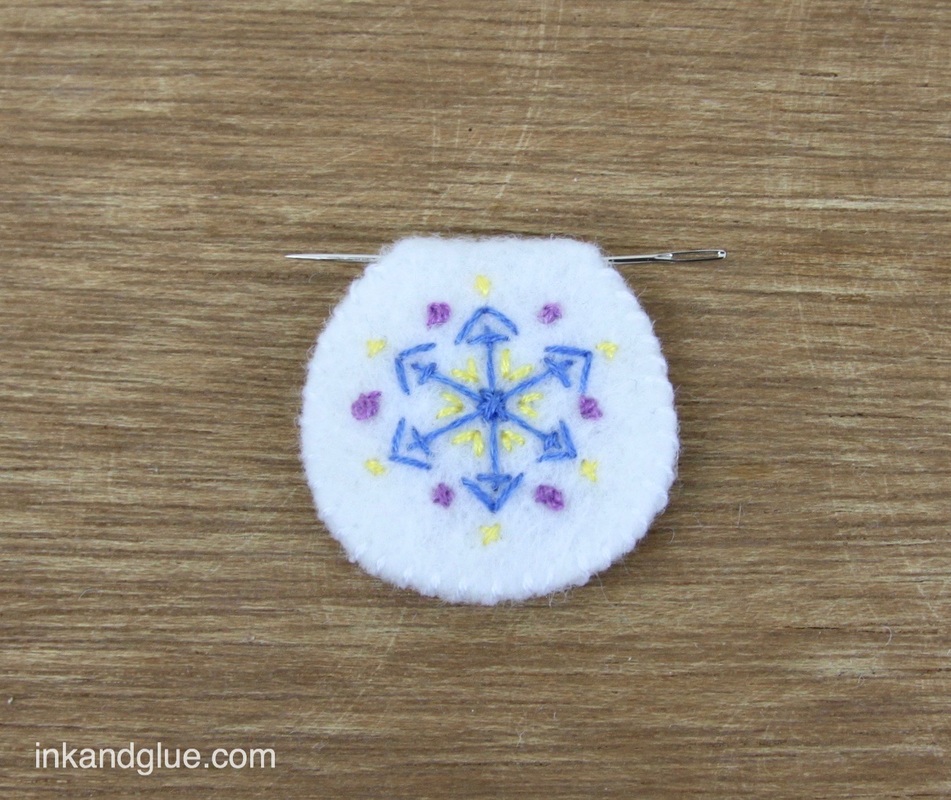
xo! 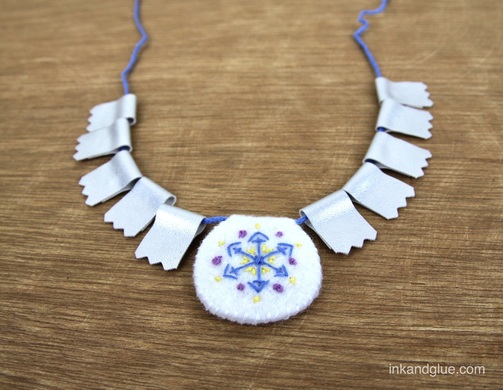 Ever sewn your own jewelry? This is an easy little project that you can make as complicated or fancy as you like. If you or your child can make a stitch, they can make this. Really! To make the pendant, cut out a smallish rectangle from felt. Mine was about 1.5 by 3 inches. It should form a square when folded in half, which is what you should do for step two. Press the fold with your finger for a few seconds to help it stay.
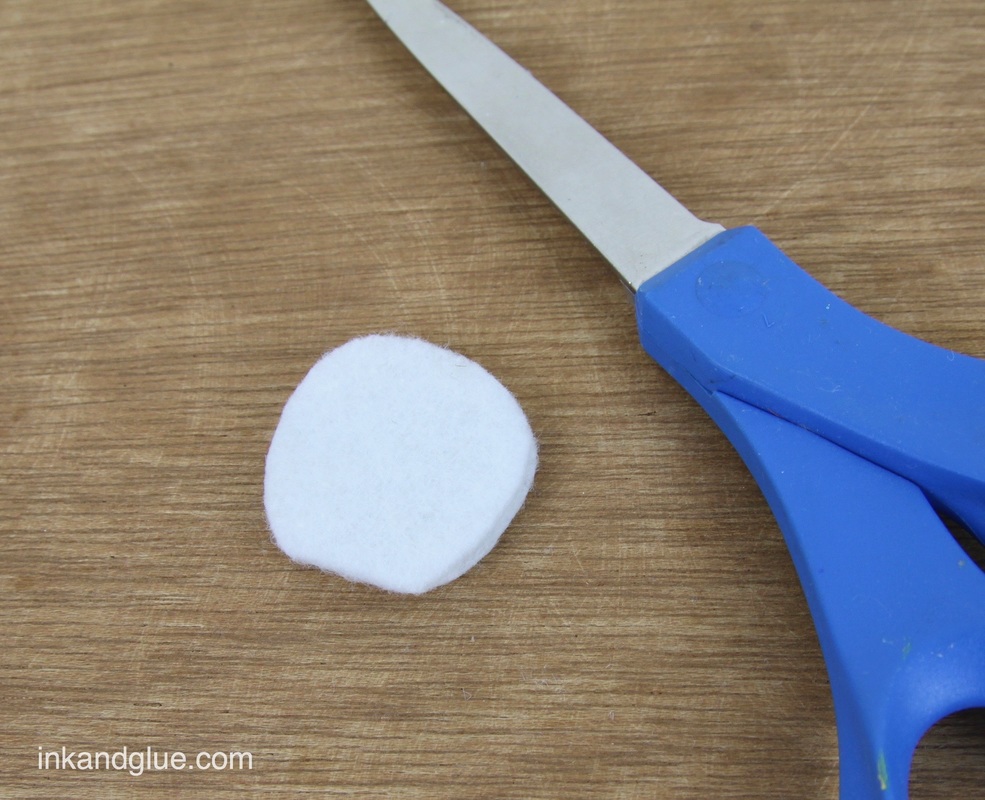
Keeping the felt folded, cut out a circle through both layers, while leaving a portion of the fold intact. It should look a little like a simple snowman if you open it up.
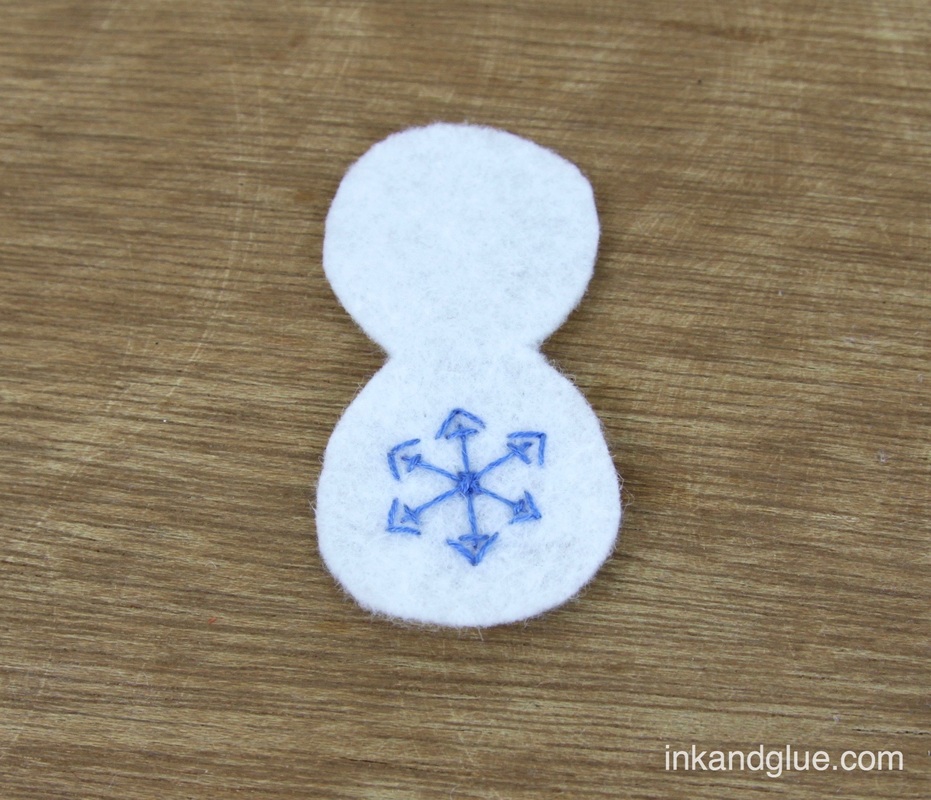
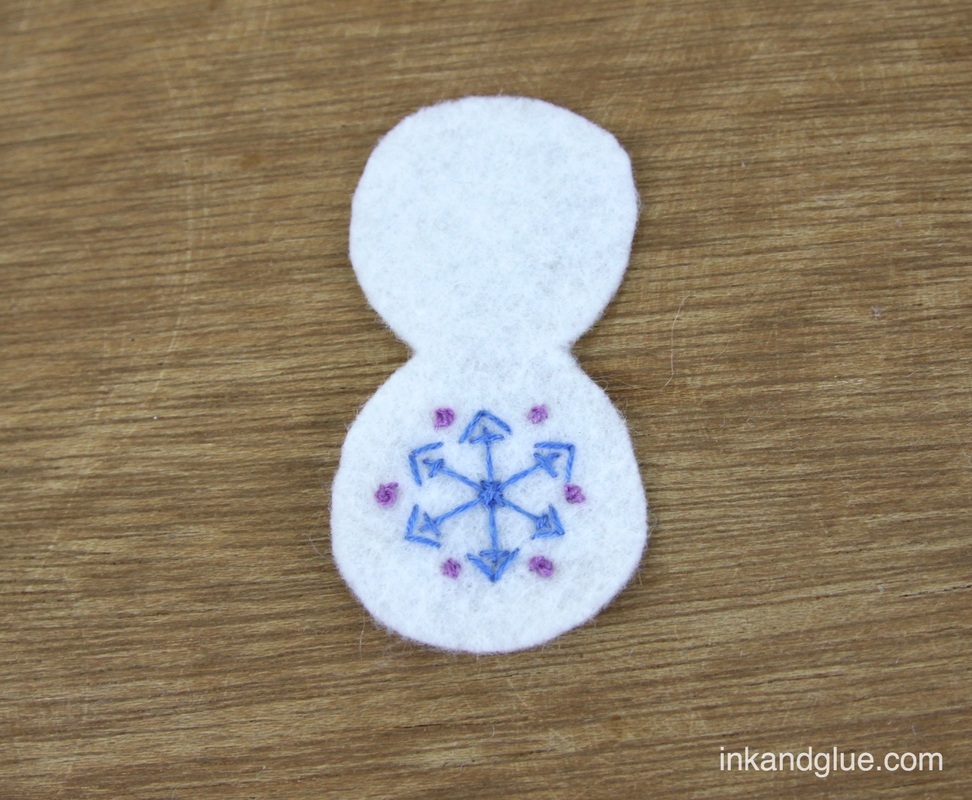
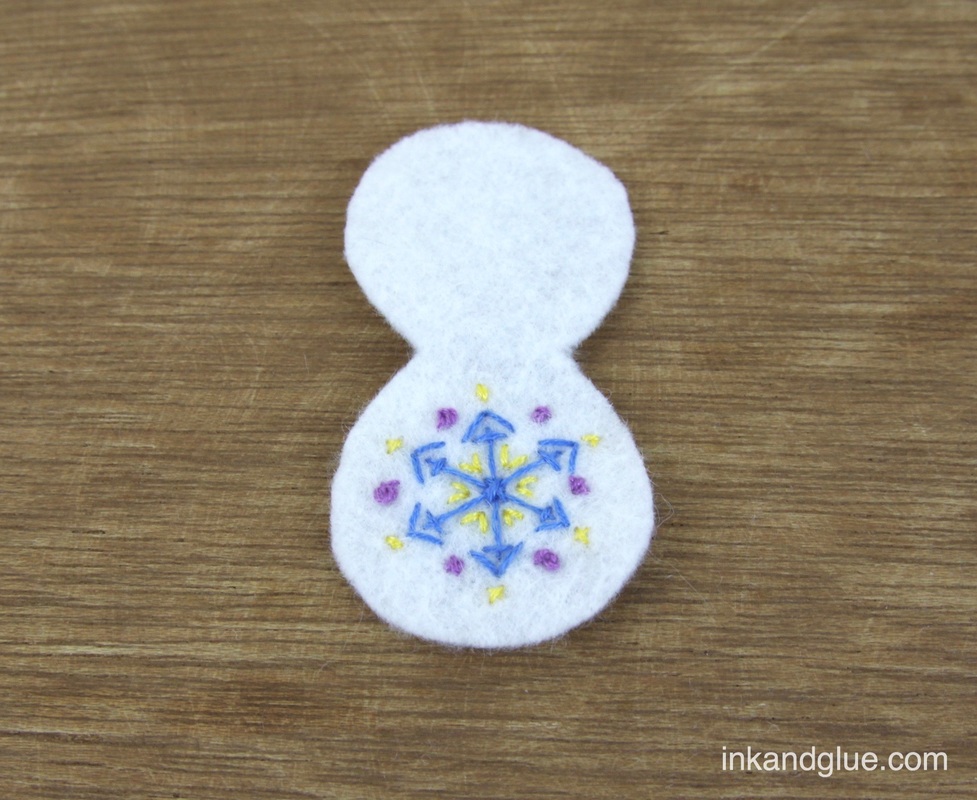
Embroider! Because I was working on such a small thing, I didn't want to use full-strength embroidery floss. I cut off about an 18-inch length and separated the six strands into three strands of two. 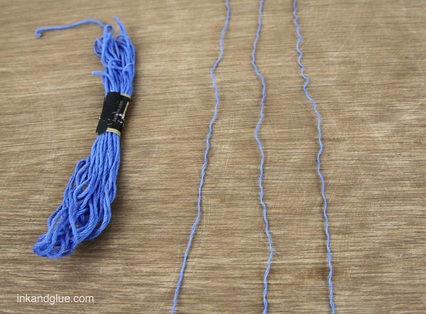 Keep your stitches inside one of the circles, and don't get within an eighth of an inch of the edge of the felt. I started with the blue, then added some lavender, and ended with a bit of yellow.
And now for the hidden surprise! In order to make wearing this a lot easier, you need to add some weight. Choose a coin, such as a penny, and place it on one of the circles of the felt piece. 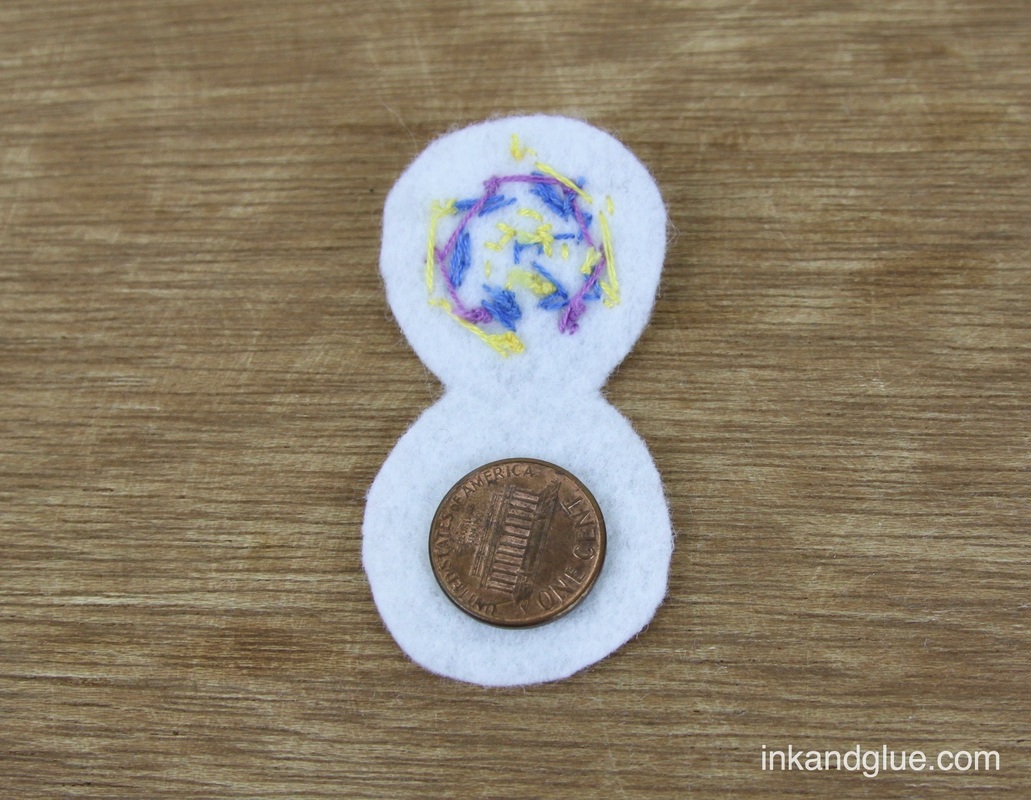 Fold the felt over and start stitching on the curve just below the fold. (Why below the fold? Because you want to leave a little channel for your necklace cord.) I used a third-weight strand of embroidery floss, like I did above, and just did a simple whipstitch. Finish the stitch line before you reach the fold. Hopefully, you will be able to slide a needle through the fold-channel without piercing the felt.
Now you have a finished pendant! You can go ahead and thread it onto a necklace-length piece of floss and call it a day. Or, make a few simple fabric beads to accompany it. This method works with non-fraying fabrics such as felt, pleather, or, what I used, shiny metallic vinyl. 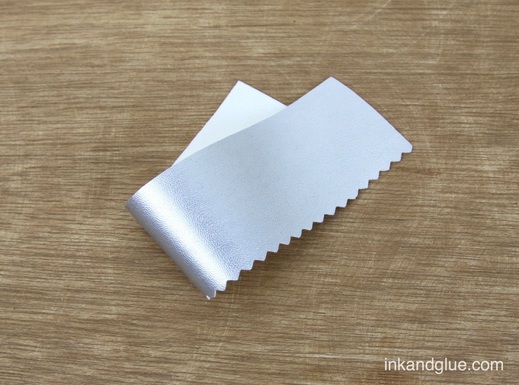 Cut a short strip of fabric and (optional) trim one edge with pinking shears. Cut the strip into a bunch of sections of roughly equal size. 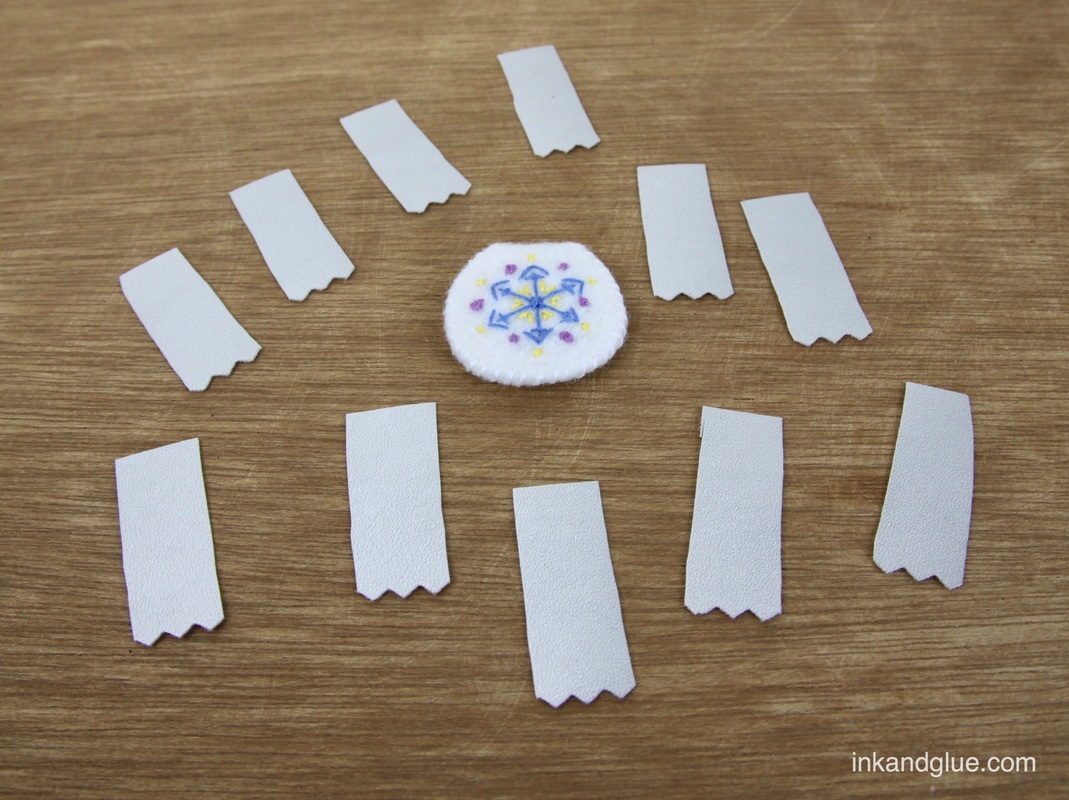 Fold and glue each little piece over, leaving a nice channel for the necklace cord. For glue, I used a fabric glue that's meant for basting (it's a white glue, not the super gooey clear gel type).
Thread a big needle with your cord of choice — I used full-strength embroidery floss — and add your fabric beads. Tie the ends together, but make sure it's long enough to slip over your head. 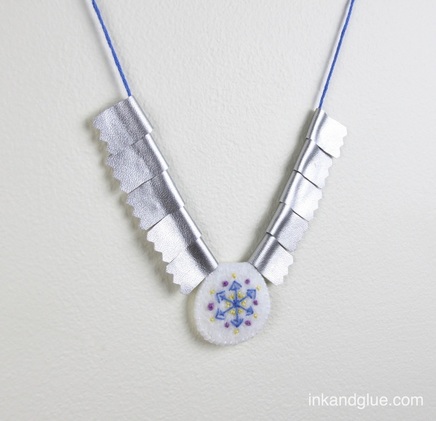 Shine on! xo
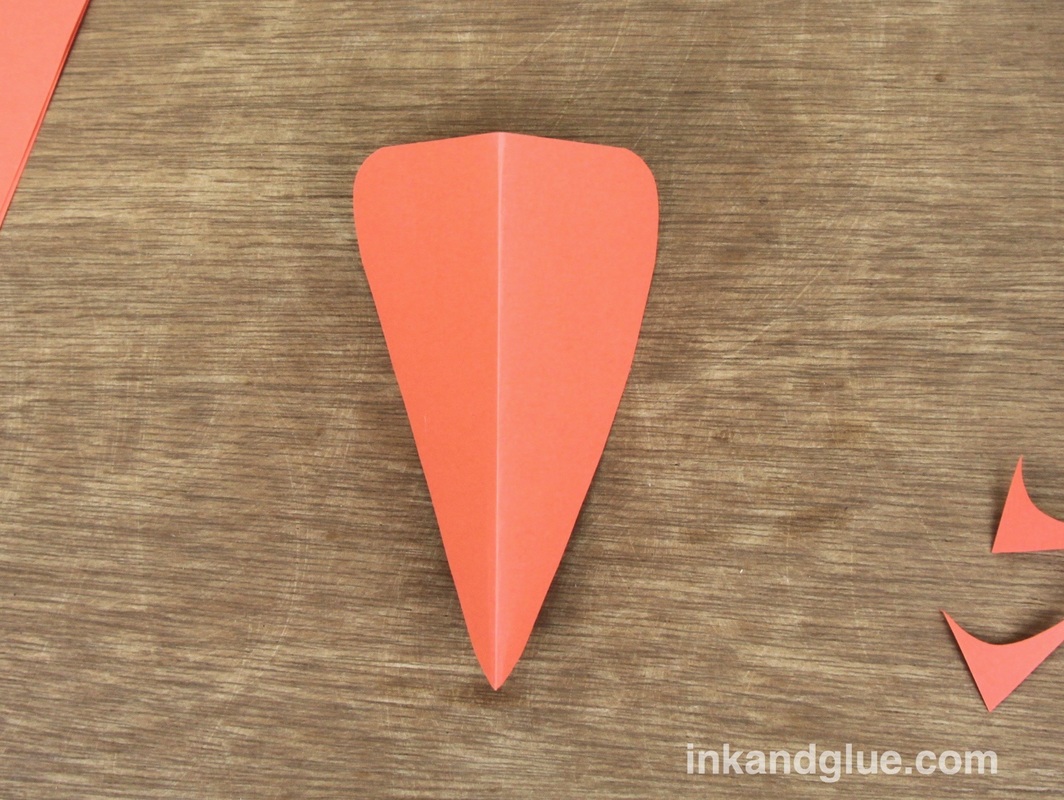
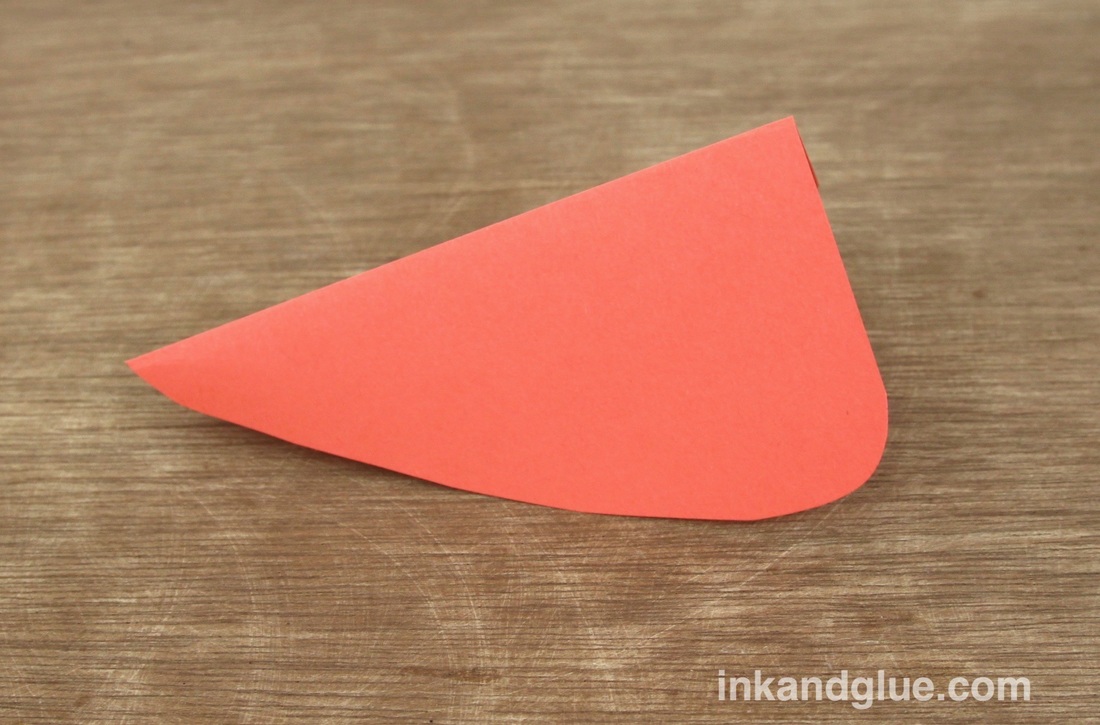
Here's the easiest paper beak ever. It's feather-light, super comfortable, and doesn't interfere with breathing. The only catch is that, unlike 99% of the costume ideas out there, it relies upon a pair of glasses to wear it. Have 20/20 vision? Get a cheap pair of costume glasses; you can glue things to them, which you really shouldn't do with prescriptions (unless you're made of money). Add feathers, and go big: think Elton John. 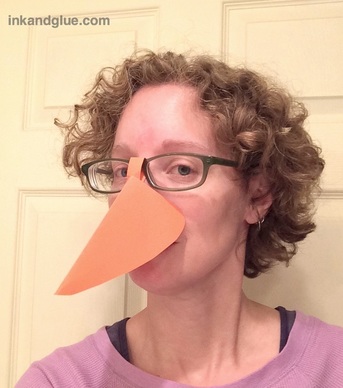 (Yes, that's me, in soft-pants studio-time mode.) You only need a piece of paper, scissors, and glue for this — really! Start by folding a piece of beak-colored paper in half. Cut a triangle with the fold along what'll be the top ridgeline of the beak. Trim your folded beak piece to shape and round the corners a bit.
This is what mine looked like when it was shaped as I wanted it.
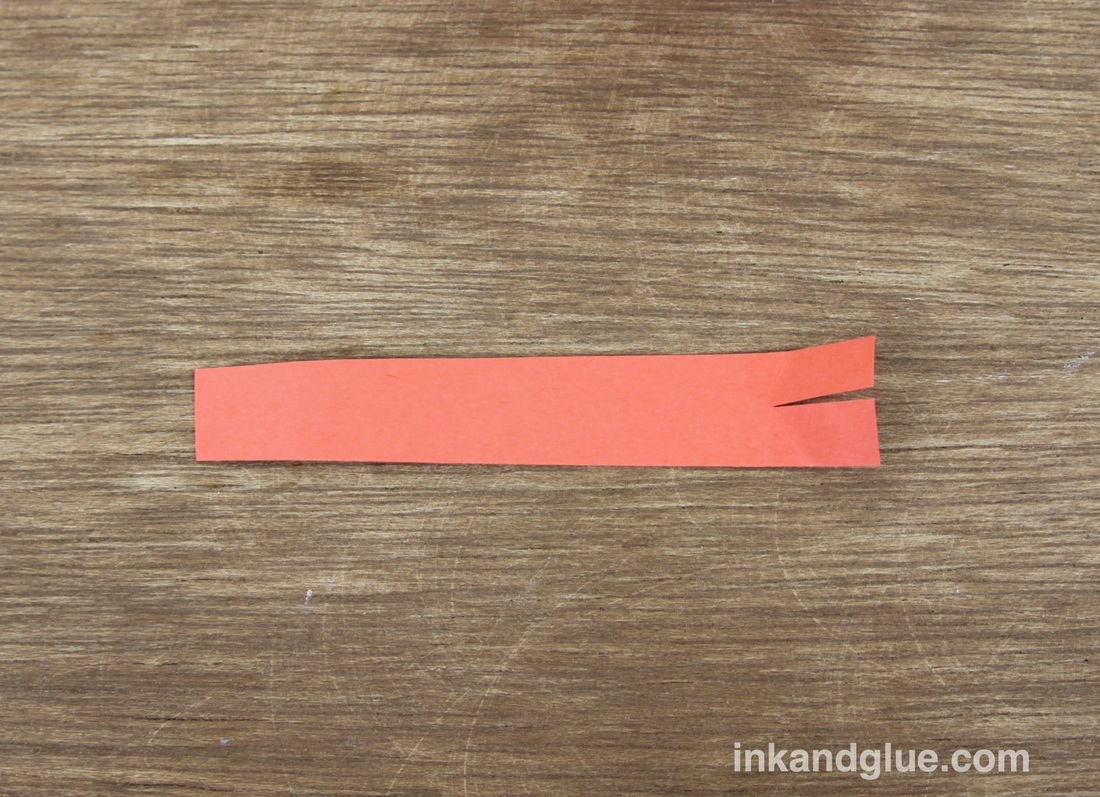
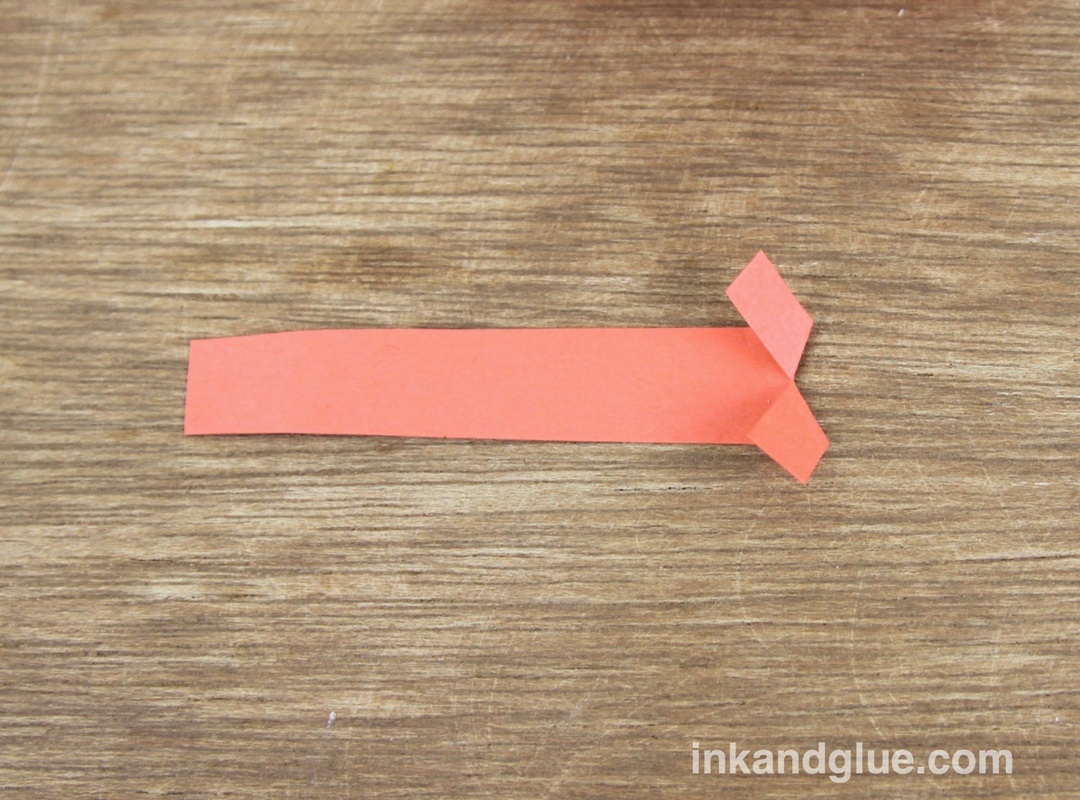
Next, cut a third- or half-inch-wide strip of paper that's about three inches long. Make a cut about a half inch into the center of one short end of the strip. Fold up the resulting tabs at 45-degree angles, as shown.
I'm using a blue strip of paper for the next steps to make it easier to see. You're going to glue the folded-in tabs to the inside of the fold at the wide edge of the beak. It feels a little counter-intuitive, so make sure you're not accidentally gluing it the wrong way. At left, you want to put glue on the sides of the two little tabs that are facing away from you. The photo at right is like one of those optical tricks where you don't know if the thing you're looking at is convex or concave. Here, it's concave — the middle fold is further away from you than the outer edges.
Here's a photo showing what the beak will look like if all has gone well. If it hasn't, just tear it off and try a new strip in the same place. The glued-on tabs will be hidden inside the beak, so no worries. 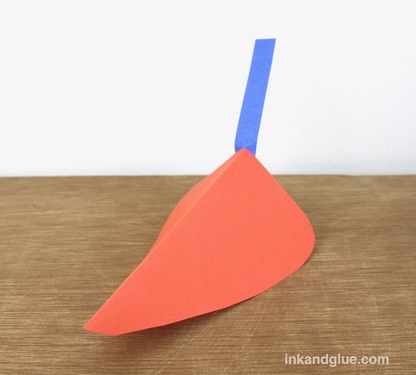 Now take your beak to a mirror, and slip the tab over the nose piece of your glasses. Fold the paper around the glasses. Tape the strip to the underside of itself, if you want a slightly more permanent hold. 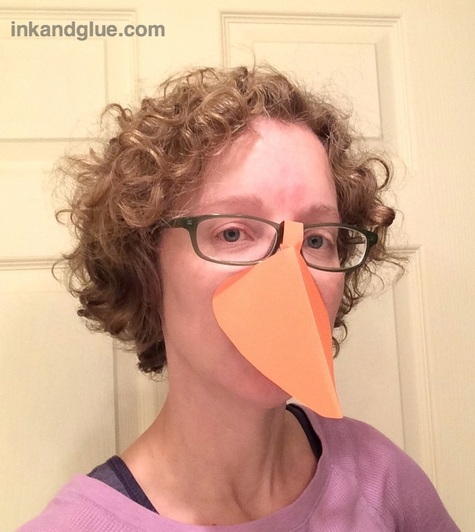 Finito! If you want your beak at more of a jaunty, upright angle, try changing the angle of the short side, as shown below. In that photo, the folds of the two beaks are at the top. The top beak has the same angle as the one I'm wearing; the bottom will point the beak a bit more skyward. 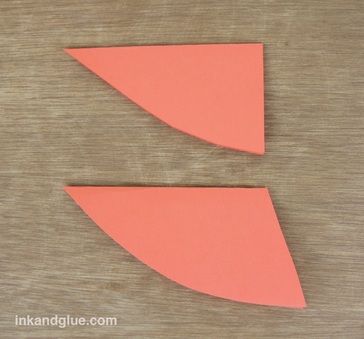 IIIIIIII (that's Woodstock-speak for xo)
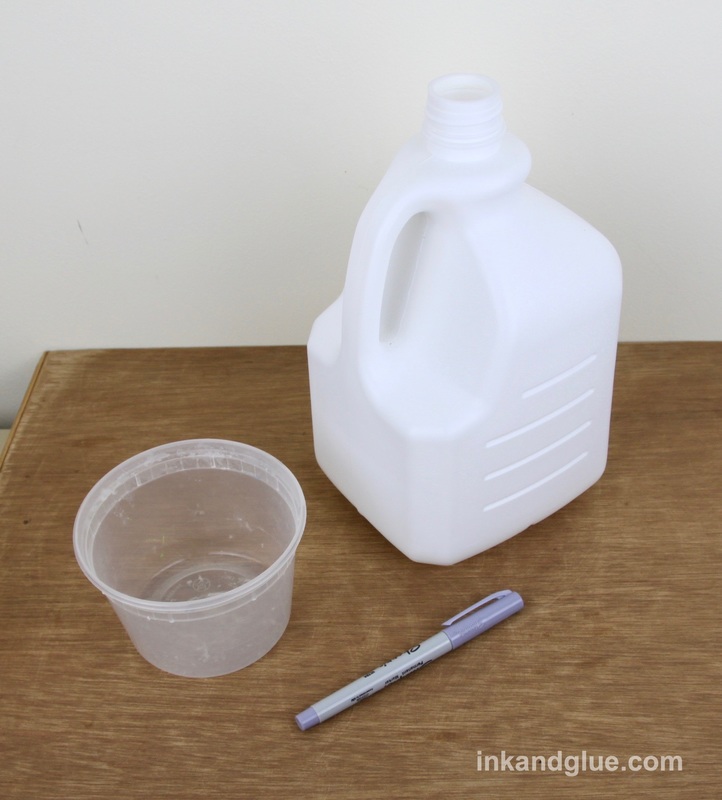
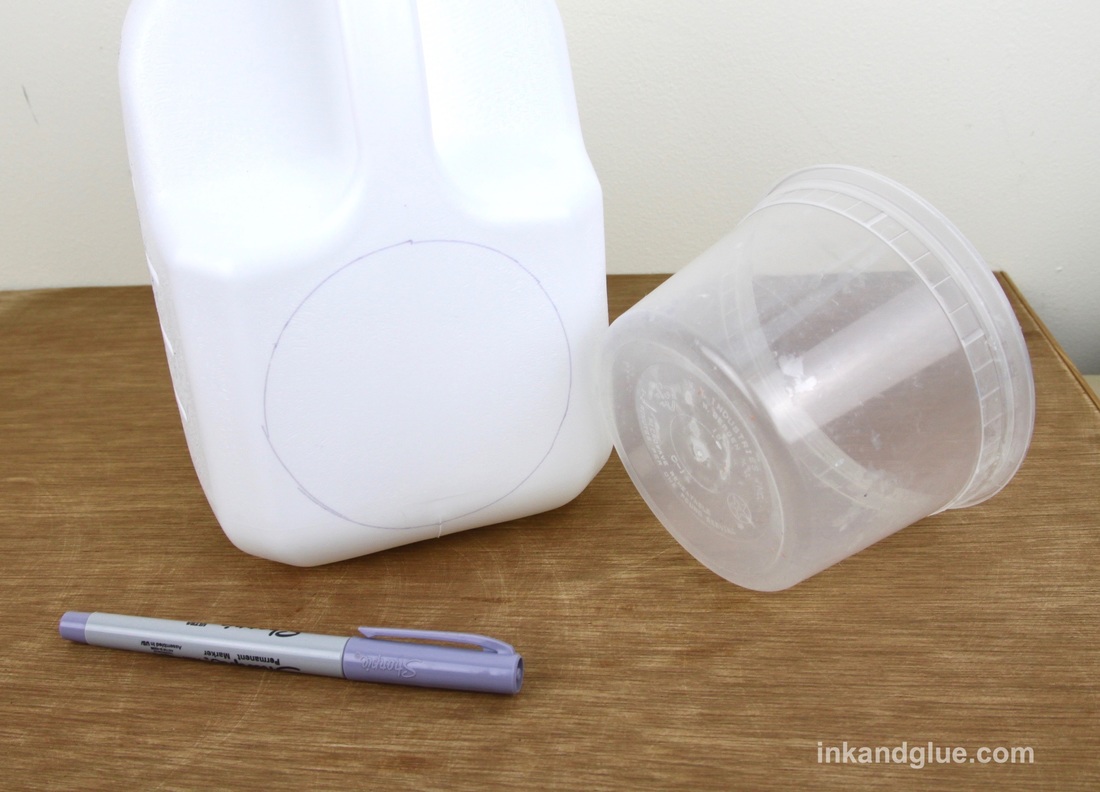
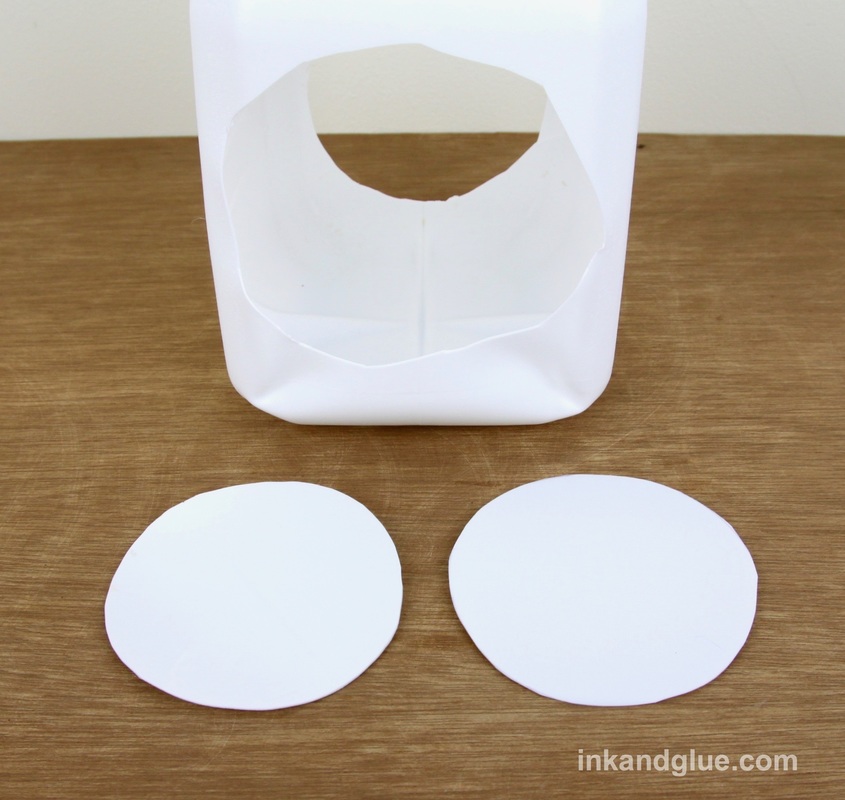
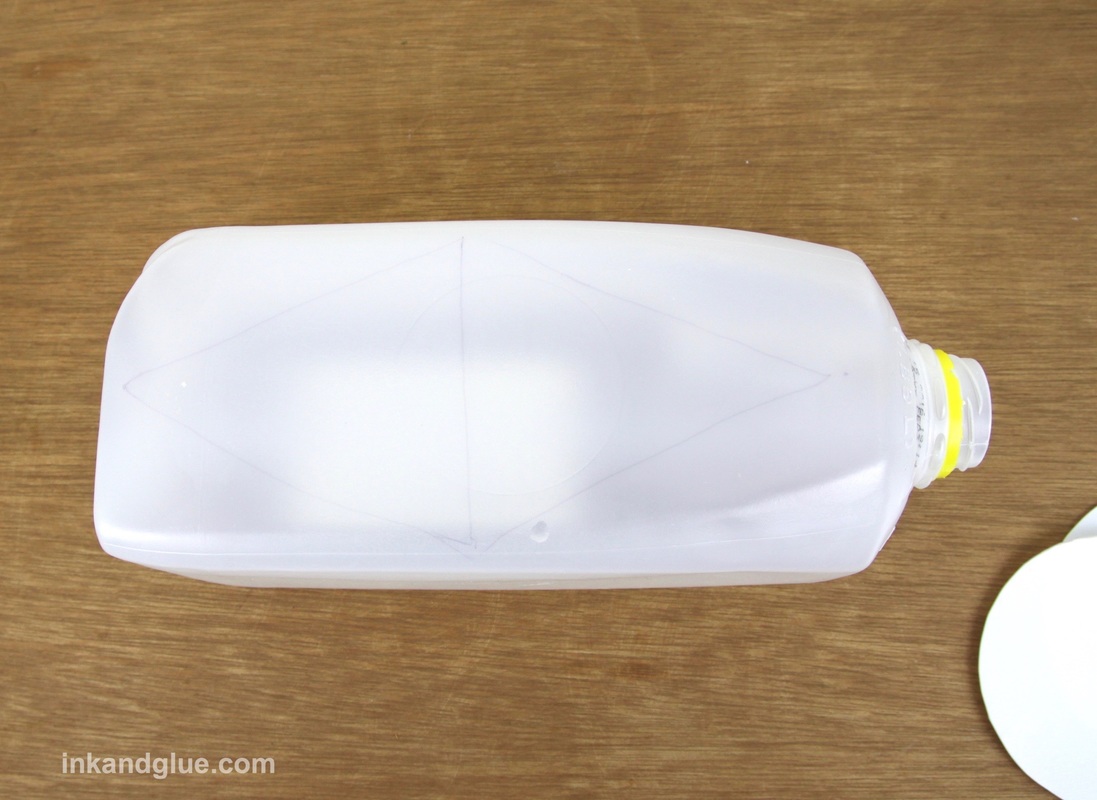
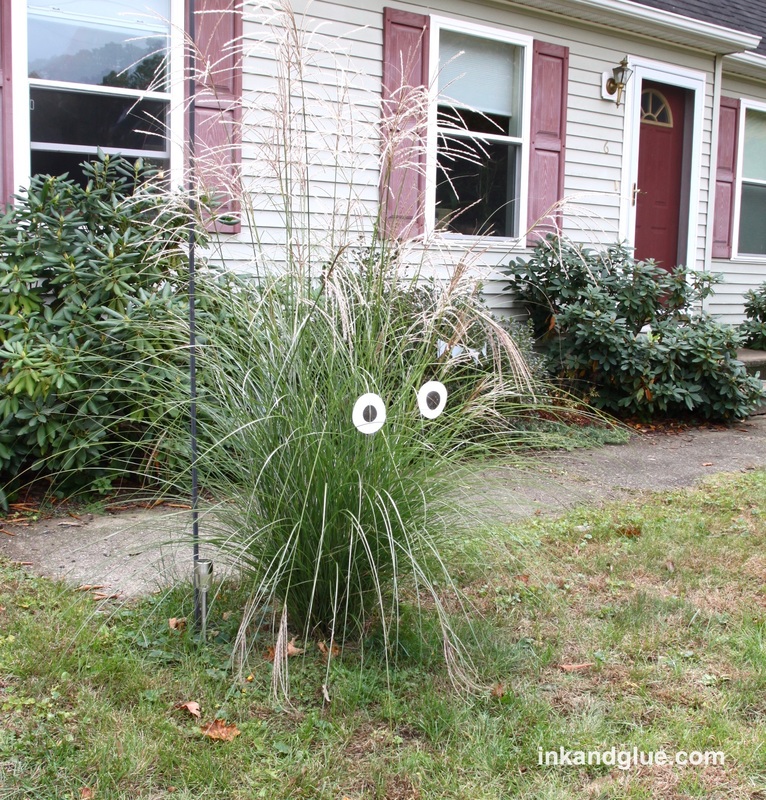
A Facebook follower in Arizona made a yard monster! I think he used disposable plastic bowls for the eyes, which is a nice variation. What a happy desert-dwelling guy! 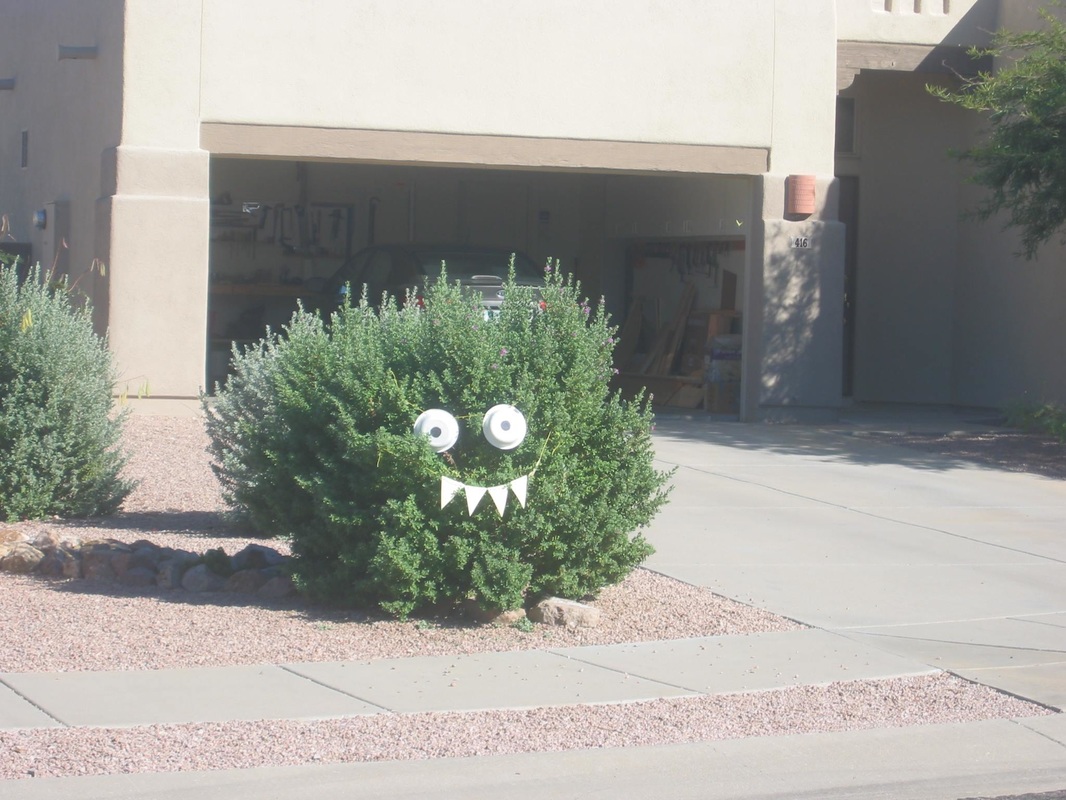 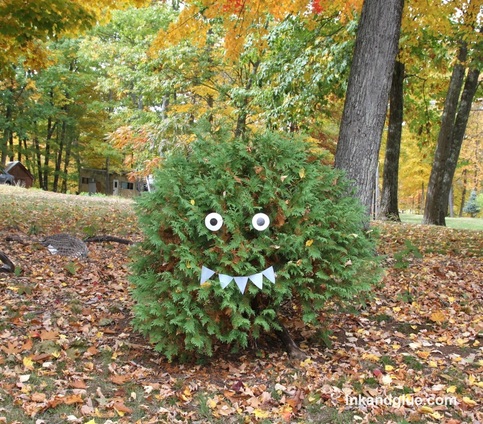 Need a yard monster for the upcoming Halloween holiday? Of COURSE you do; everyone does. Here's a way to make one that's both quick and nearly free. Start with two white or white-ish plastic beverage jugs that have been emptied and swished with clean water. Find a round thing (such as this leftover Chinese soup container) that has a diameter that will fit on one of the flat surfaces of your largest jug. Trace the circle onto the jug twice.
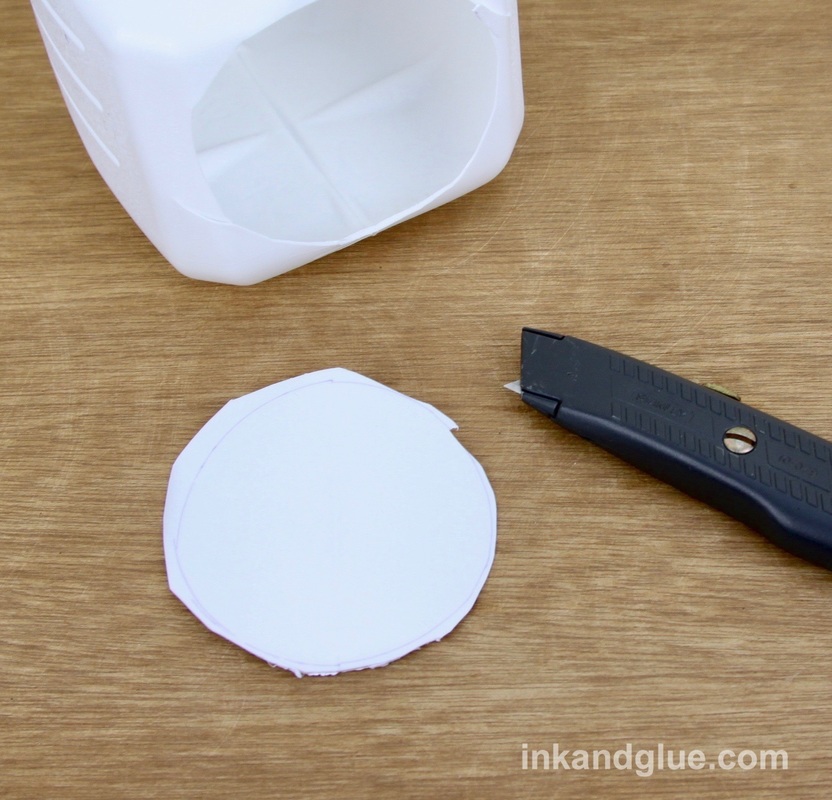
Use a utility knife to cut the circles from the jug. I cut them out pretty roughly, and then trimmed the circles neatly with scissors.
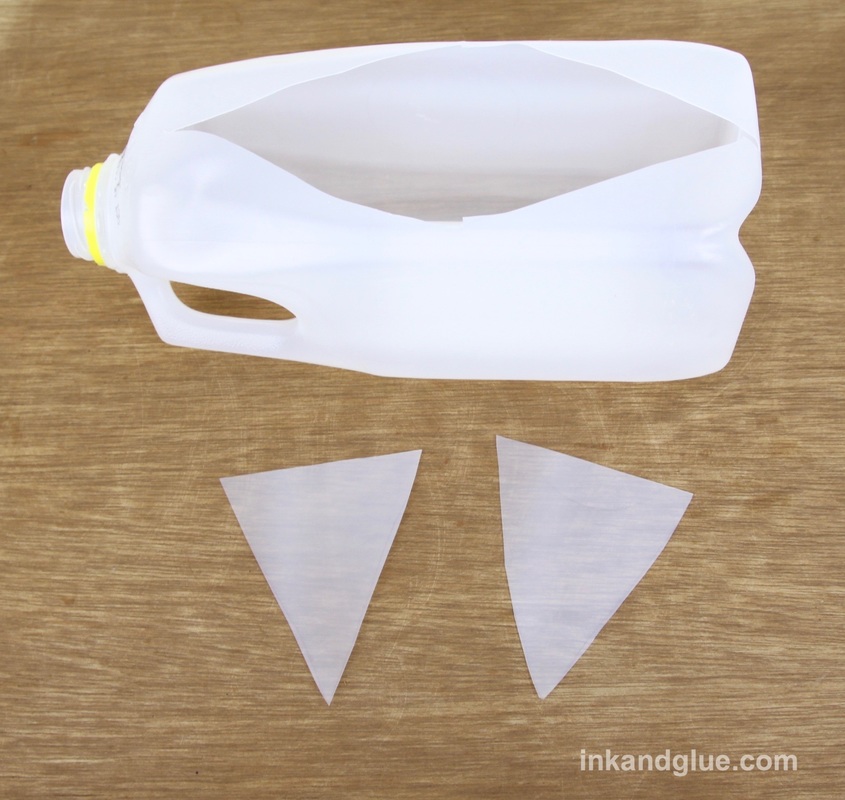
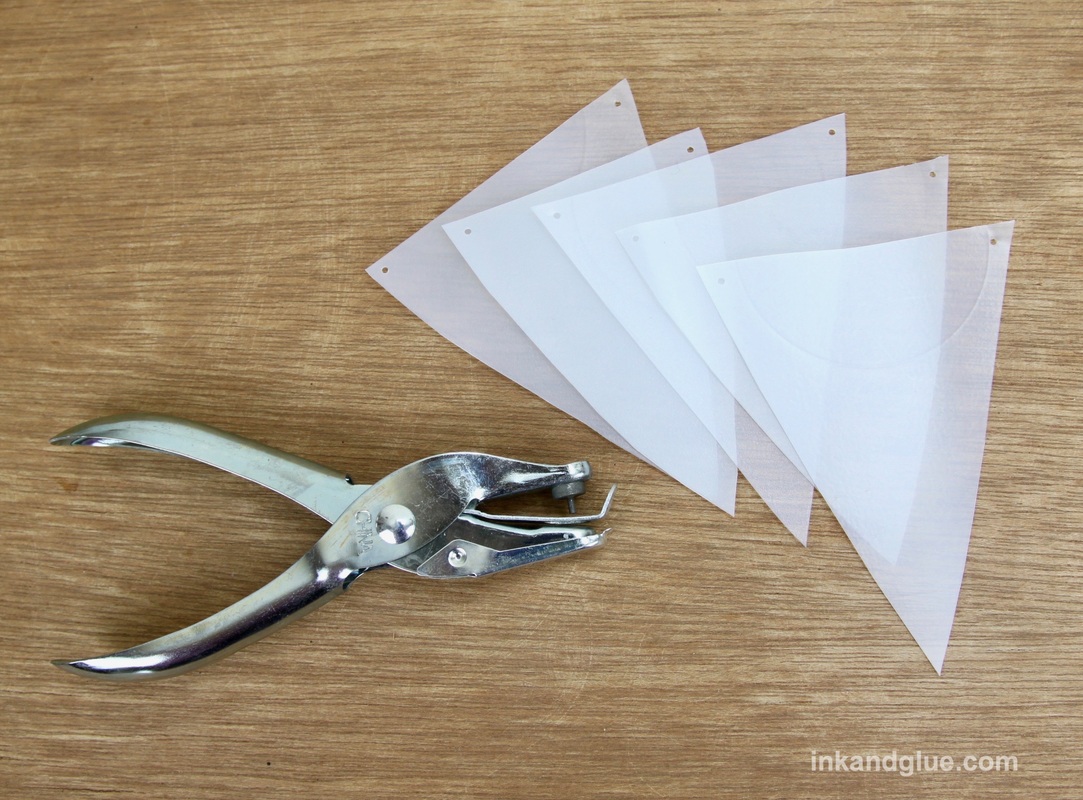
On the second jug, sketch five or six large triangular teeth on the flat panels and cut them out as you did above. My second jug was much softer plastic than the first, so I was able to just use the utility knife to start a hole, and used the scissors to cut out the shapes.
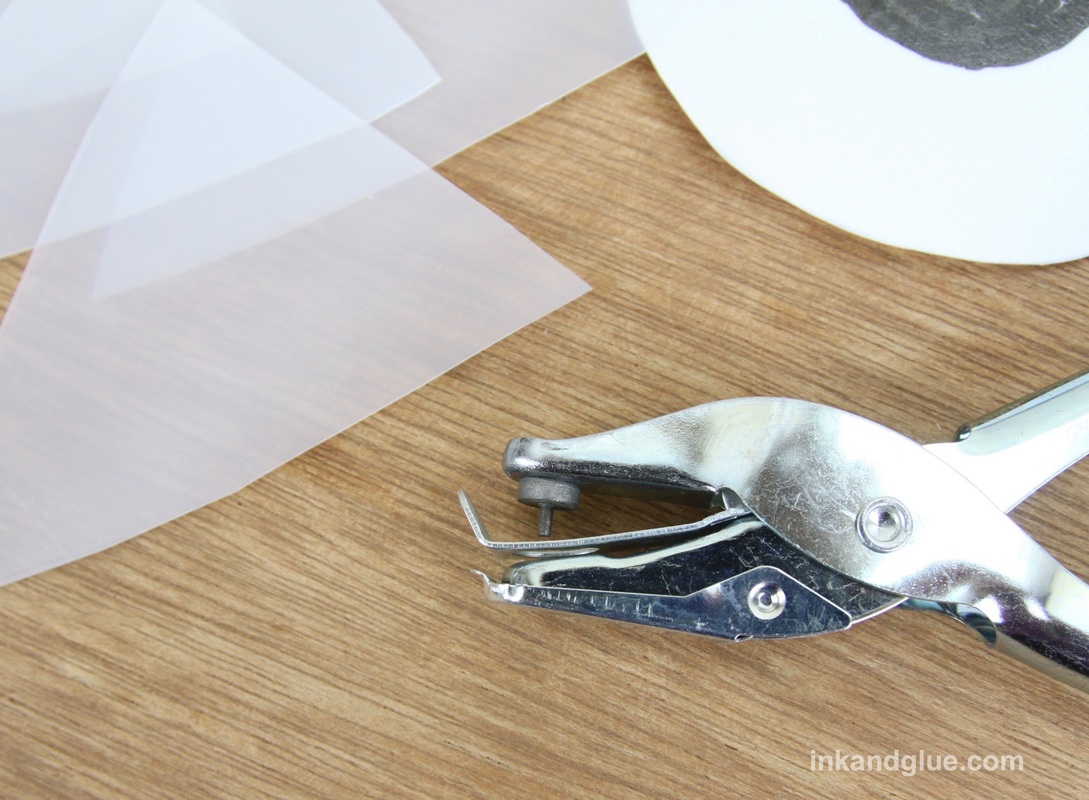
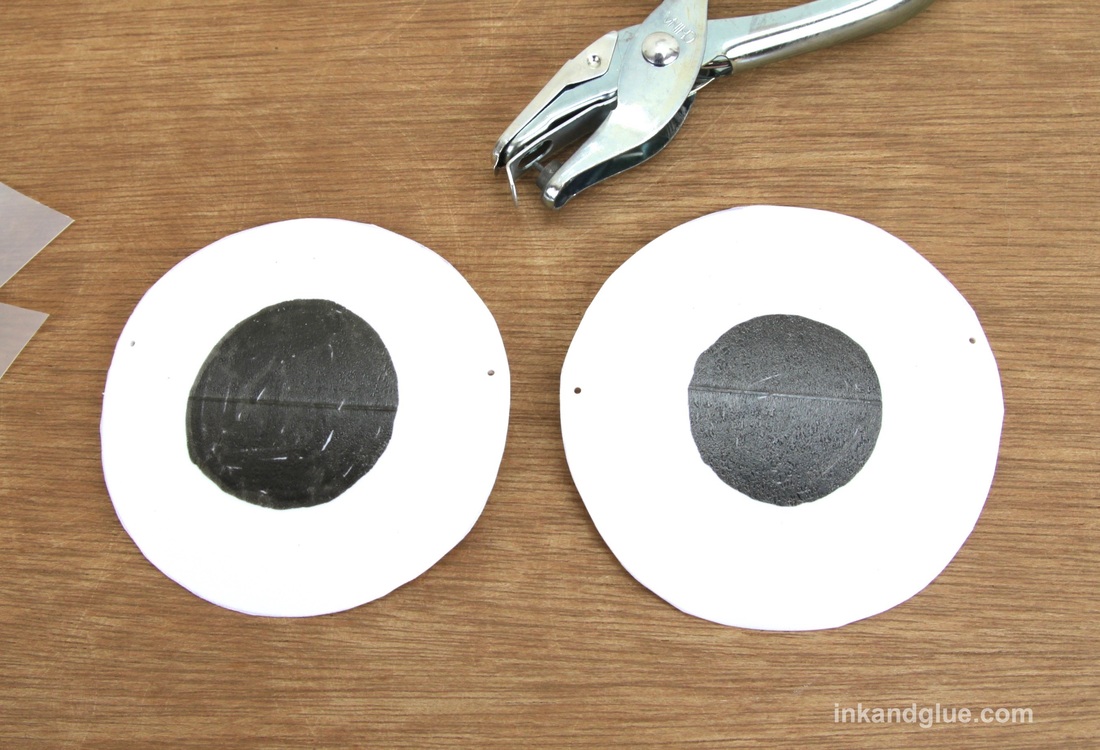
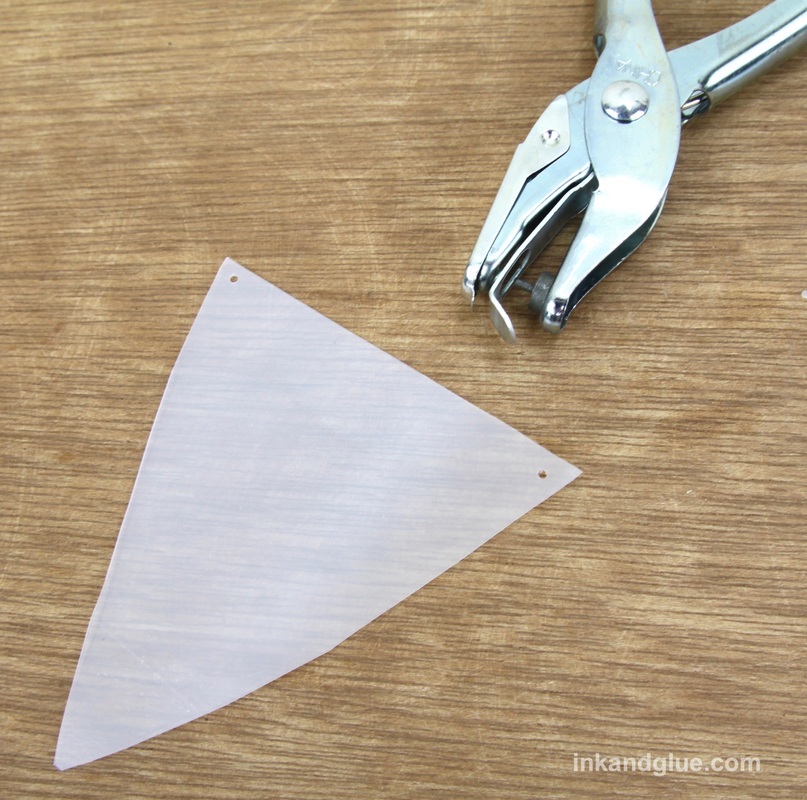
Draw pupils on the circles with black permanent marker, and let the ink dry (just a couple of minutes). As long as you don't rub and scrub, the ink will stay on the plastic in the rain.  Now you'll be punching holes in opposing edges of each eye and the corners of each tooth. You can use a large tapestry needle, or a pushpin (wiggle it to enlarge the hole), but I use a hand-held, 1/16" hole punch. I recommend it.
Punch the holes within an eighth to a quarter of an inch from the edge. For the teeth, only punch holes in the shorter two points; leave the tooth tip un-holed.
Cut two yard-long pieces of fishing line (aka clear plastic cord). Weave one cord length through the holes in the teeth. Tie a large-ish loop near each end of the cord. 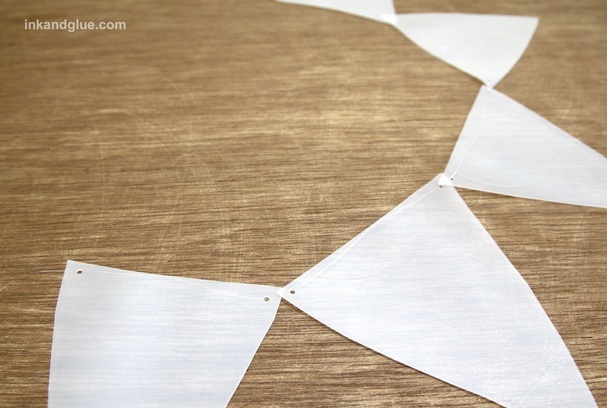 Feed the other cord length through the holes in the eyes, looping the cord through twice — this will keep the eyes from sliding freely, but will still let you slide them along the cord's length if you need to. Tie a loop at each end of this cord, too. Note: It is very difficult to photograph "invisible fishing line." 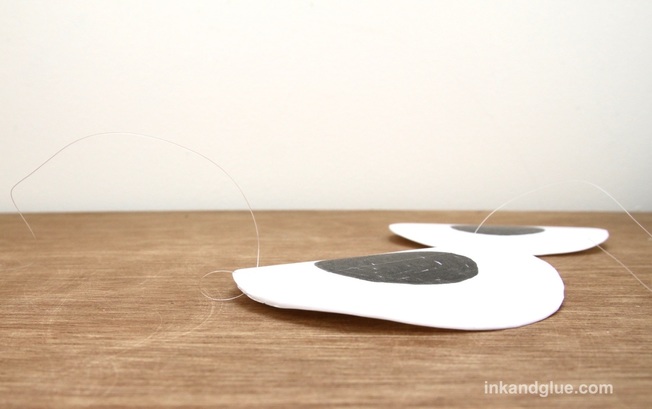 Head outside with your eyes and teeth and find a suitable shrubbery to enliven. Hang your eyes and teeth row by hooking the loops around any semi-sturdy part of the bush. Don't be afraid to do some minor pruning if you need to. I kept mine au naturale, but it took patience to get everything to lay correctly and neatly. 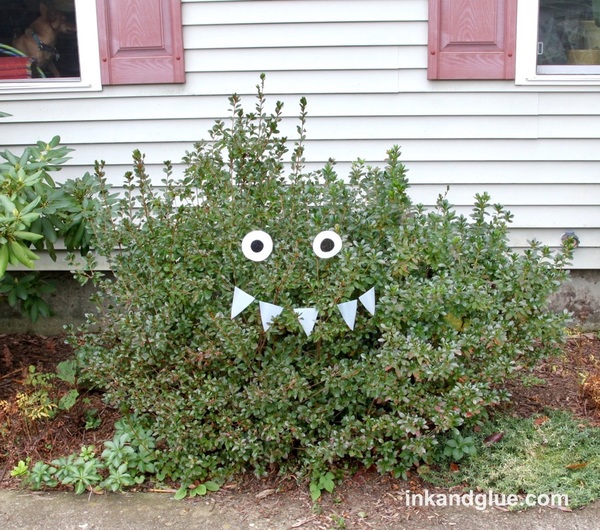
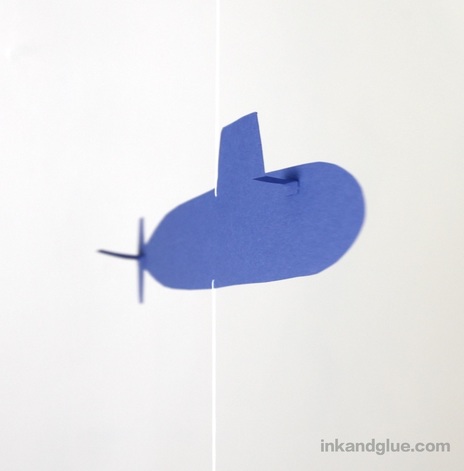
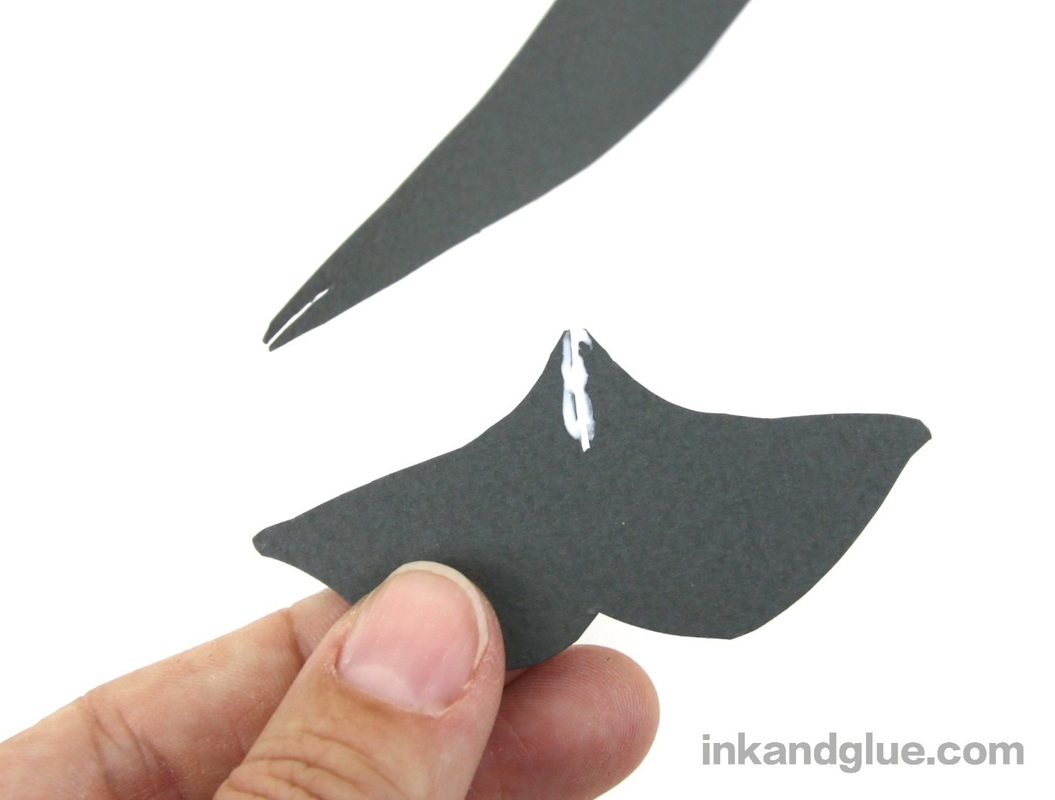
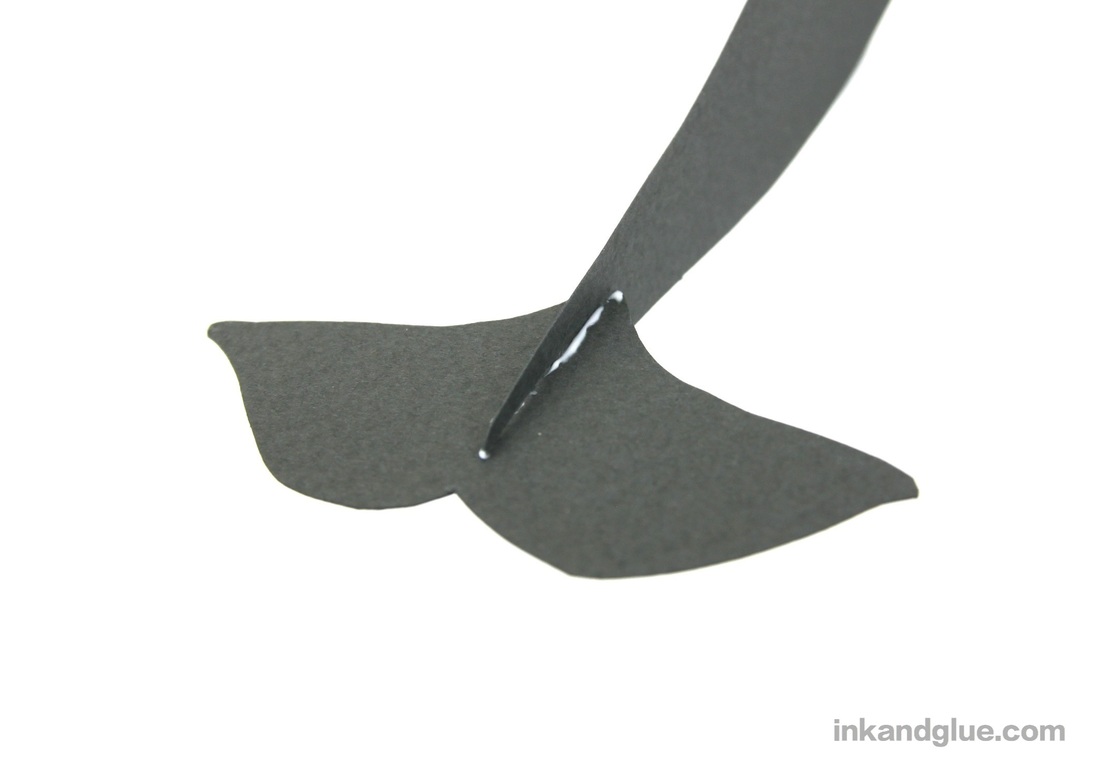
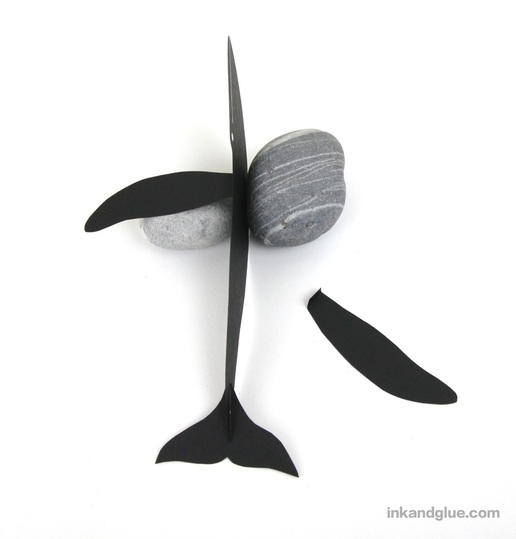
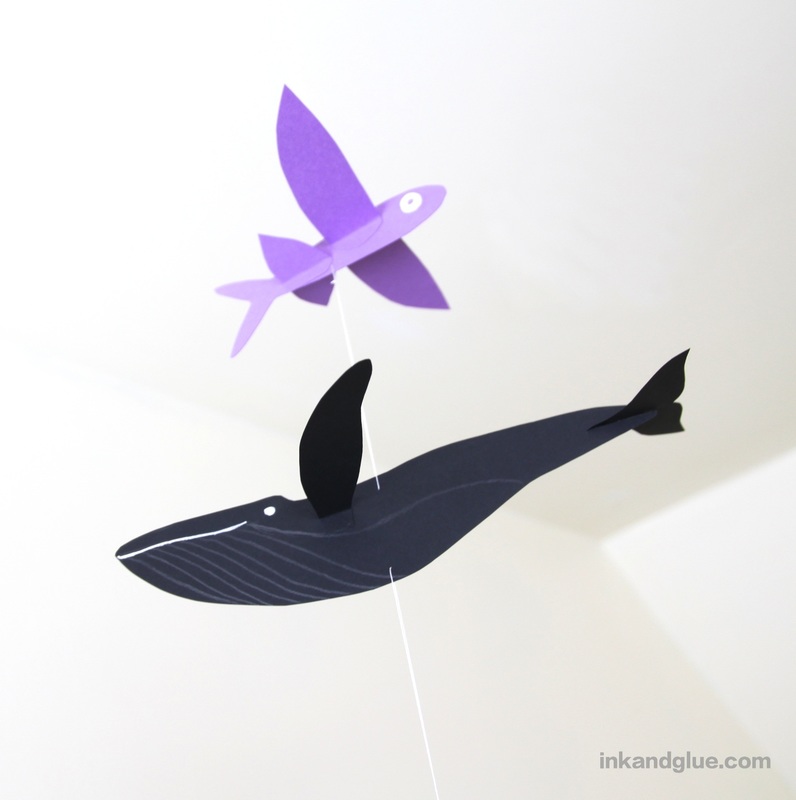
To make a whale like mine, cut out four pieces from card stock: The body, in profile; two flippers, with an extra 1/8 inch of length at each flipper's base; and a tail. (How did I come up with those shapes? First, I sketched a whale from the side and the top. I cut the body from the side drawing, and one flipper and the tail from the top-down drawing. Then I used those pieces as tracing templates to transfer the shapes onto a sheet of card stock. Trace them lightly with a pencil so you can erase the lines afterwards.)  Add any details you'd like to your whale. I used white paint marker and pencil. 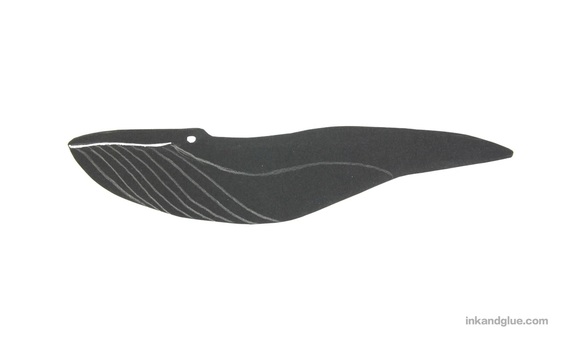 Use a craft knife to cut the thinnest possible sliver out of the end of the body and the base of the tail. (You can simply cut a slit instead of a sliver, but the tail piece will want to flip flat against the body.) 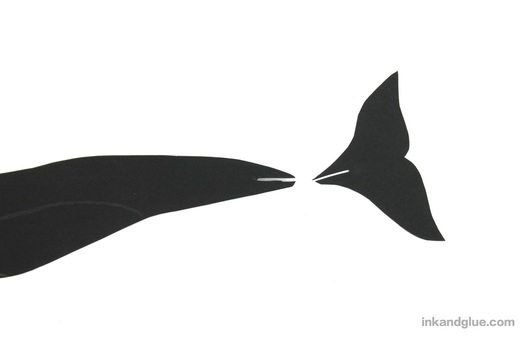 Smear a little bit of glue on the slit in the tail (shown here on my narwhal), then insert the tail into the body. Let the glue dry.
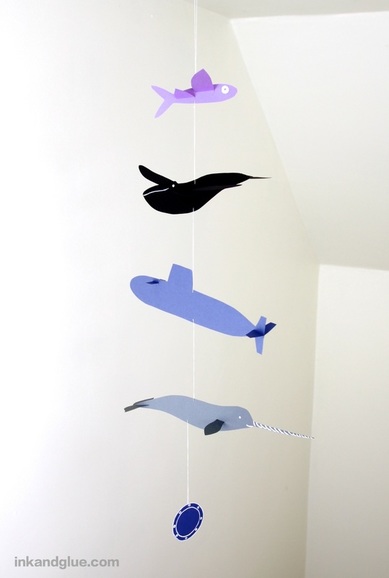
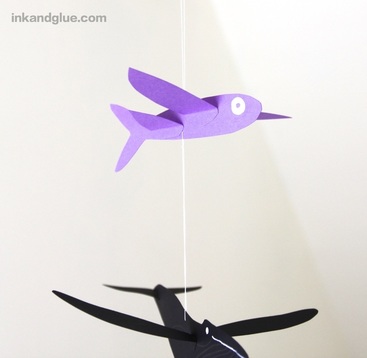
You now have a whale! Here she is in flight. 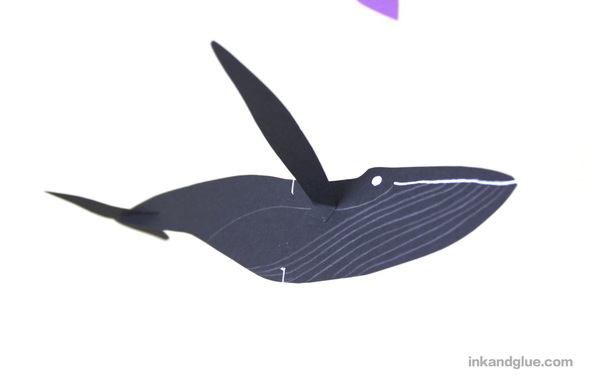 Make a few more friends for your whale to fly with, then use a needle and thread to connect them with thread loops. To get the balance of your mobile right, tie a length of thread to a paper clip or a brass paper brad, then slide it onto the back of the creature. Hold it up by the thread, and move the clip or brad back or forwards until the creature is flying straight-ish. Thread a needle with 6-8 inches of thread and pierce the spot where the brad/clip was. If you're on the top animal, tie the thread ends in a knot. If you're in the middle or the last piece, insert the needle into the belly of the creature above, in a spot that's directly below that creature's hanging spot. I started my stack with the smallest creature I made, a flying fish. Then I added the whale, and below that, a submarine.
 Next up was a narwhal. (Did you know the horn is actually a tusk? It basically comes out of the whale's mouth, not its forehead. Weird!) For the bottom piece of the mobile, I went with a simple circular porthole. 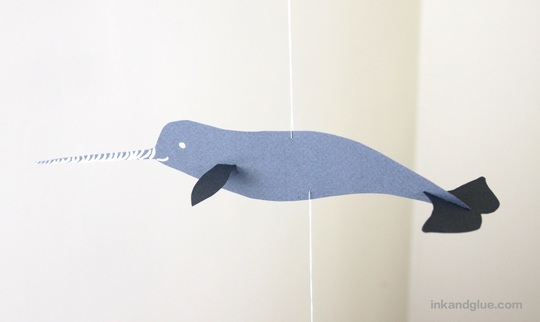 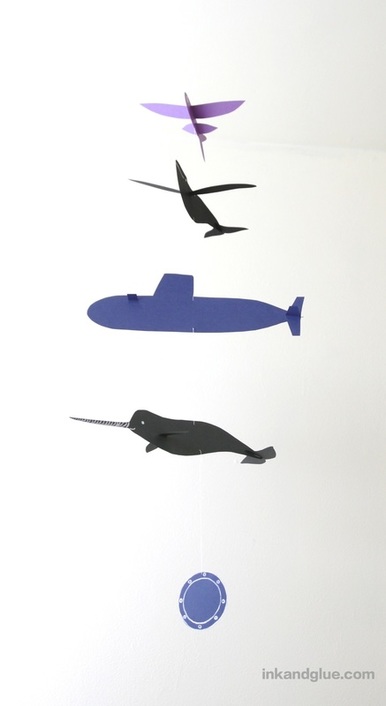 Happy oceanic explorations!
xo Ran out of time to post a full project, so here's a photo-only look at what I was playing around with last night. Xo!  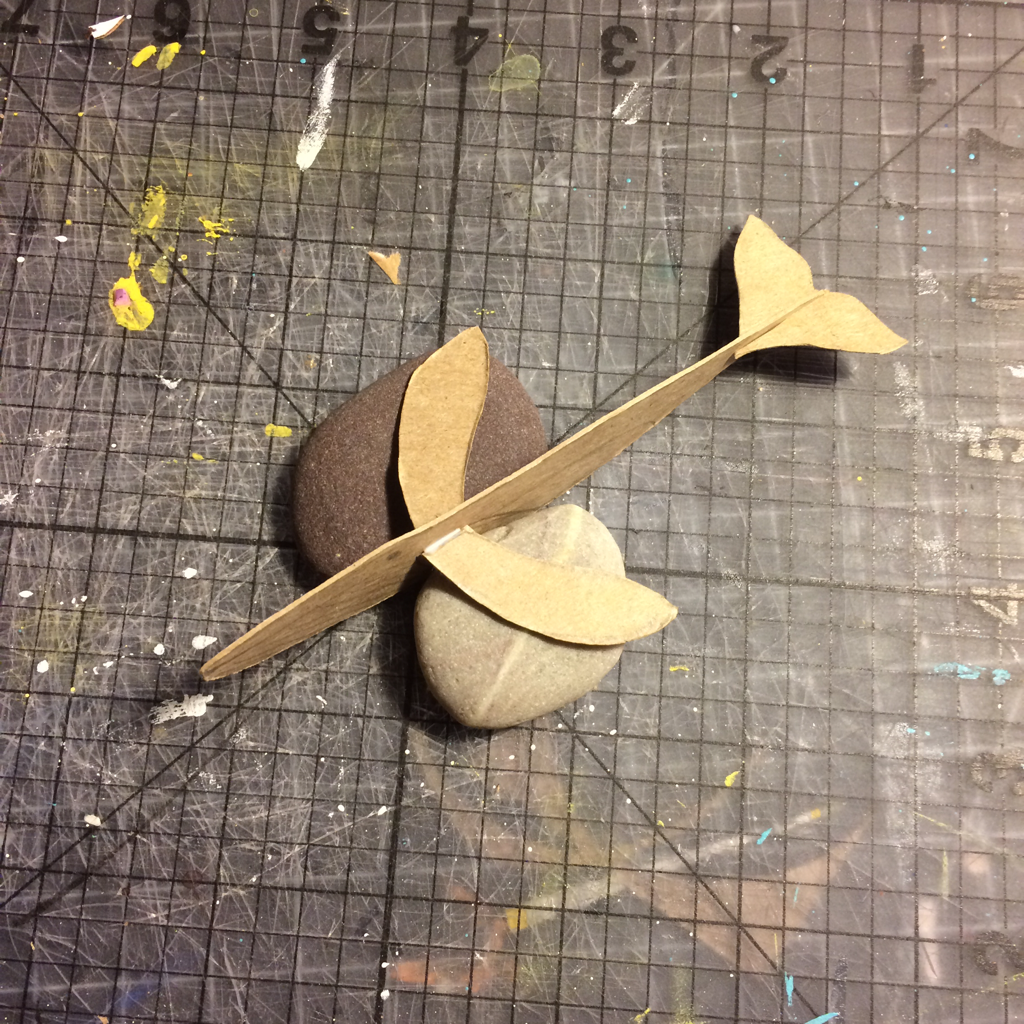  |
Categories
All
Archives
March 2017
AuthorI'm Debbie Way, an artist and writer who enjoys making things. |


 RSS Feed