|
Have you met Brock Davis? He's an artist and photographer that makes you look at everyday things a little differently, like a chopped cucumber, noodles on a plate, or a broccoli stalk. Long-time readers know I love this kind of thing, and I think it's especially mind-expanding for kids to see art made with unexpected materials. Brock does this especially well, and he does it at a regular, human scale, making it even more accessible. 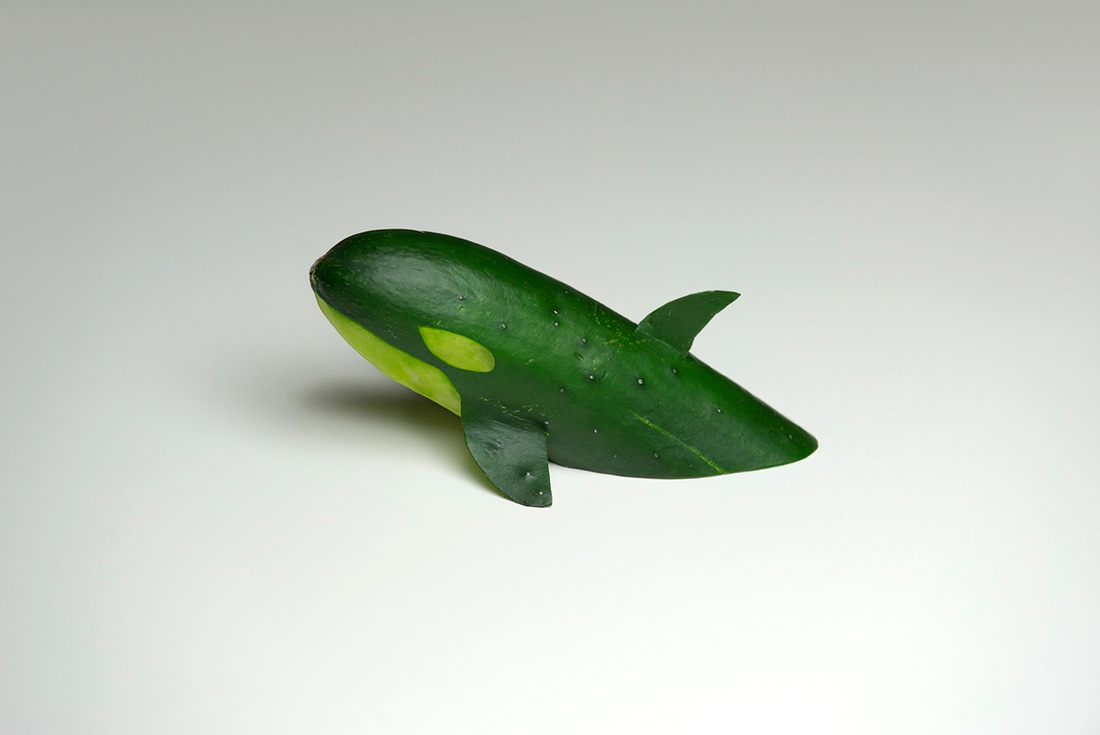   Not all of his work involves food. Check out Pearl:  And here's Shark: 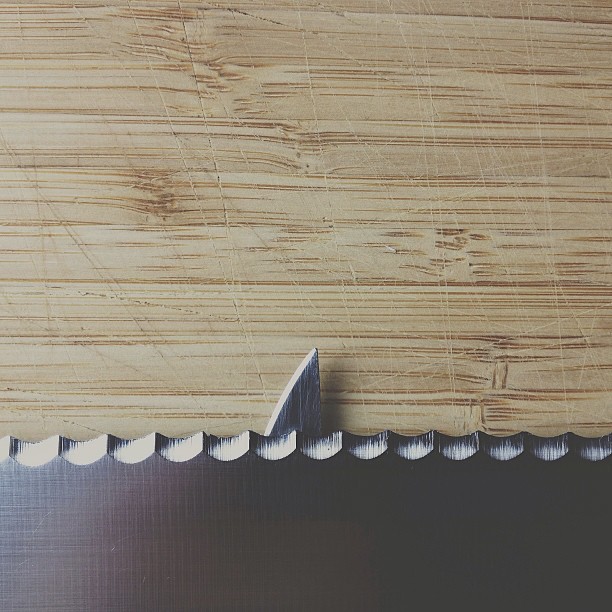 Chopstick Pants makes me laugh: 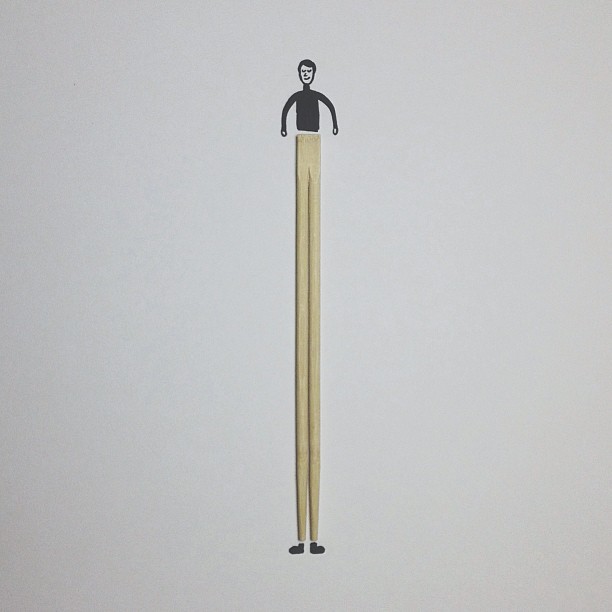 And I can see lots of kids giving themselves Ninja Knees:  There's lots more on Brock's website, so click on any of the images to go to his gallery. Click! Go!
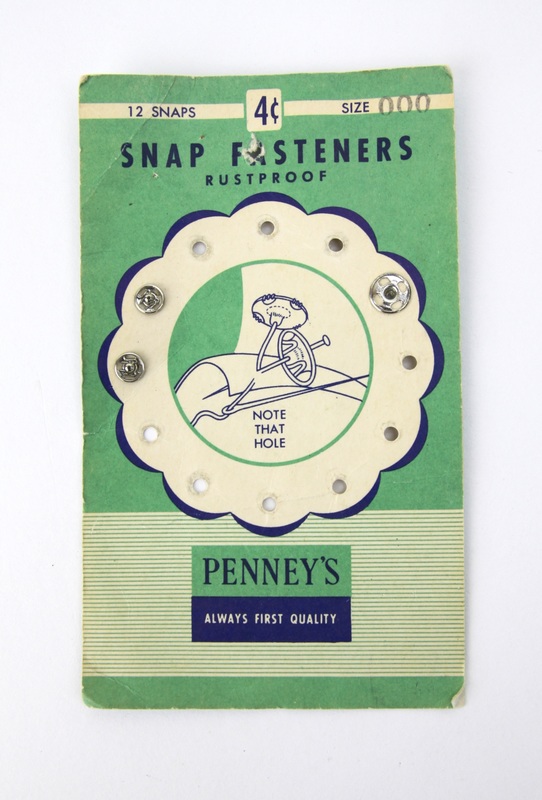
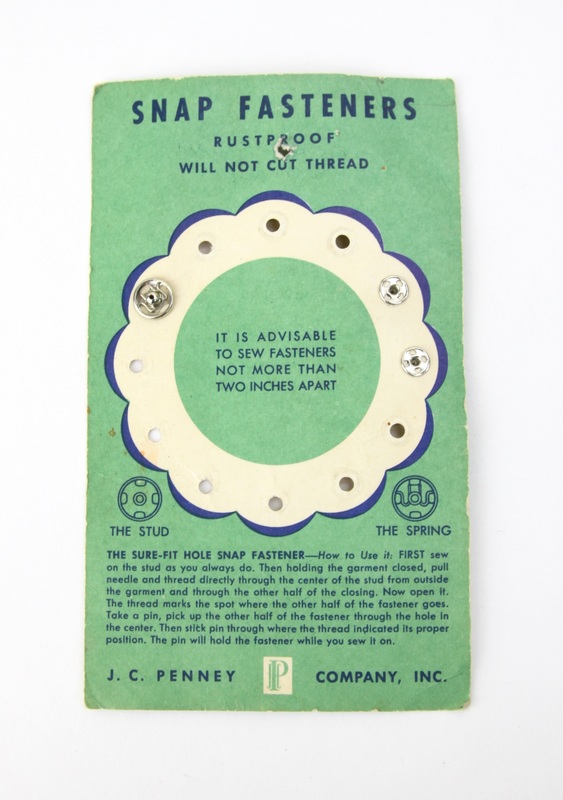
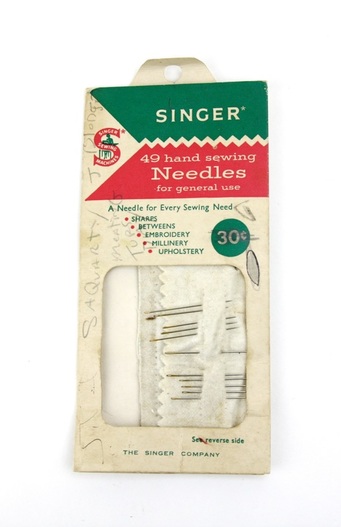
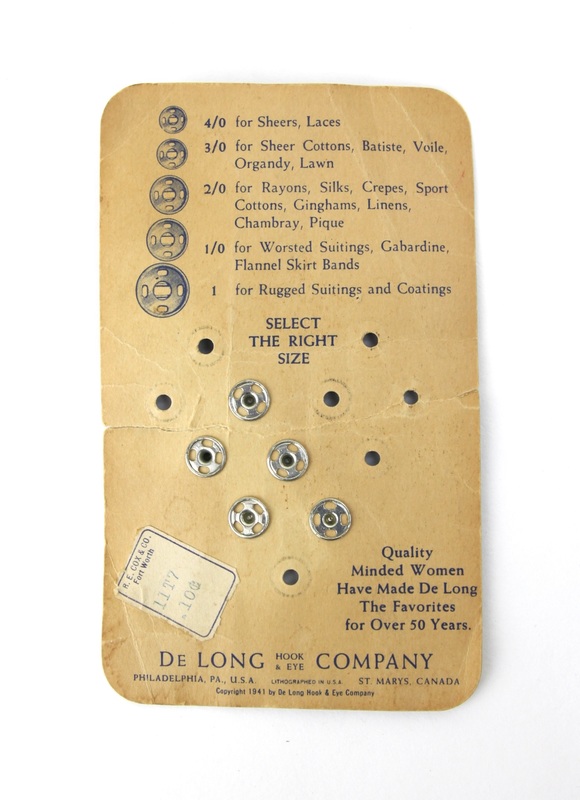
xo! As the subject of an I Love Vintage post, "sewing notions" may sound a bit dry. But if you take a moment to look at the designs and illustrations on the packaging of these snaps, hooks, and needles, I bet you'll be as charmed as I am by them. All of these were bought as parts of larger collections of sewing stuff at tag sales or estate sales. Clearly they were used, and carefully saved, by thrifty old ladies who knew their way around a sewing machine. I like that I'm able to keep them in use. (And I have used them, over the years.) After all, "Beautiful things are always hand made."  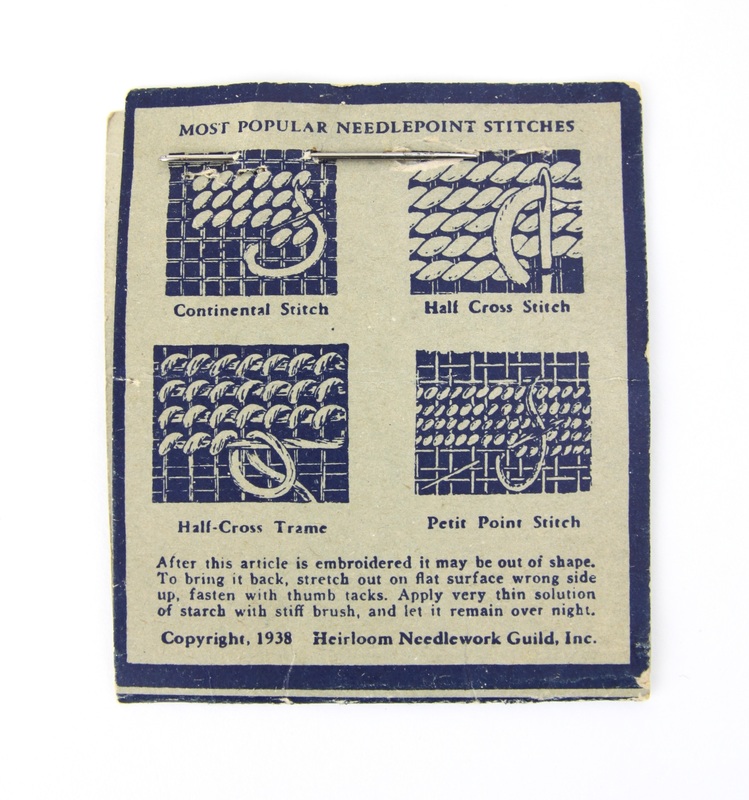 12 snaps for four cents? I love you, Penney's.
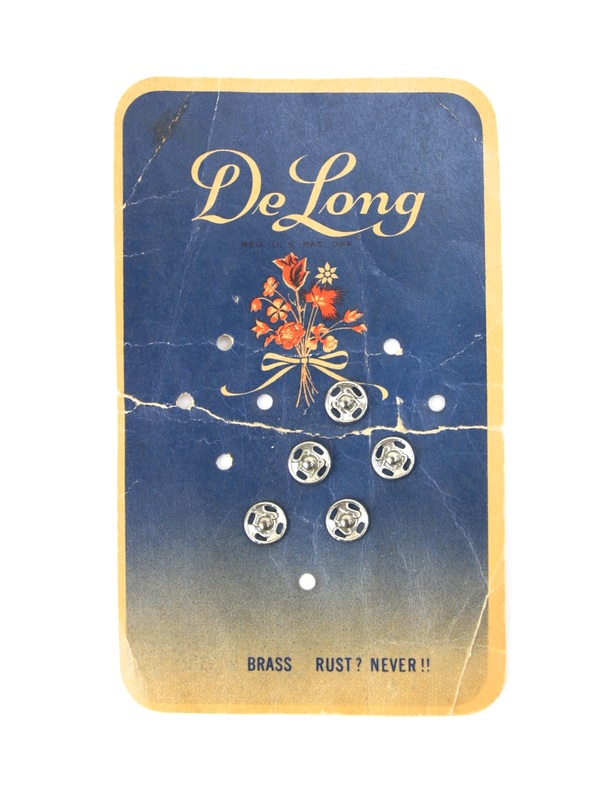
This one's so gorgeous and simple. Rust? Never!! And they haven't. Best 10 cents ever spent.
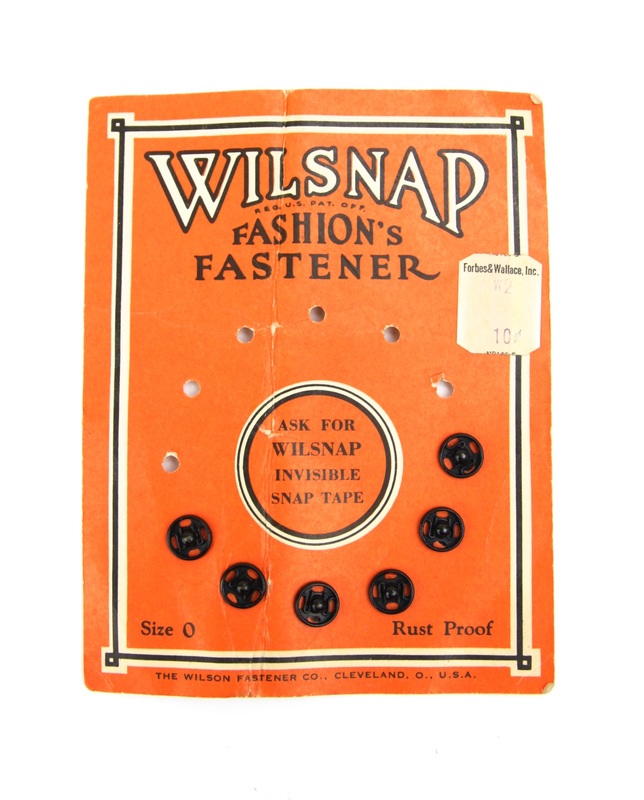
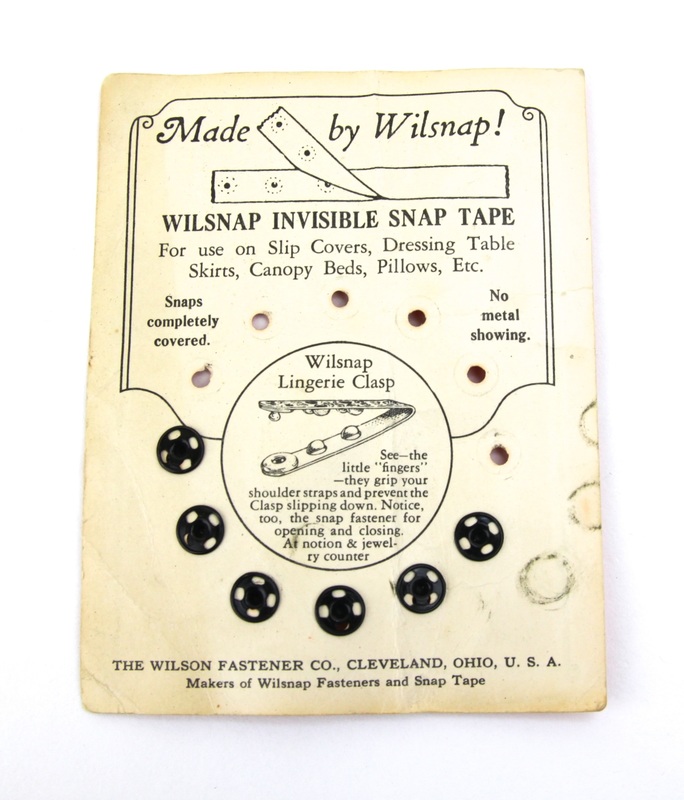
This big wire loop is a very handy way to corral safety pins, and the ultra-charming acorn tag only adds to its charm. 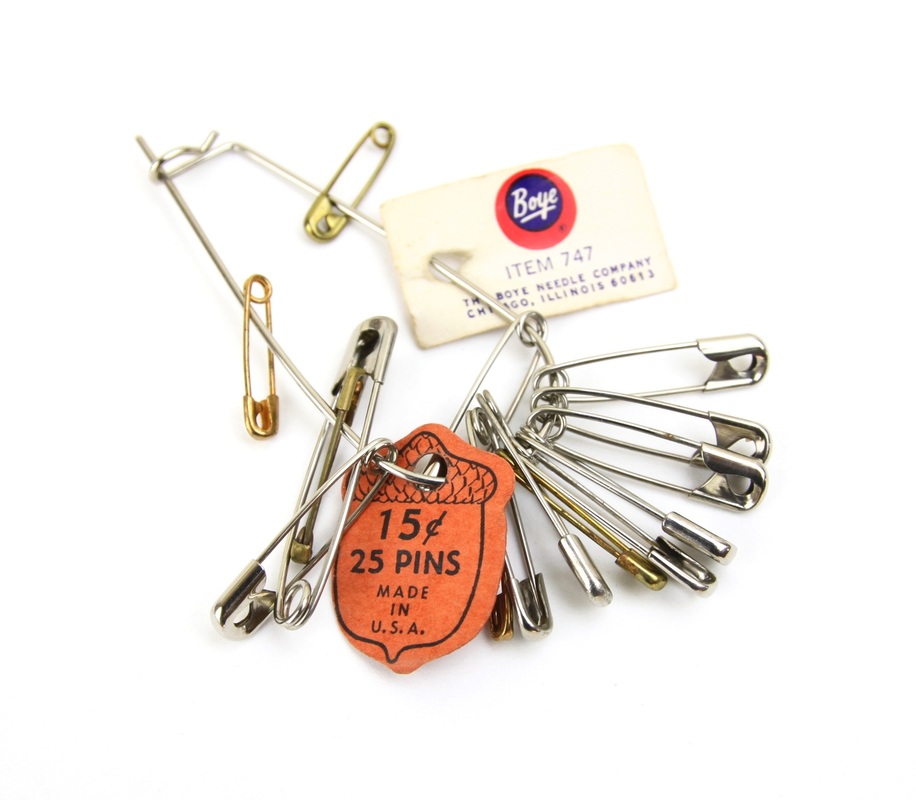 I get a bit melancholy when I notice that all of these notions were made in the U.S.A., and they surely aren't, anymore. Ah well. 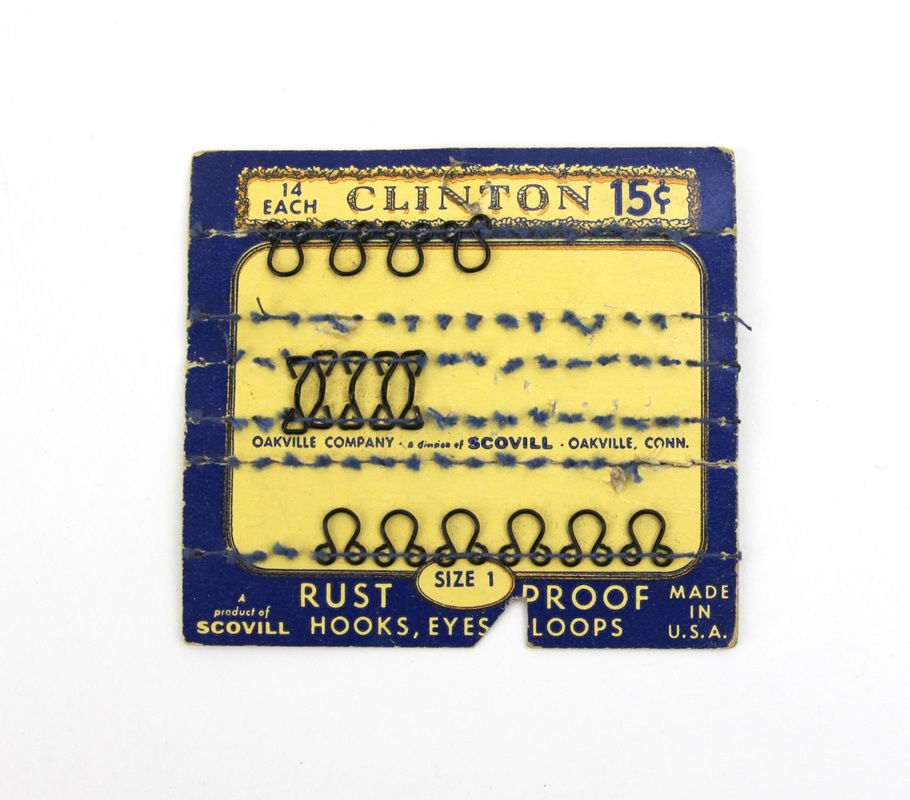 Fashion's Fastener, sold at Forbes & Wallace, Inc. (link goes to the incredible Department Store Museum). Another well-spent dime.
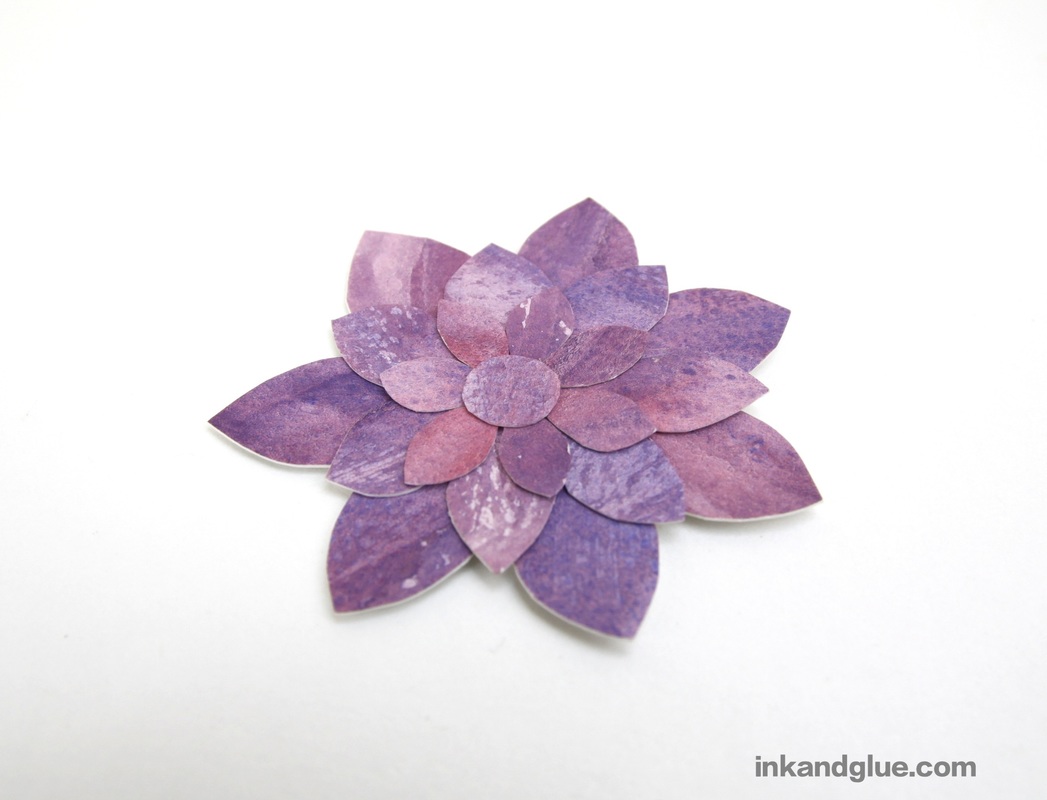
xo! Looky there, a new header image has arrived! I really liked how the watercolor flower turned out, so I wanted to share with you how I made it. I actually tried using two very different types of paper. The one above is made with tracing paper: I just roughly brushed on varying shades of purple and let the paper dry. Then, I cut petal shapes from the paper, brushed Mod Podge onto the backs (one at a time), and smoothed them to a scrap of sturdy card stock. I added a second round of overlapping petals to the first level, ending up with five over five. This photo shows a second flower made using this method, sitting on top of the cut-up paper. 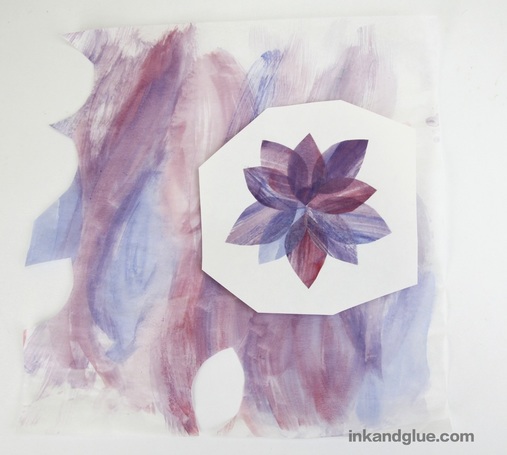 I did something similar using actual watercolor paper; brushed varying shades of purple (mixed using blue and red in my simple watercolor set) onto the paper, let it dry, and cut out petals. This time I cut them in three different sizes, then stacked them from largest to smallest. 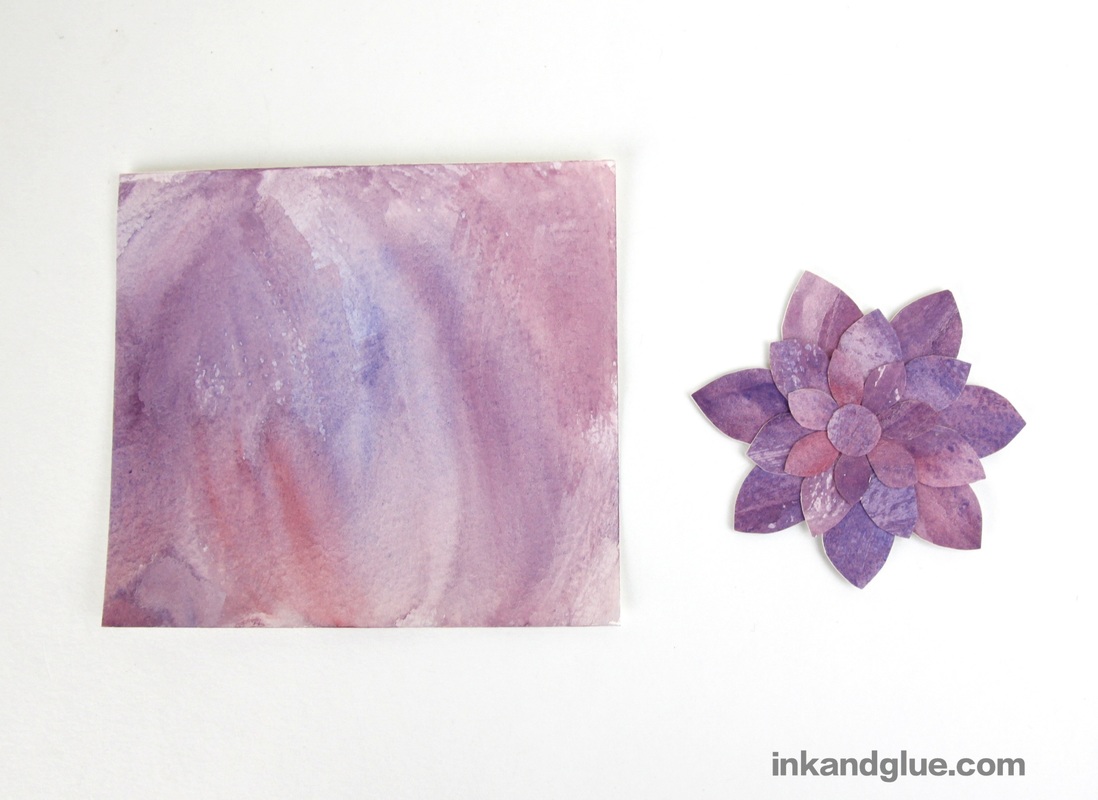 You get more dimension with the thick watercolor paper, but you lose the nice translucency of the tracing paper. More photos of the two effects:
Because the watercolor petals were so thin, and so evenly glued down, I was able to use a craft knife to cut out the letters in "ink" without much difficulty.
Happy Spring! xo 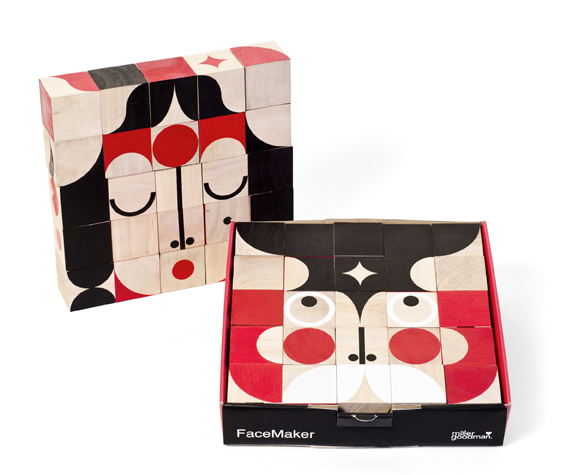 I've just discovered a wooden toy manufacturer called Miller Goodman. (Click on the name to go to their homepage, which features a virtual building toy.) MG makes painted wooden cubes (among other products) that can be reconfigured to make endless combinations, creating faces, animals, and more. There's a "facemaker" set and a "shapemaker" set, and each has a "mini" version with fewer blocks. (Links go to an American shop; here's the native British Miller Goodman store. Naturally, the sets combine seamlessly. 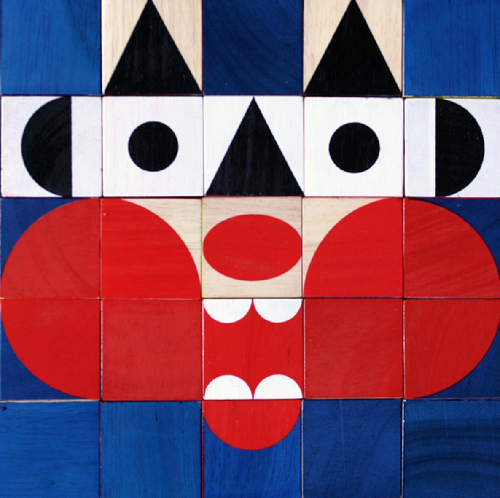 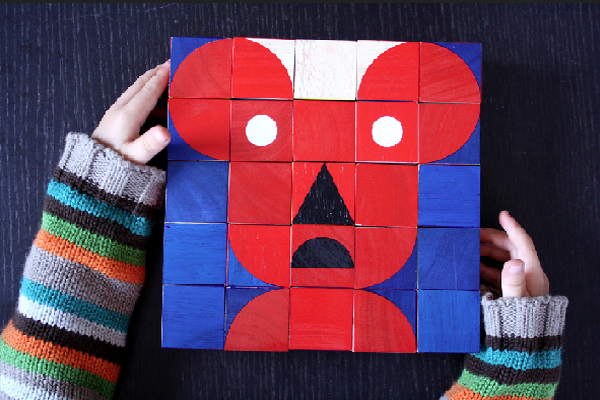 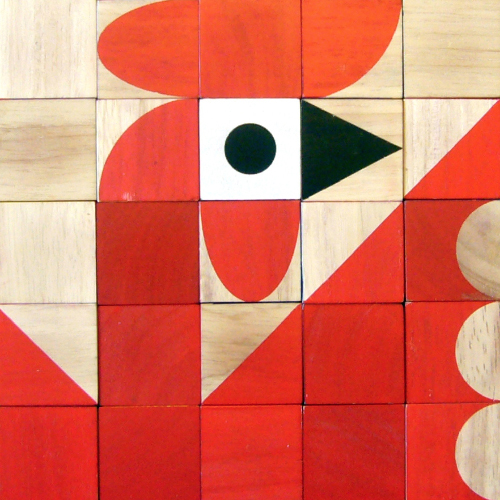 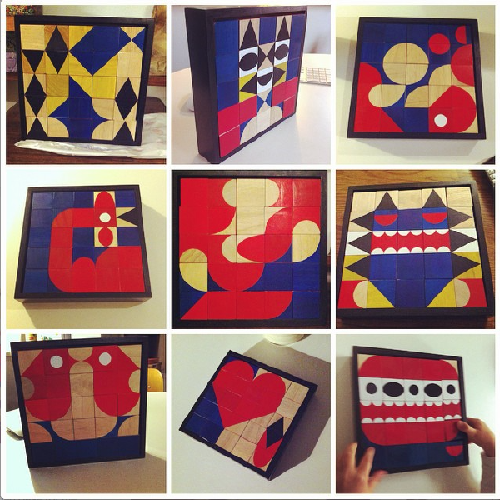 The images shown above are from Miller Goodman's gallery page, which is full of inspiration. Go!
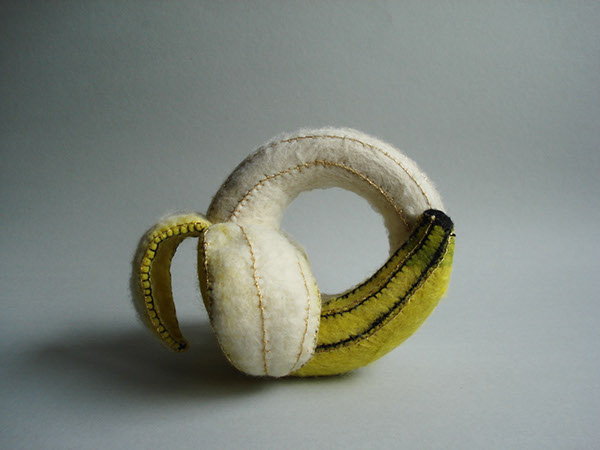
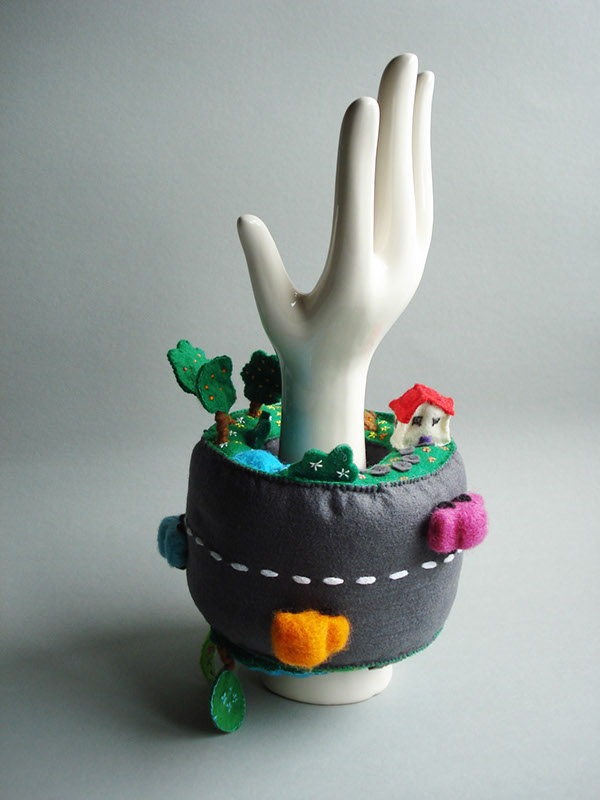
xo After living here several months, I finally got hip to a weekly "dog meetup" at a park a couple of miles from my house. Though Franklin is one of the smaller dogs there, he is very quick and nimble, and enjoys being chased. He just has a good attitude about it all. Here he is during a quieter moment, mellowing out by chewing up a stick. 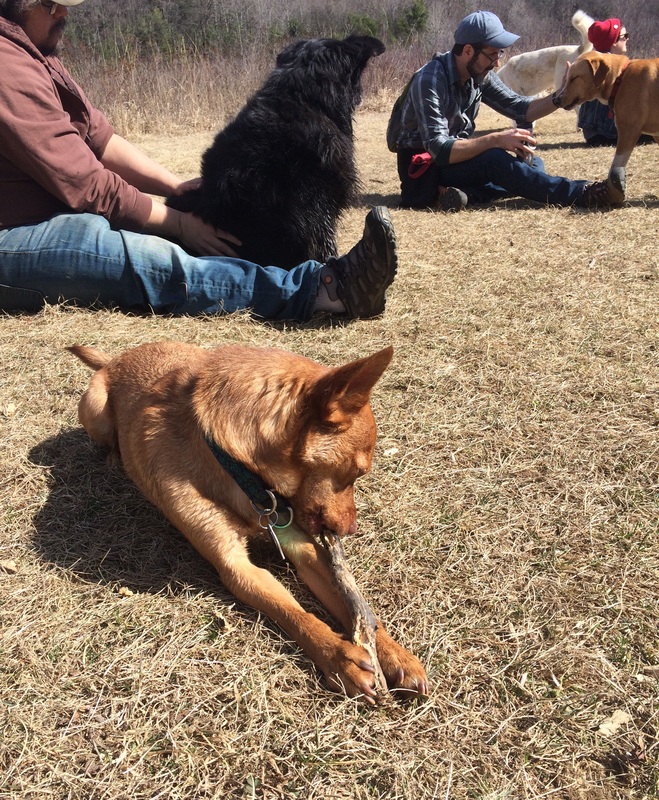 I dipped back into the McCall's Make-It Ideas well for this edition of I Love Vintage. There's something of an Easter theme (see the bunny?), though, really, bunnies are an 'anytime' treat. These are beanbags that are almost entirely put together with regular glue. I never had much luck with gluing felt, but if you're going to try it, use fabric glue and clamp the edges with clothespins as the glue dries. Or just sew it; it's not very difficult, and the end result is sturdier and less likely to suddenly fail and send beans all over the floor. 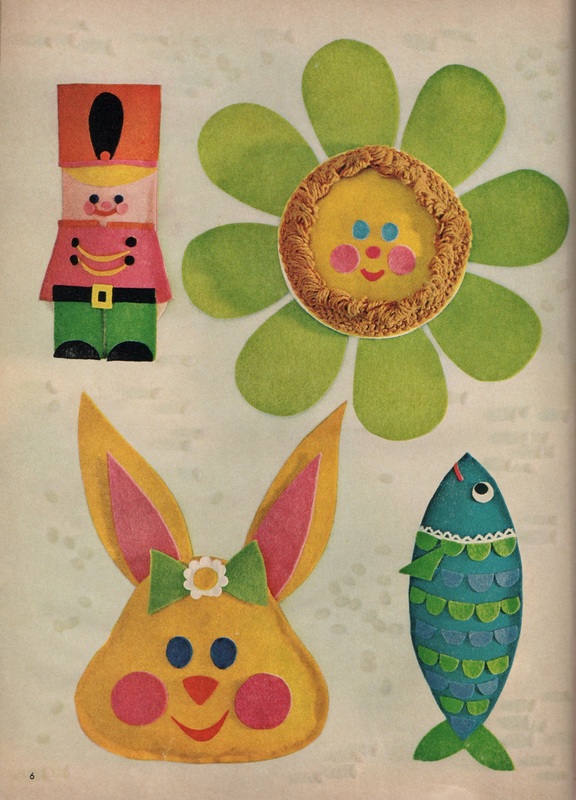 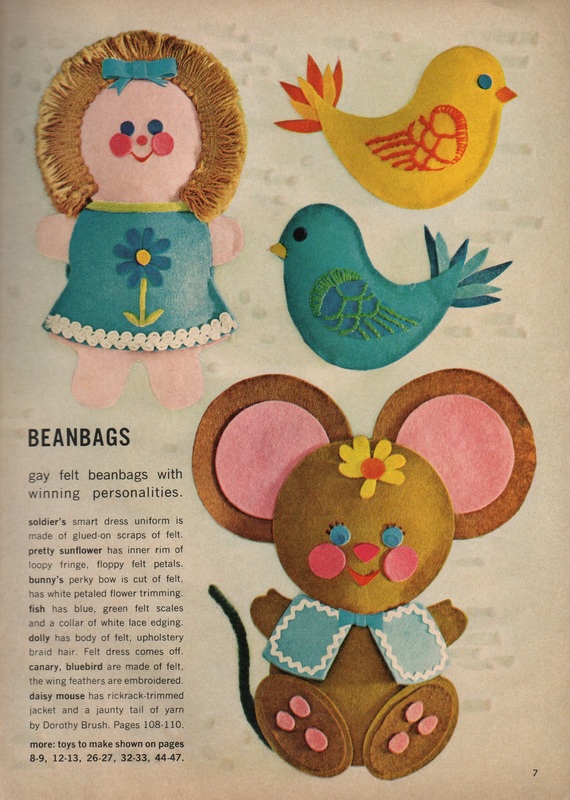 Older McCall's mags always include patterns for their crafts, which I appreciate (and never actually use, but I think they're good for reference). Whoever originally owned this magazine must have made the mouse, because there are pen marks all over its pattern. 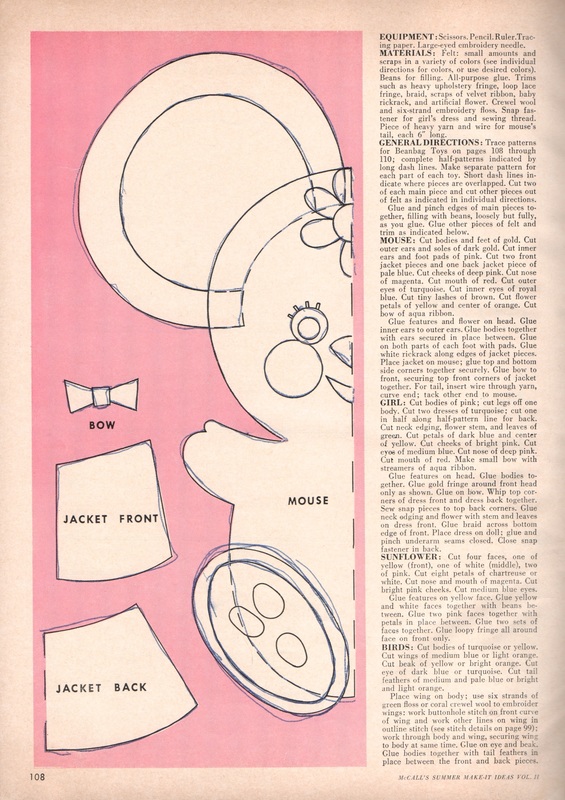 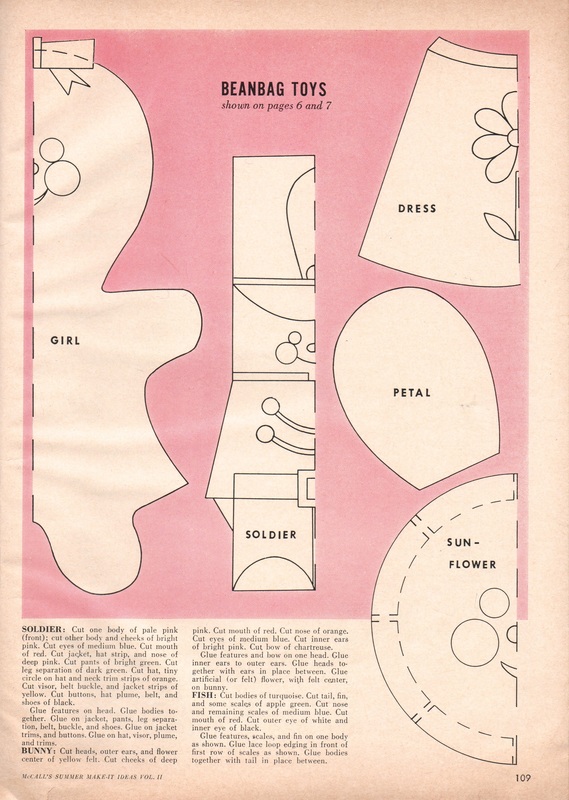 Enjoy! xo Have you met Maria Filipe Castro? She's a fiber artist in Portugal. She makes these extravagant sewn felt bangles (click on an image to go to her site and see more photos of each):
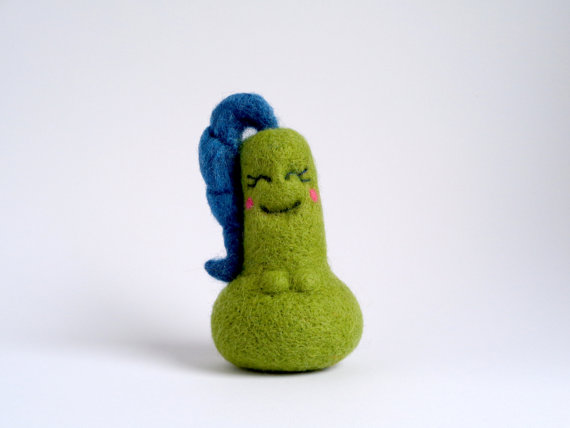
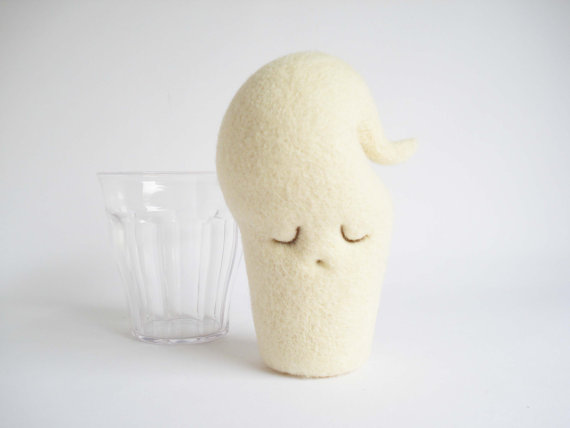
And they are amazing. But what initially caught my eye is her absolutely perfectly made, needle-felted characters. These are all available for sale on her Etsy site; click on the image to go to that item's page. Note: The green character below is named "Katy Pear" after Katy Perry!
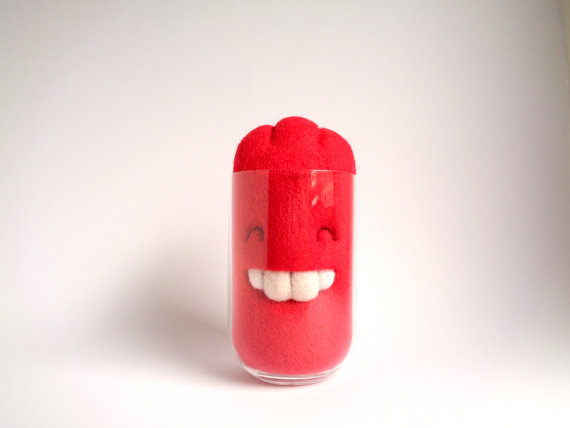
Here are a few of her "beverage" series, showing tomato juice, almond milk, and strawberry milk. I can't get over how much personality is in each of these, and how perfectly smooth the felting!
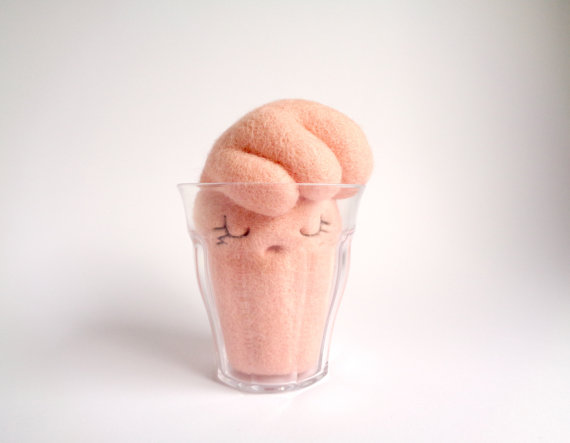 Anthropomorphizing inanimate things can lead to a lot of creativity and hilarity. With the now-well-known kawaii style of putting a cute face on everything and anything, it can be a fun exercise to go a step further and give each thing its own personality and backstory. Which reminds me, I still haven't come up with a good name for my car...
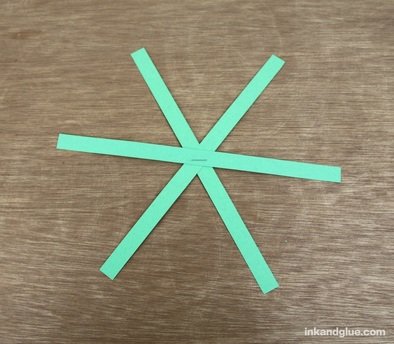
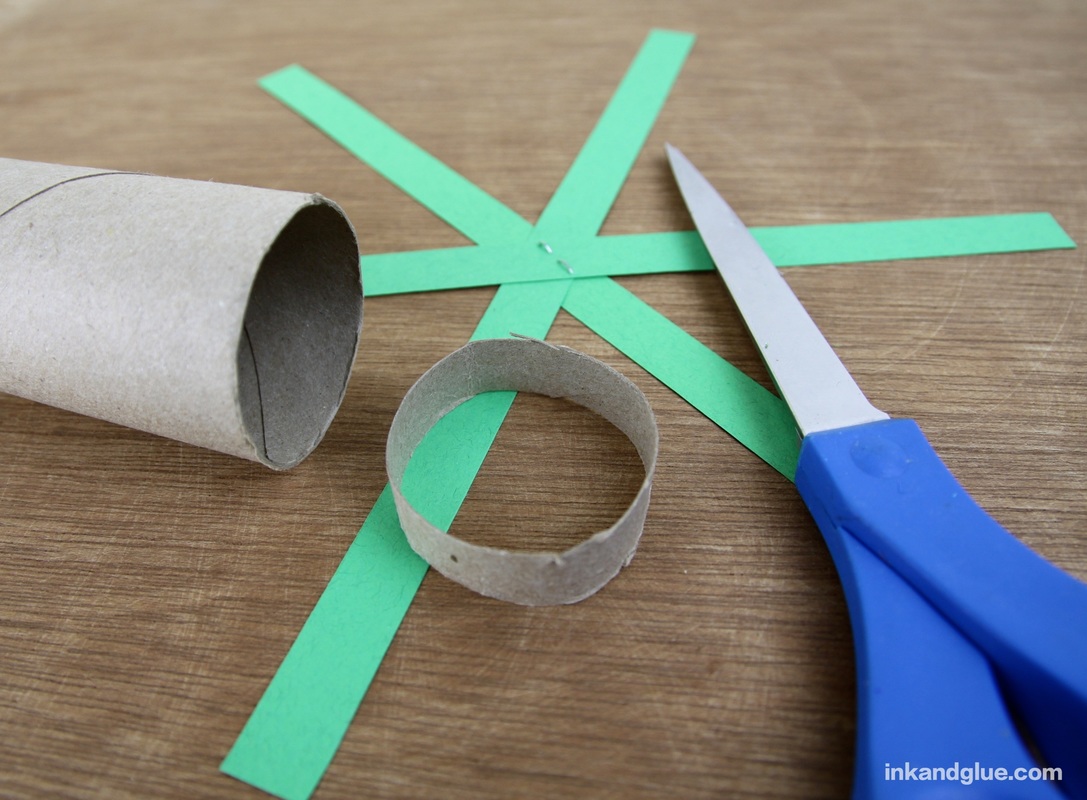
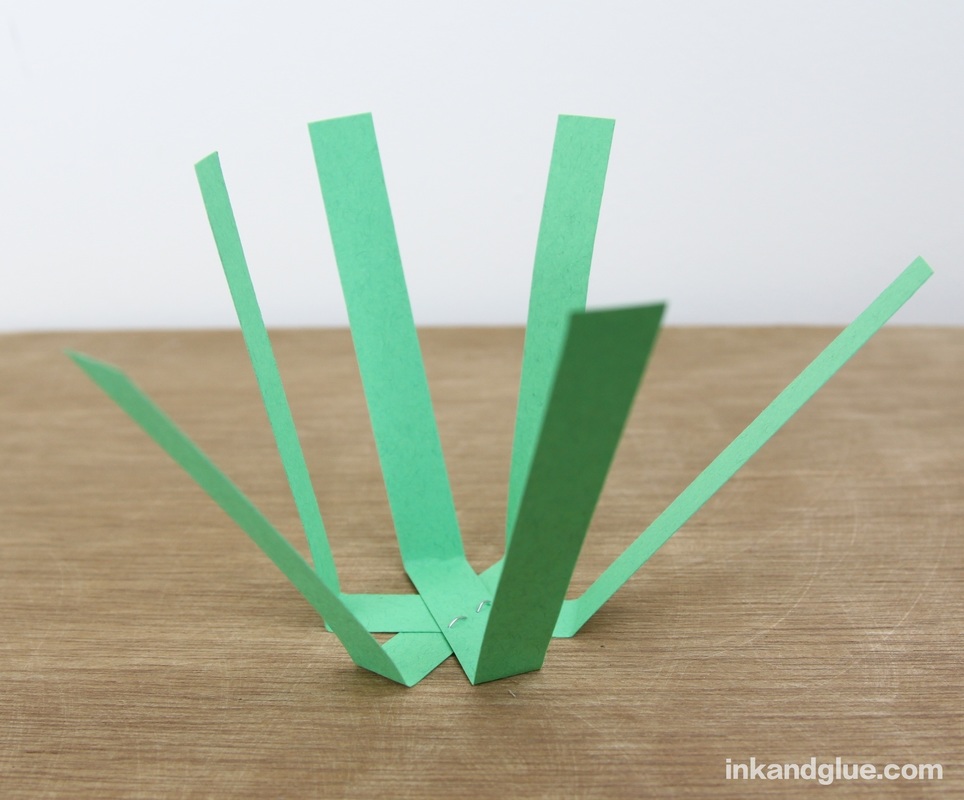
xo!  (I couldn't resist including the bunny shaker from last week in this photo!) A few strips of paper, glue, and a single staple is all you need to make a miniature spring basket you can fill with treats (or a single, treasured egg). Here's how to make one. First, cut half-inch wide, 8 1/2-inch long strips of paper from a few different colors of paper. I used a floral pattern to mix in with the solid construction paper strips. All told, I used 6 strips to make this basket, not including the flower addition. 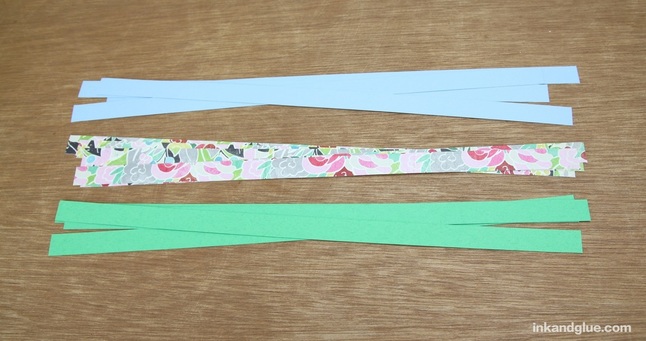
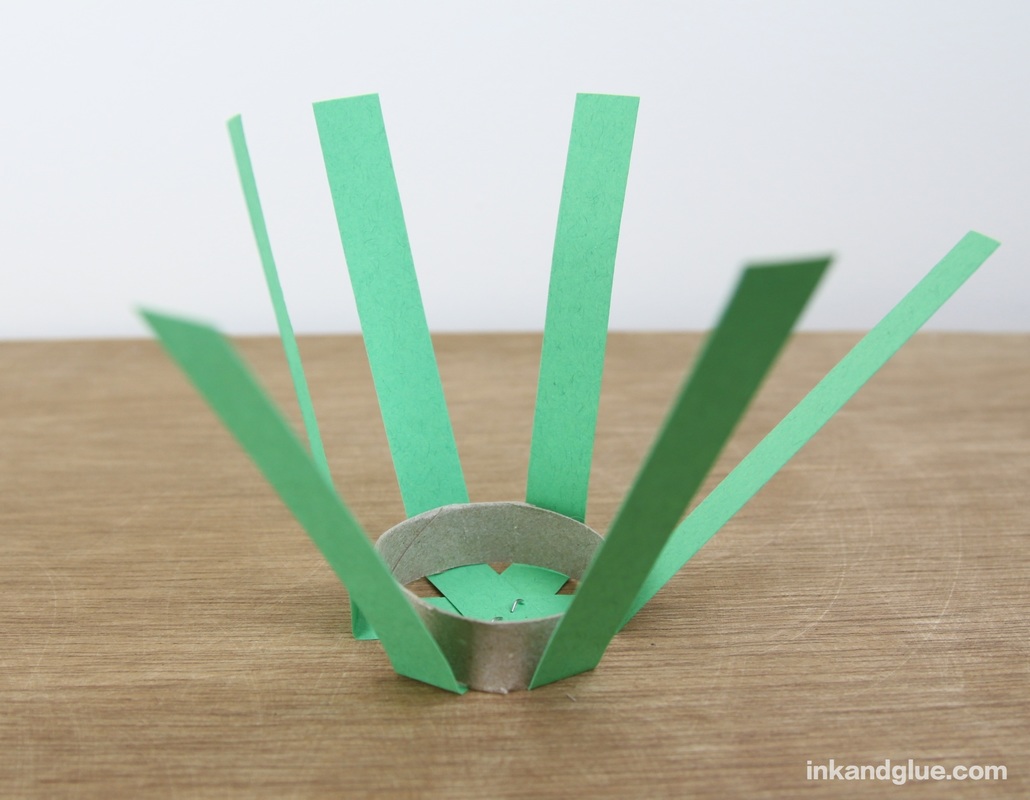
Center the ring on the asterisk, and use it as a guide to fold up the six spokes of the basket. (You can use a jar lid or something else with a round base, of course. I chose a TP tube because you can see through it, which makes it easier to center it.)
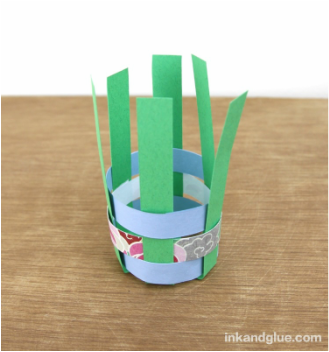
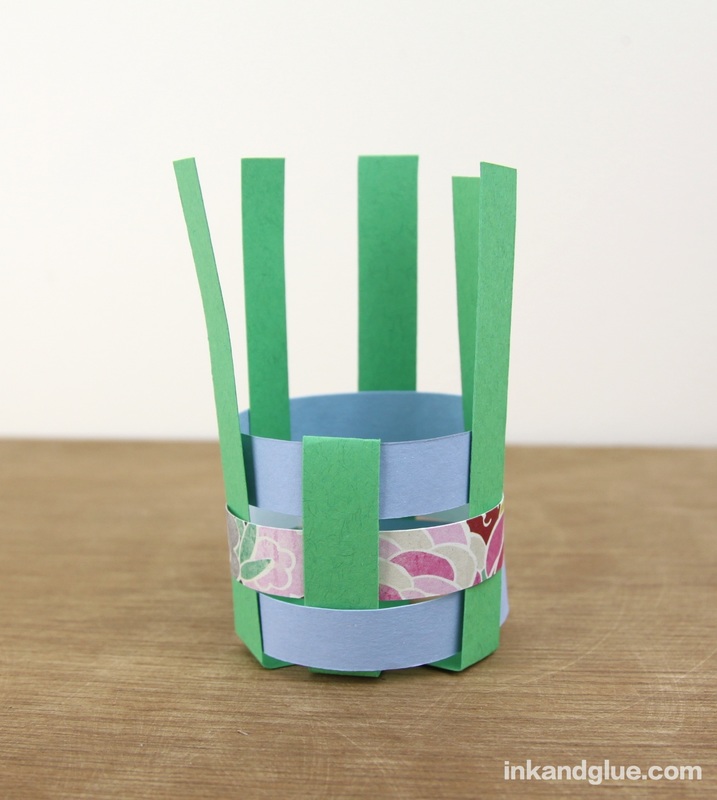
Now, weave a strip into the vertical spokes. Trim the strip so you leave a half inch or so of overlap where the ends of the strip meet. I glued the ends of the strips to themselves, and not to the spokes, so I could move them up and down (or even slide them off and reorder them) if I wanted to. To make the basket more sturdy as you build it, consider gluing the strips to the spokes. It doesn't look like much until you put on the second strip: 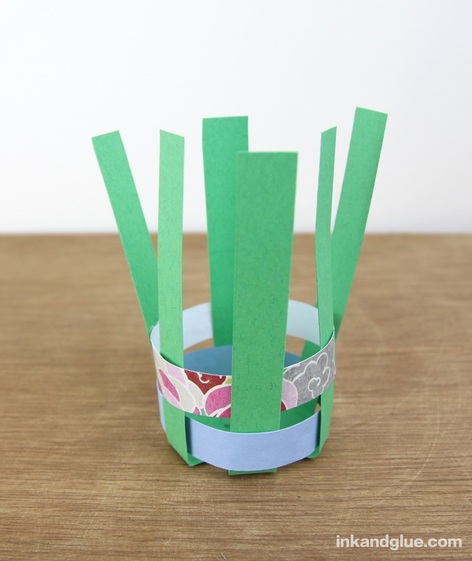
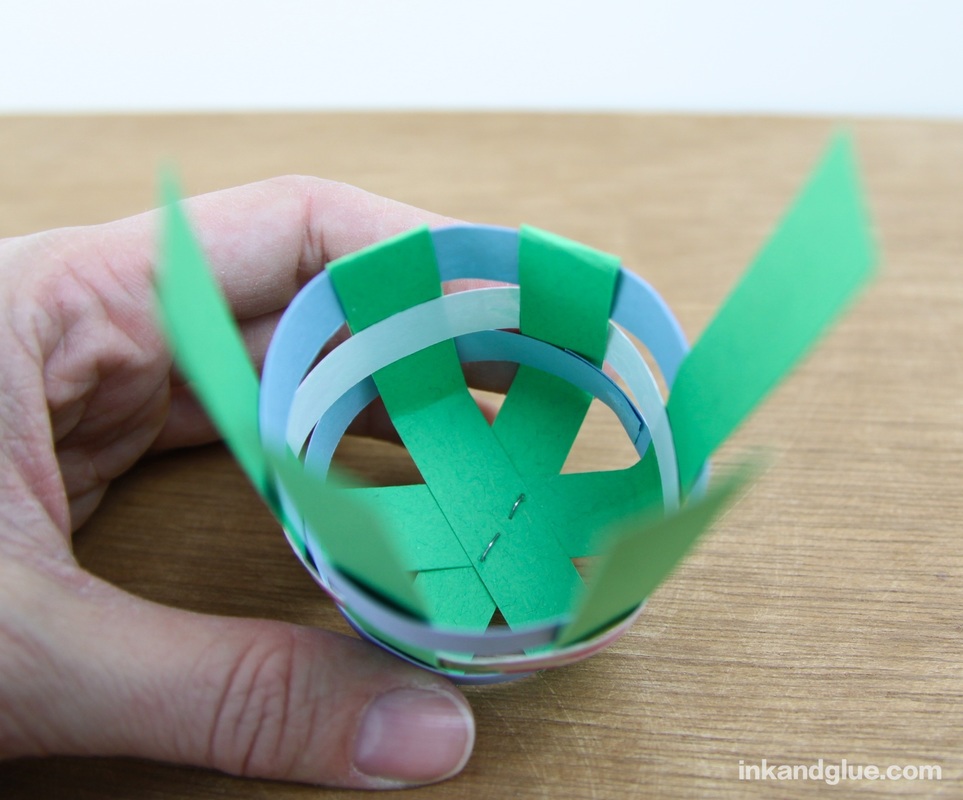
To finish the basket, you're going to fold down the spokes and slip their ends into the weaving. To make everything fit I ended up trimming about a half inch from each spoke. Fold each spoke over the top strip. This means every other spoke will be folded in the opposite direction. The one below left is folded towards the outside of the basket, then the end is tucked into the bottom strip. The one on the right shows a neighboring spoke that's been folded towards the inside of the basket, with the end tucked into the bottom strip. Unfold the spoke, add glue stick or a thin layer of tacky glue to the inside, and refold.
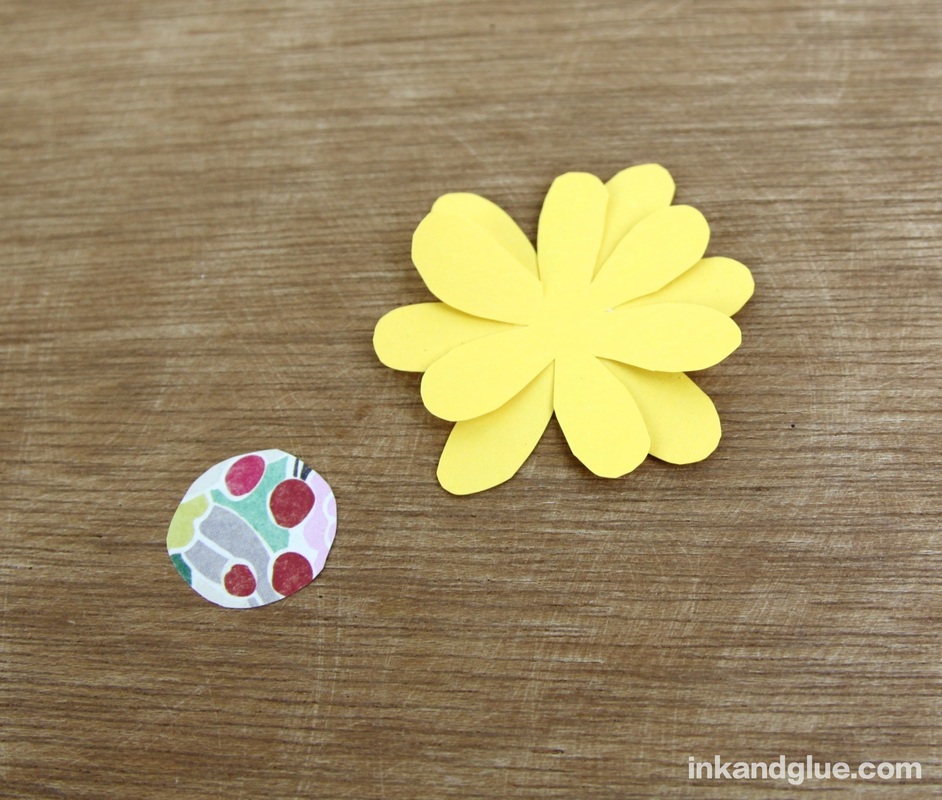
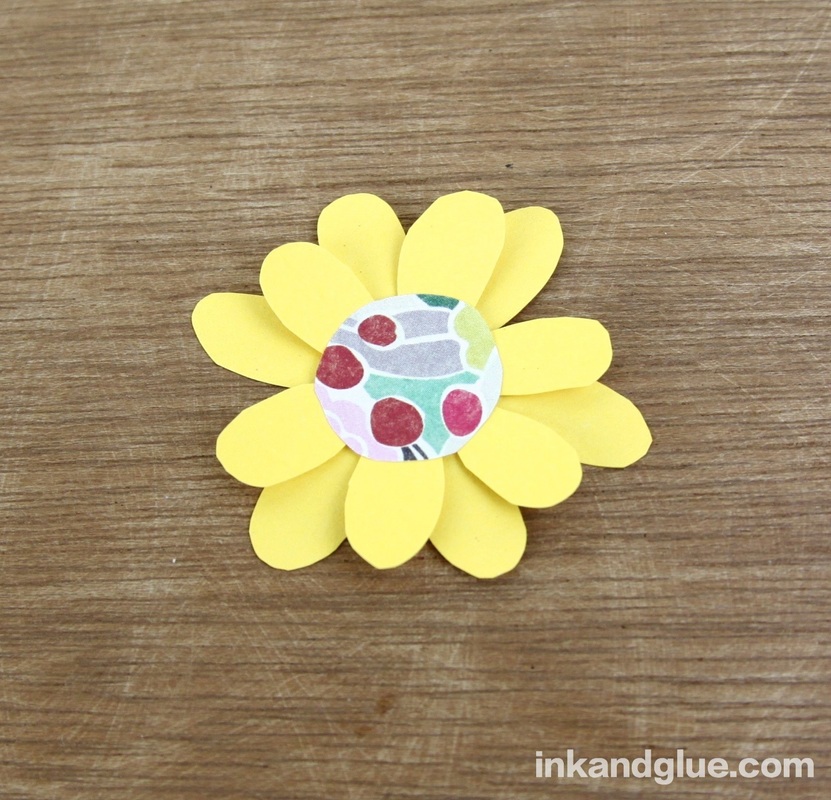
Do this with all six spokes, and you've got a tidy little basket! You can add a handle, or glue all sorts of embellishments to it. I added a paper flower. To make mine, cut out two similarly-shaped flowers, one slightly smaller than the other. Cut a circle from another color of paper. 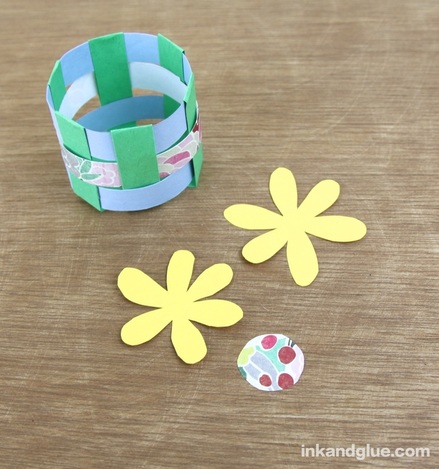 Glue the smaller flower to the larger one, and then glue the circle to the center. Fold up the inner petals a little to add some dimension.
Glue the flower to the side of your basket. Done! I placed a standard-sized plastic egg in mine to give a better sense of its scale. 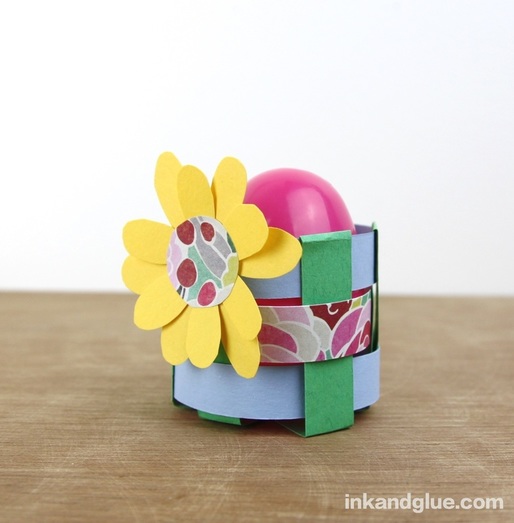 You could easily make a number of these baskets so that each person at your Easter brunch or dinner could have their own. Fill them with candy, if you'd like; I'm partial to Robin's Eggs. 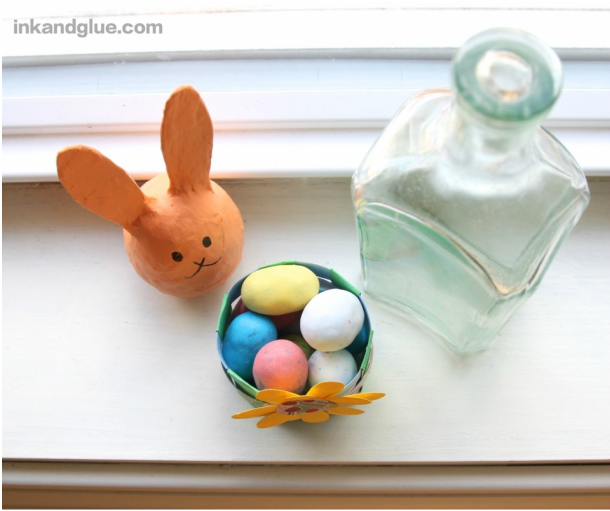 Happy Easter!
xo March in New England is sometimes semi-affectionately called "mud season," and Franklin's been thoroughly enjoying it. Here he is after being mauled (playfully!) by a full-sized Golden Retriever puppy. I think he's half proud, half annoyed: 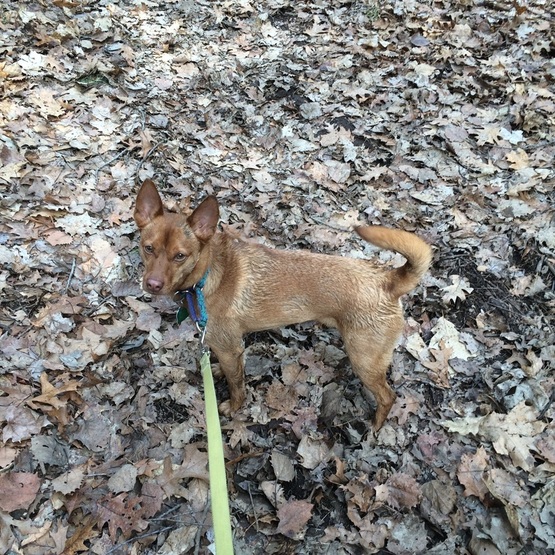 And here he is on a trek down a half-drowned meadow pathway. 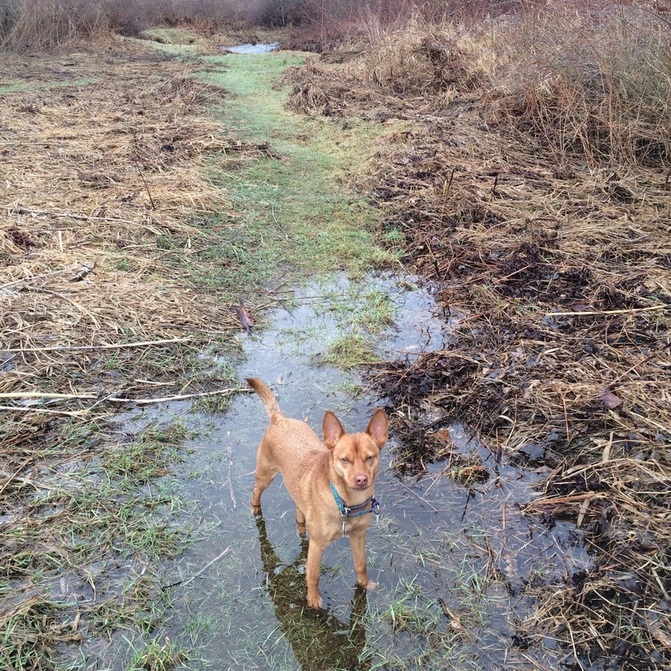 Don't wait for perfect weather to get outside! It's always worth it.
xo Have you ever started a fire using a magnifying glass in the sun? Or, if not an actual fire, have you ever made a pile of dry grass start to smoke, then yank the magnifying glass away in shock because you're afraid of burning your house down? (Ahem.) A company called Atellani in Texas has successfully Kickstartered a tool called Febo that harnesses the focusing power of a magnifying lens not to burn things for fun, but to "draw with the sun" on wood, cork, leather, and more. 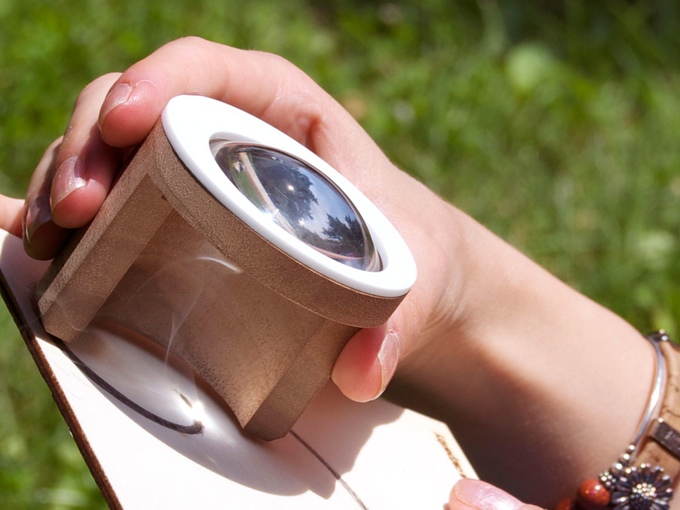 Though much safer for your fingers than a traditional electric wood-burning tool, you'll need to protect your eyes from the focused dot of sunlight the lens creates. Luckily, a pair of UV protective sun shades are included in each order. Febo says the tool is meant for all ages and abilities. 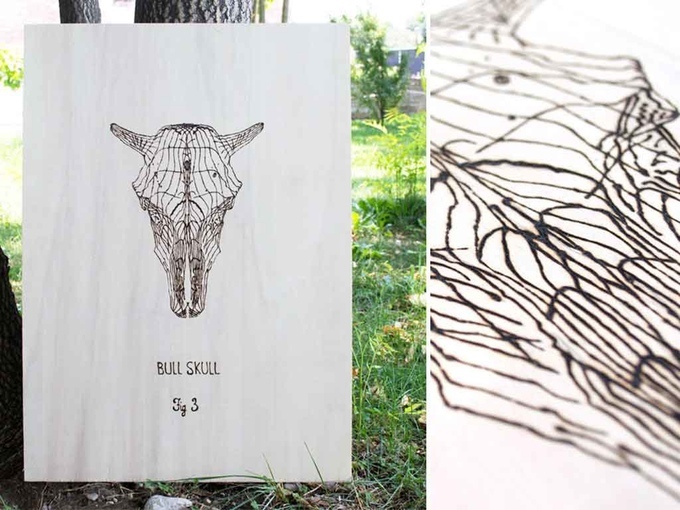 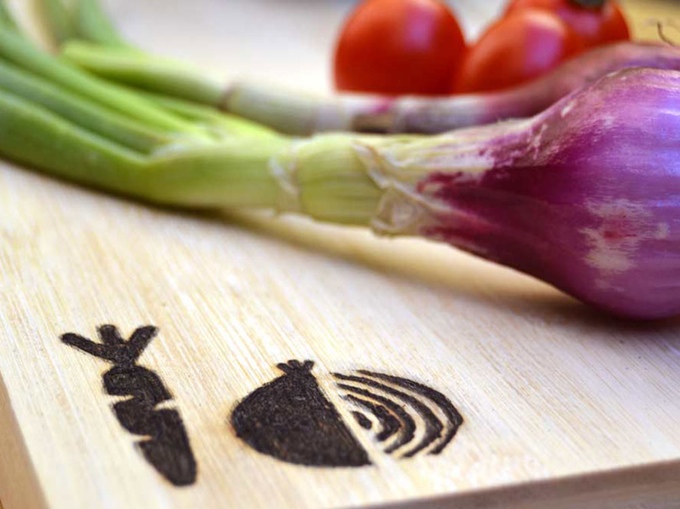 Apparently, if the sun is strong enough, it only takes a couple of minutes to make a design like the one on the cutting board above. Pretty neat! 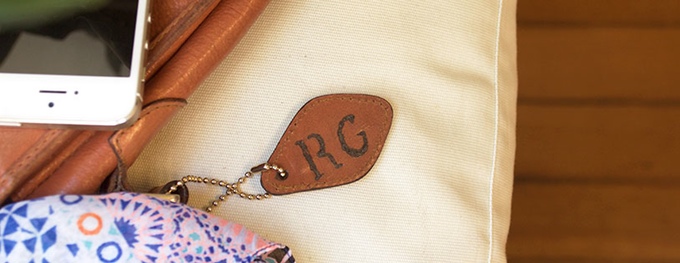 Read all about how it works on Febo's Kickstarter page, and pre-order one here; they start at $59. This is a truly off-the-grid tool, and as long as the sun continues to shine, you'll be able to use it forever!
xo |
Categories
All
Archives
March 2017
AuthorI'm Debbie Way, an artist and writer who enjoys making things. |


 RSS Feed