|
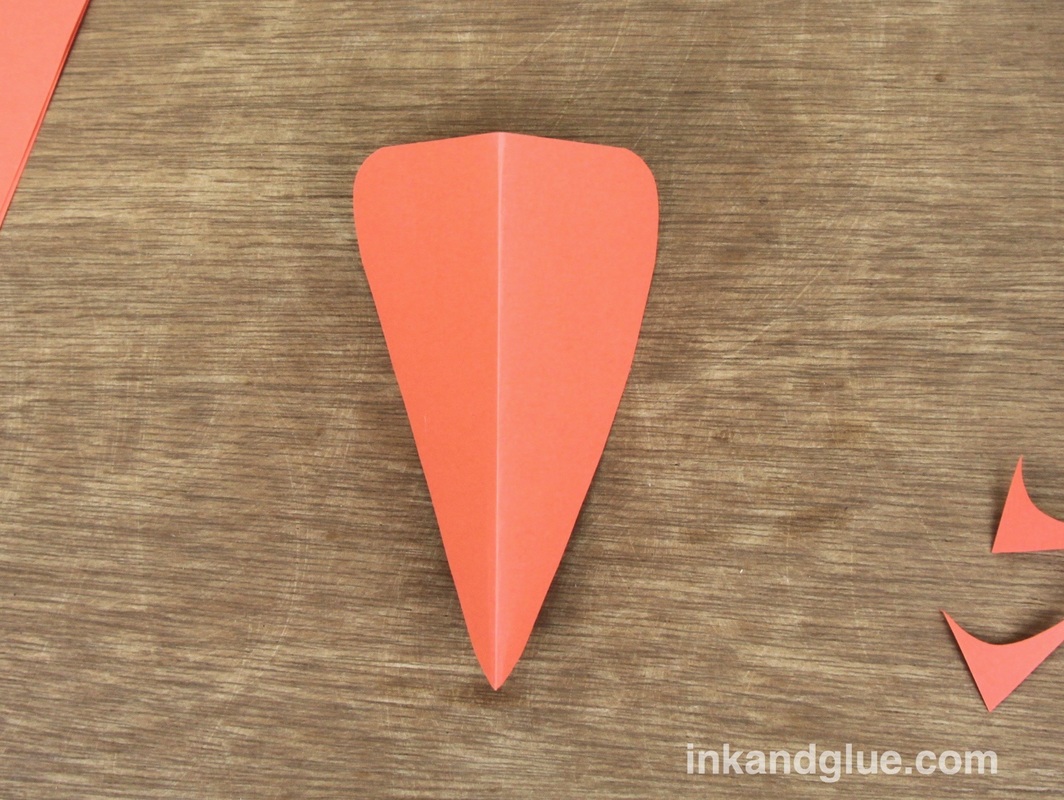
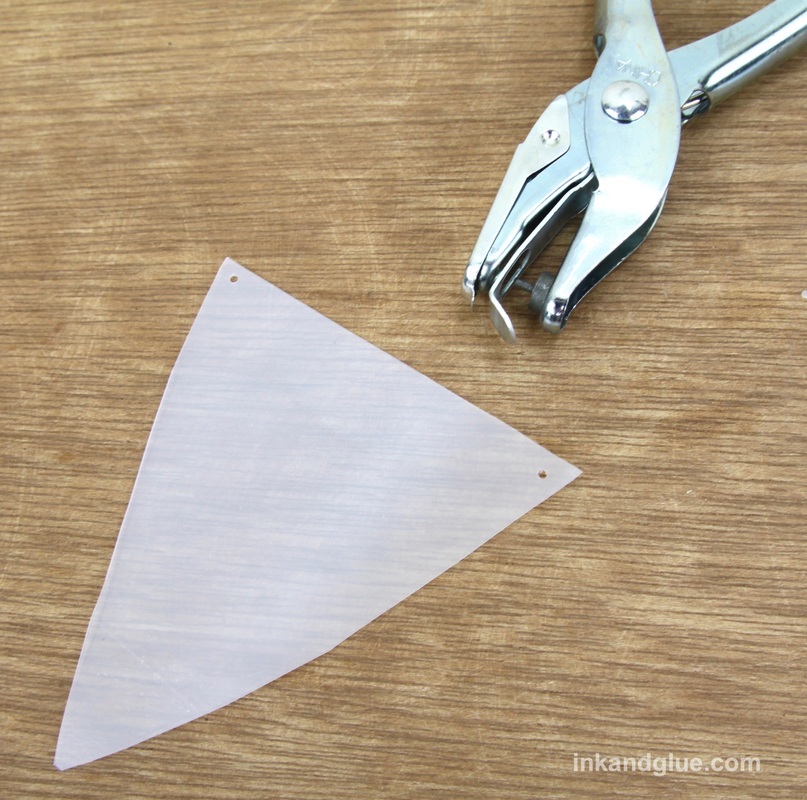
Here's the easiest paper beak ever. It's feather-light, super comfortable, and doesn't interfere with breathing. The only catch is that, unlike 99% of the costume ideas out there, it relies upon a pair of glasses to wear it. Have 20/20 vision? Get a cheap pair of costume glasses; you can glue things to them, which you really shouldn't do with prescriptions (unless you're made of money). Add feathers, and go big: think Elton John. 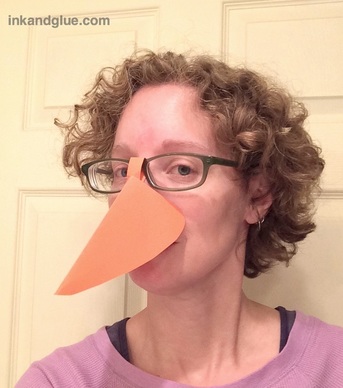 (Yes, that's me, in soft-pants studio-time mode.) You only need a piece of paper, scissors, and glue for this — really! Start by folding a piece of beak-colored paper in half. Cut a triangle with the fold along what'll be the top ridgeline of the beak. Trim your folded beak piece to shape and round the corners a bit.
This is what mine looked like when it was shaped as I wanted it.
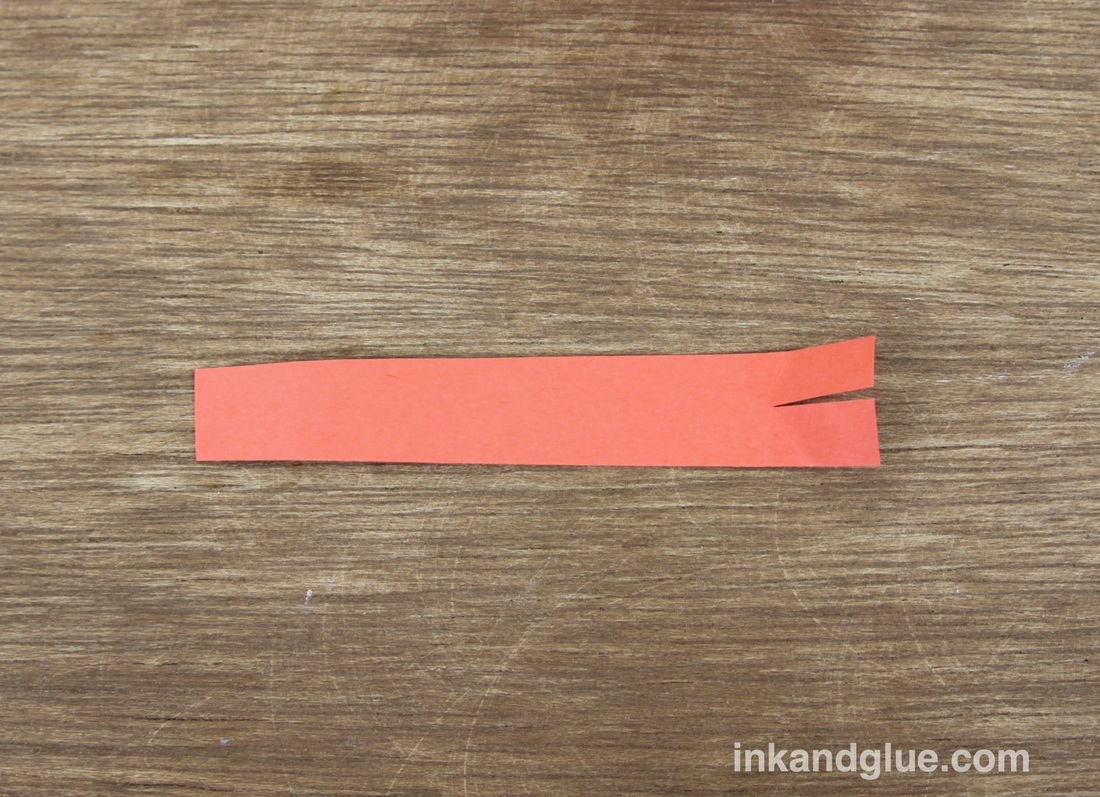
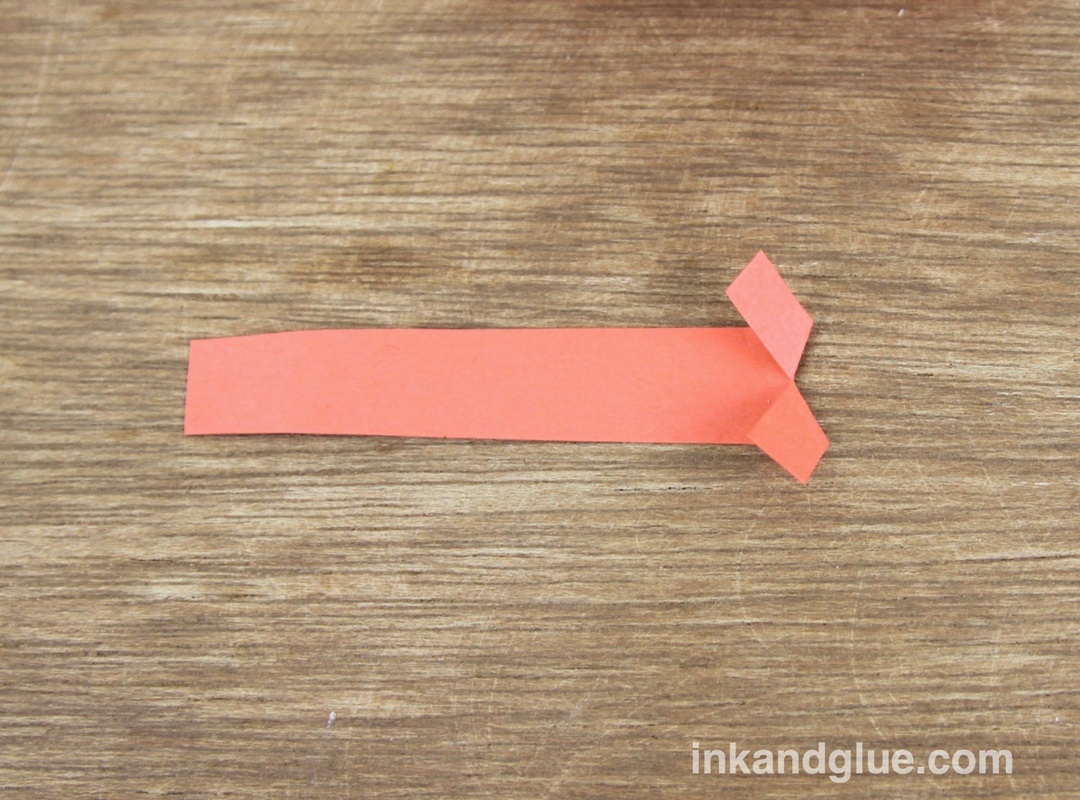
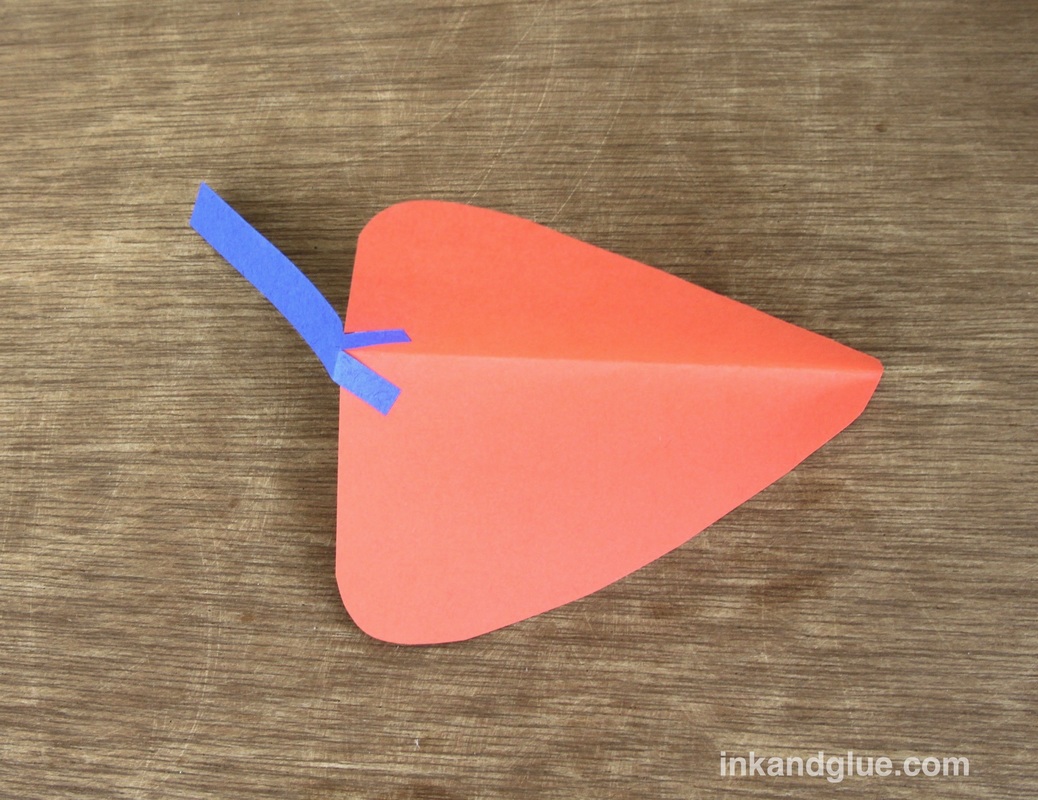
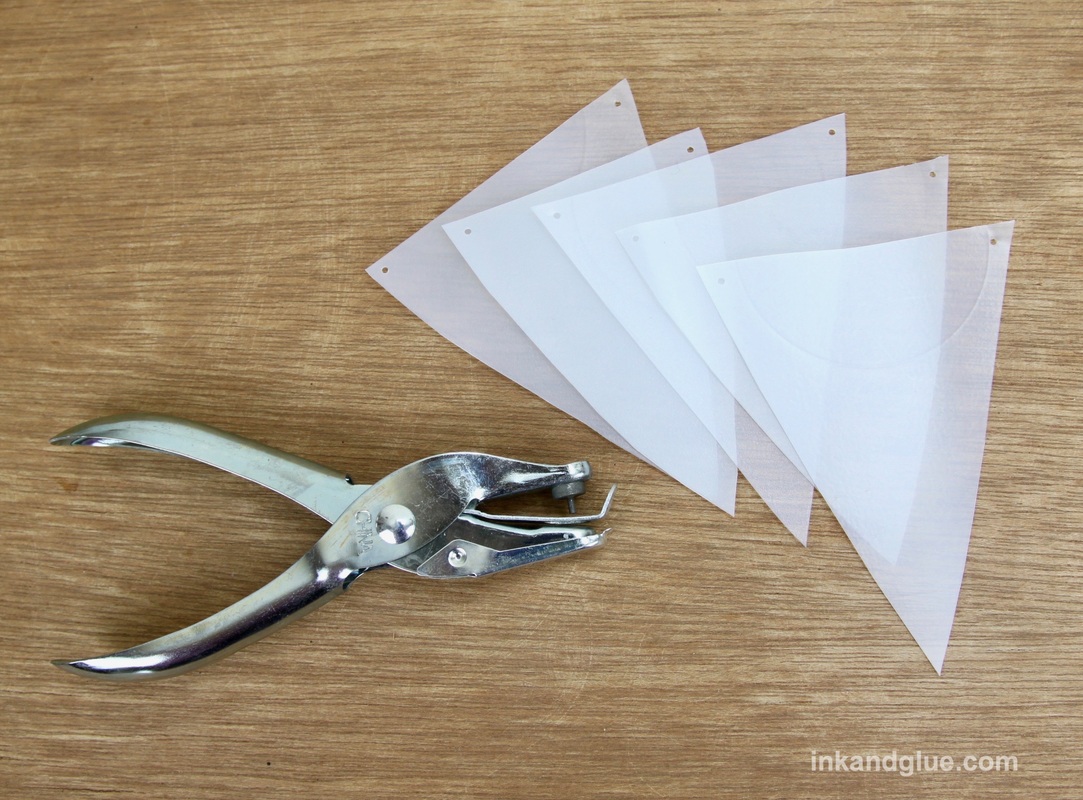
Next, cut a third- or half-inch-wide strip of paper that's about three inches long. Make a cut about a half inch into the center of one short end of the strip. Fold up the resulting tabs at 45-degree angles, as shown.
I'm using a blue strip of paper for the next steps to make it easier to see. You're going to glue the folded-in tabs to the inside of the fold at the wide edge of the beak. It feels a little counter-intuitive, so make sure you're not accidentally gluing it the wrong way. At left, you want to put glue on the sides of the two little tabs that are facing away from you. The photo at right is like one of those optical tricks where you don't know if the thing you're looking at is convex or concave. Here, it's concave — the middle fold is further away from you than the outer edges.
Here's a photo showing what the beak will look like if all has gone well. If it hasn't, just tear it off and try a new strip in the same place. The glued-on tabs will be hidden inside the beak, so no worries. 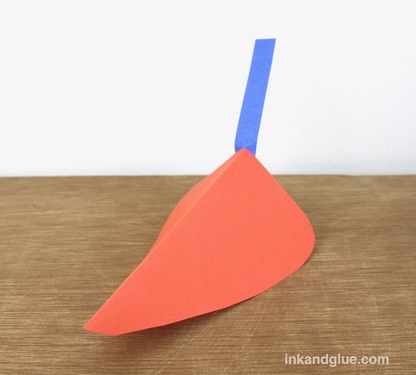 Now take your beak to a mirror, and slip the tab over the nose piece of your glasses. Fold the paper around the glasses. Tape the strip to the underside of itself, if you want a slightly more permanent hold. 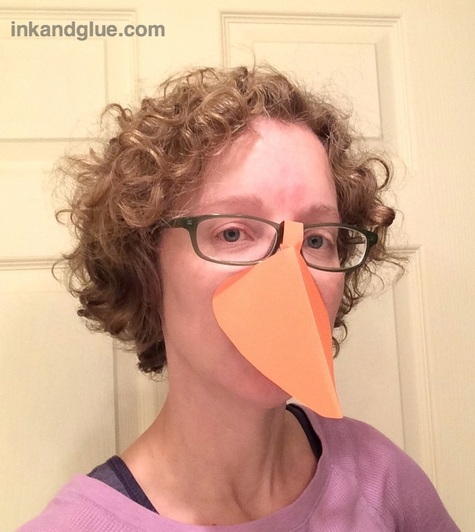 Finito! If you want your beak at more of a jaunty, upright angle, try changing the angle of the short side, as shown below. In that photo, the folds of the two beaks are at the top. The top beak has the same angle as the one I'm wearing; the bottom will point the beak a bit more skyward. 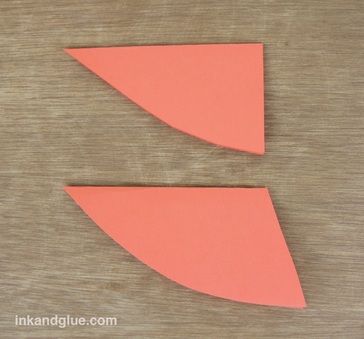 IIIIIIII (that's Woodstock-speak for xo)
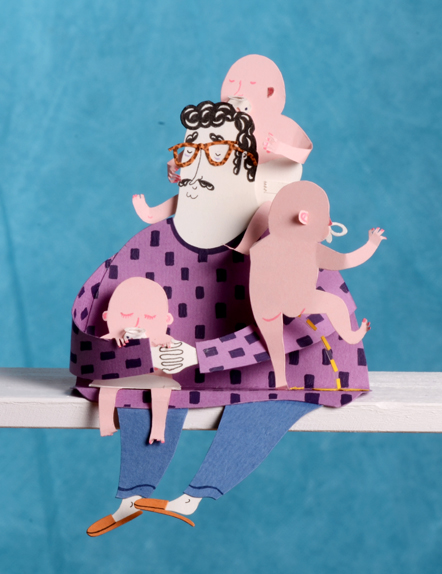
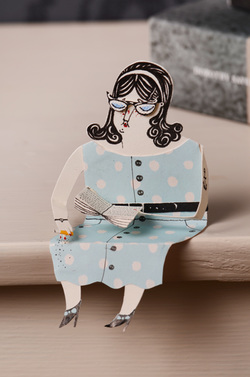
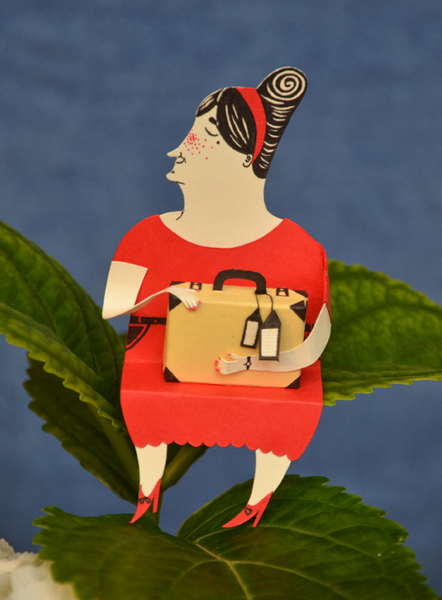
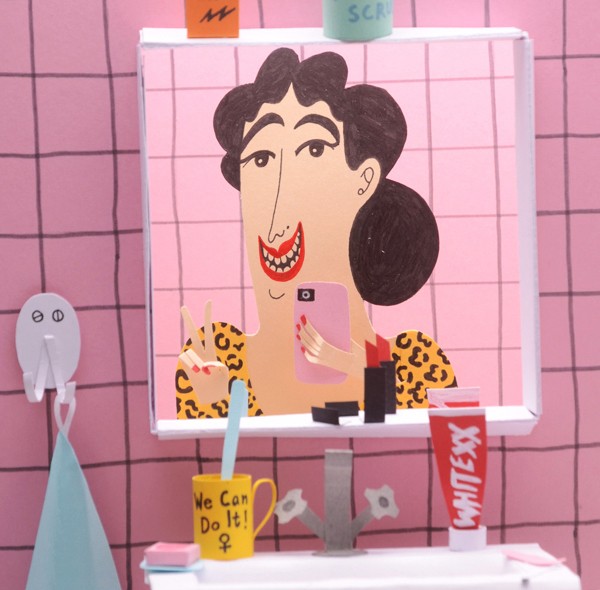
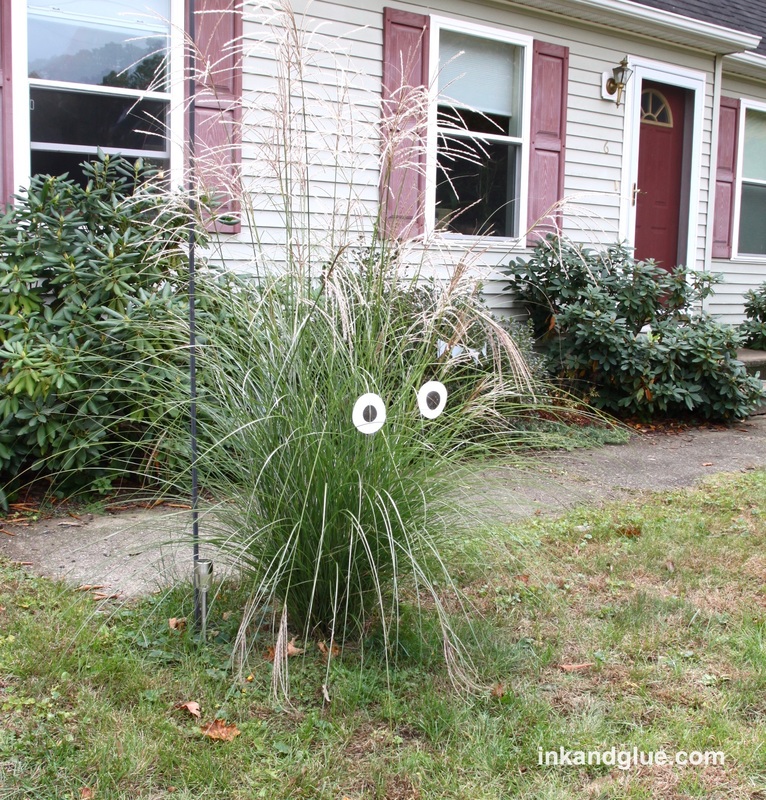
A Facebook follower in Arizona made a yard monster! I think he used disposable plastic bowls for the eyes, which is a nice variation. What a happy desert-dwelling guy! 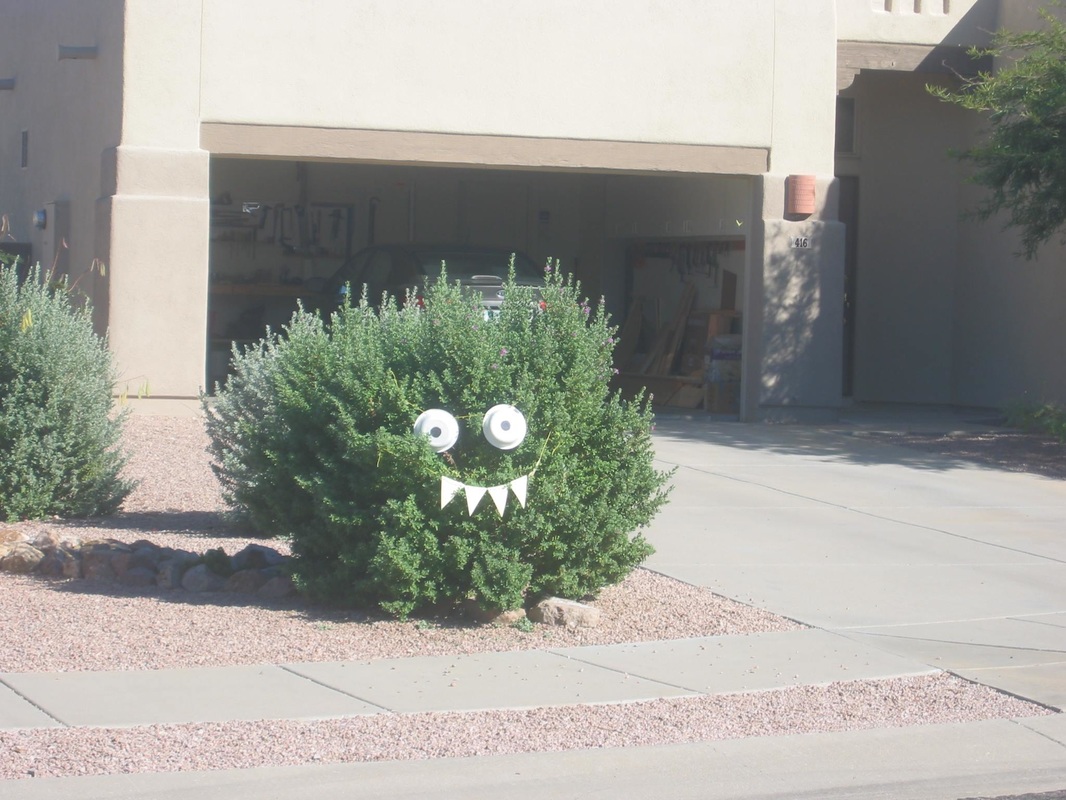 Have you met Malin Koort? She's an artist and illustrator in Sweden. She creates detailed, cut-paper scenes and characters in her distinct style. She has a series of paper people that are utterly charming and detailed. I love the ashes falling on the reading woman's knee, and the slippers of the overwhelmed papa.
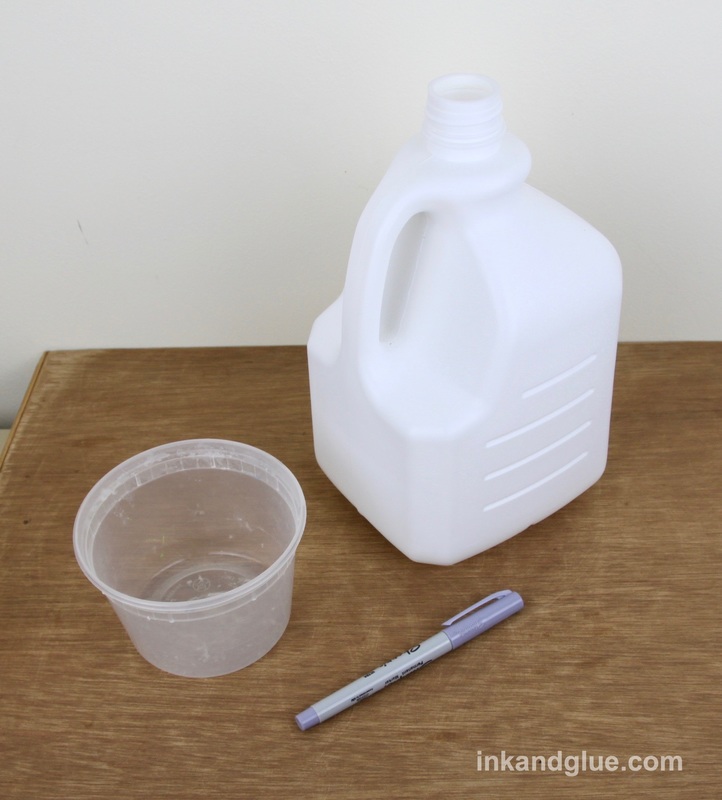
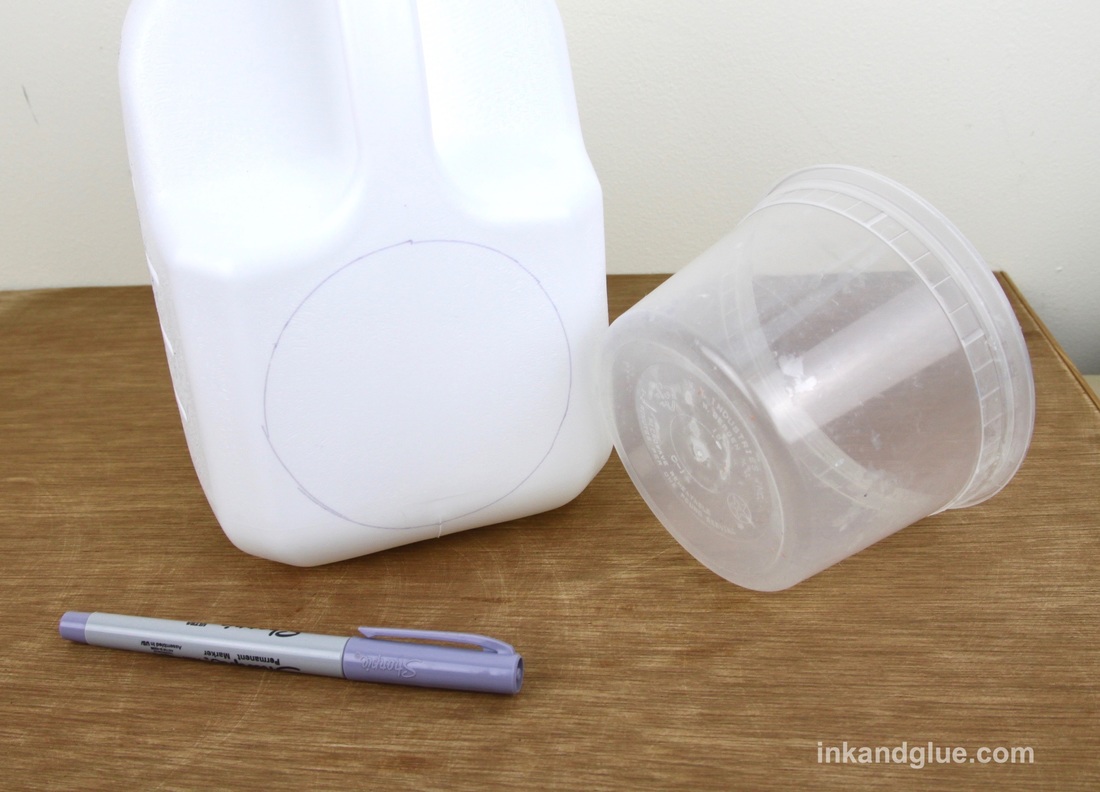
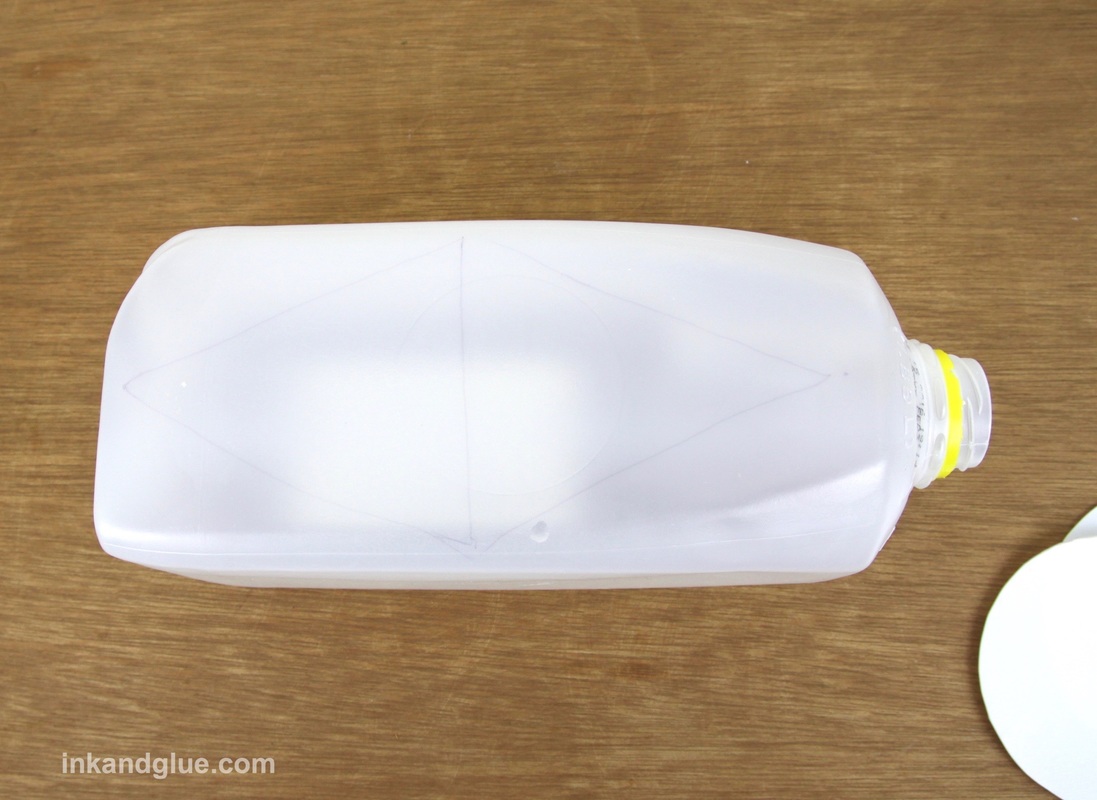
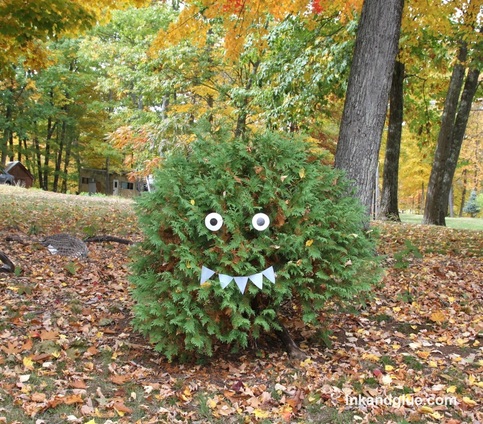 Need a yard monster for the upcoming Halloween holiday? Of COURSE you do; everyone does. Here's a way to make one that's both quick and nearly free. Start with two white or white-ish plastic beverage jugs that have been emptied and swished with clean water. Find a round thing (such as this leftover Chinese soup container) that has a diameter that will fit on one of the flat surfaces of your largest jug. Trace the circle onto the jug twice.
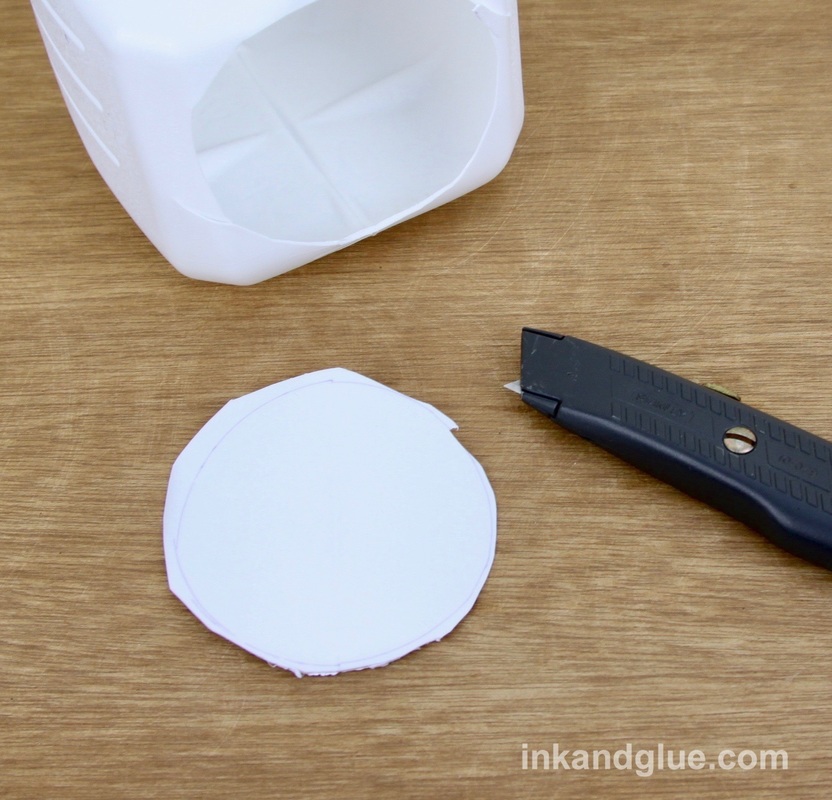
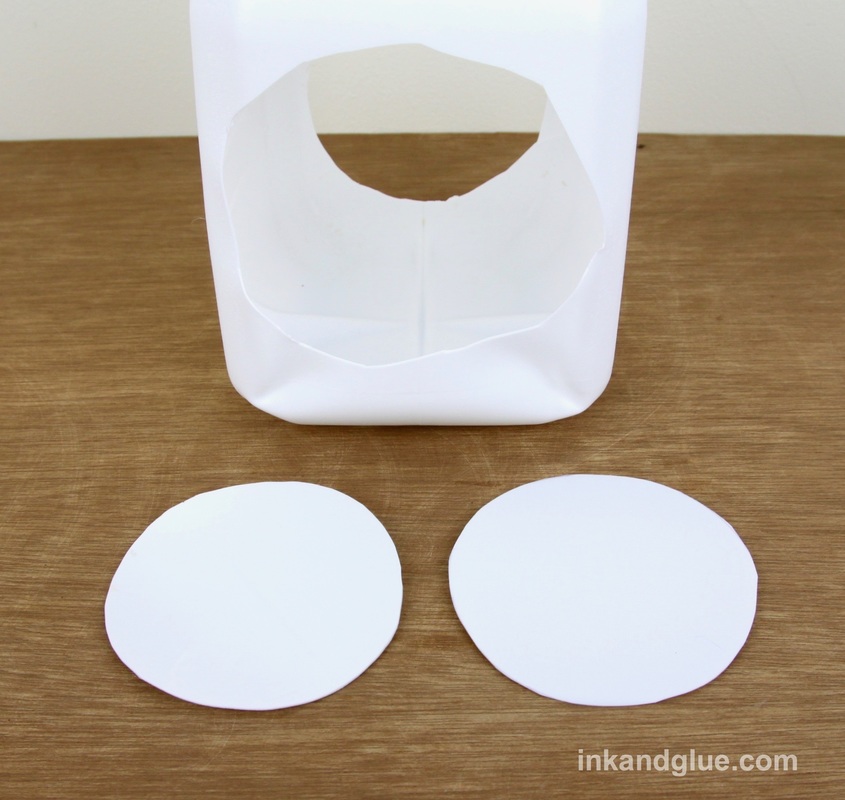
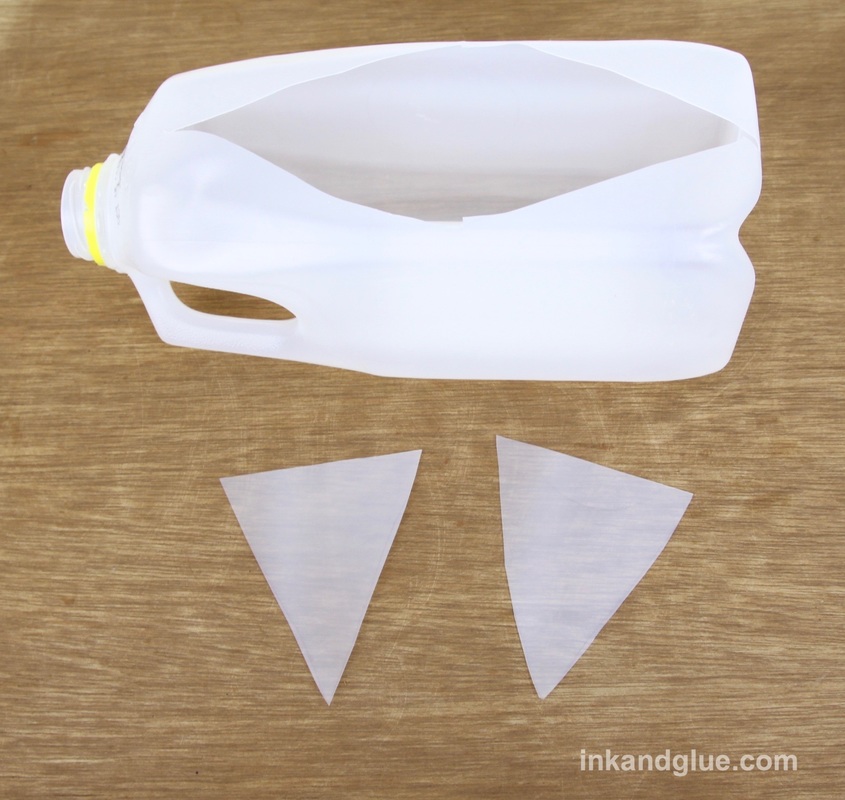
Use a utility knife to cut the circles from the jug. I cut them out pretty roughly, and then trimmed the circles neatly with scissors.
On the second jug, sketch five or six large triangular teeth on the flat panels and cut them out as you did above. My second jug was much softer plastic than the first, so I was able to just use the utility knife to start a hole, and used the scissors to cut out the shapes.
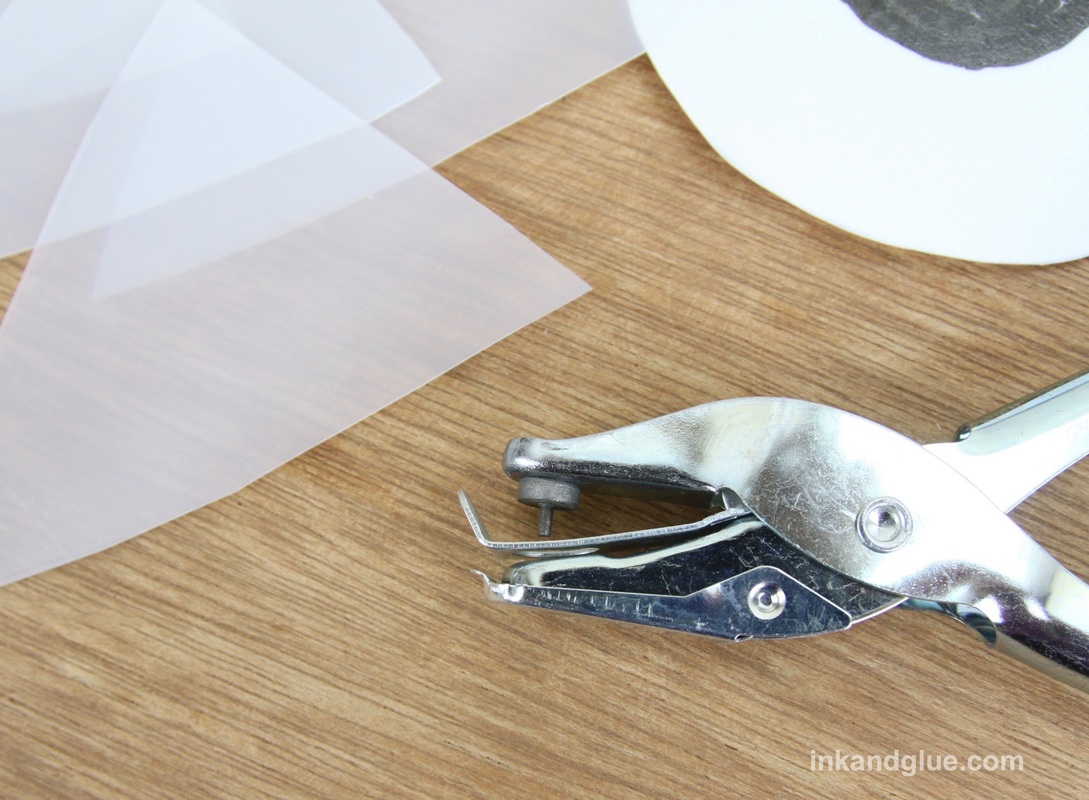
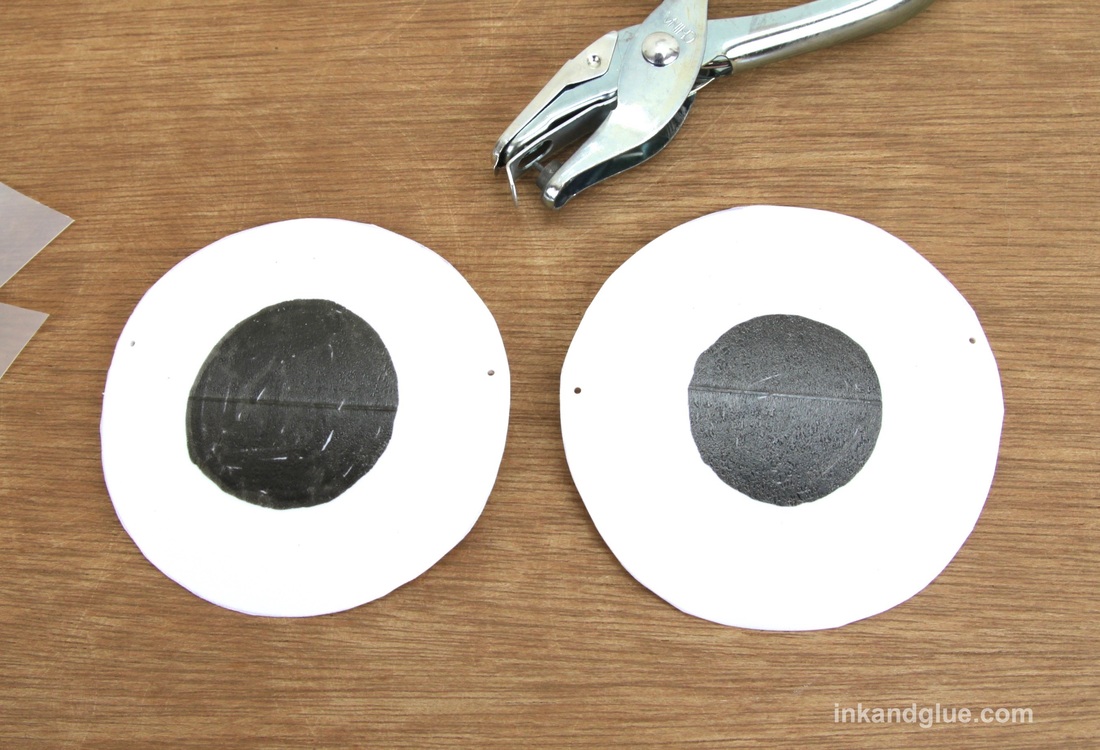
Draw pupils on the circles with black permanent marker, and let the ink dry (just a couple of minutes). As long as you don't rub and scrub, the ink will stay on the plastic in the rain.  Now you'll be punching holes in opposing edges of each eye and the corners of each tooth. You can use a large tapestry needle, or a pushpin (wiggle it to enlarge the hole), but I use a hand-held, 1/16" hole punch. I recommend it.
Punch the holes within an eighth to a quarter of an inch from the edge. For the teeth, only punch holes in the shorter two points; leave the tooth tip un-holed.
Cut two yard-long pieces of fishing line (aka clear plastic cord). Weave one cord length through the holes in the teeth. Tie a large-ish loop near each end of the cord. 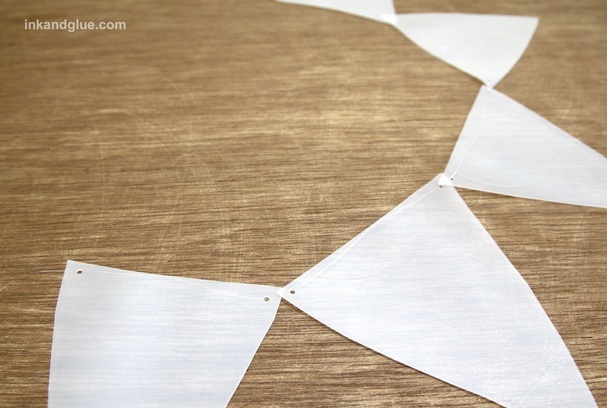 Feed the other cord length through the holes in the eyes, looping the cord through twice — this will keep the eyes from sliding freely, but will still let you slide them along the cord's length if you need to. Tie a loop at each end of this cord, too. Note: It is very difficult to photograph "invisible fishing line." 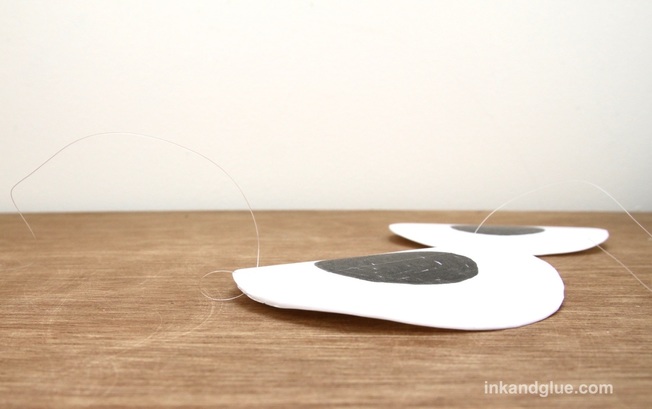 Head outside with your eyes and teeth and find a suitable shrubbery to enliven. Hang your eyes and teeth row by hooking the loops around any semi-sturdy part of the bush. Don't be afraid to do some minor pruning if you need to. I kept mine au naturale, but it took patience to get everything to lay correctly and neatly. 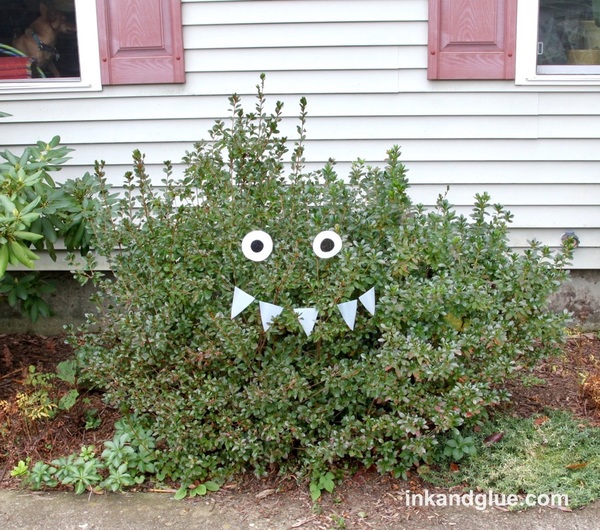
Last weekend I went to one of those pop-up Halloween superstores where you can buy an entire costume set (outfit, mask, props, makeup) for, like, $15. It's almost too easy. Why, back in my day, the only affordable "costume sets" were like this one: 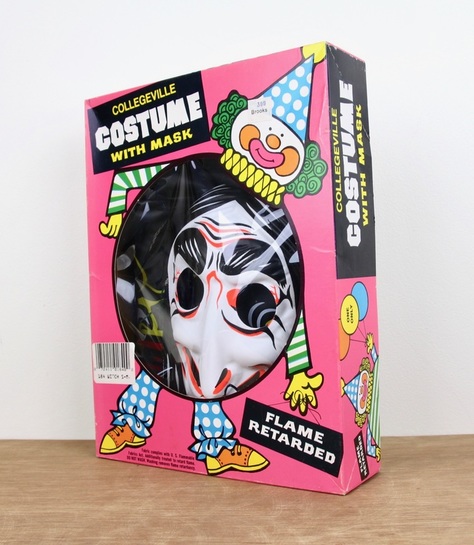 I can't remember exactly where I bought this, but it wasn't a vintage store or a Goodwill. I think it was an old, fading discount store, like a Caldor or Bradlees. It was sometime in the mid to late 90s, and seeing as this thing was manufactured in 1982, it wasn't all that old to begin with. It just looks like it was designed in the 60's. And probably was. 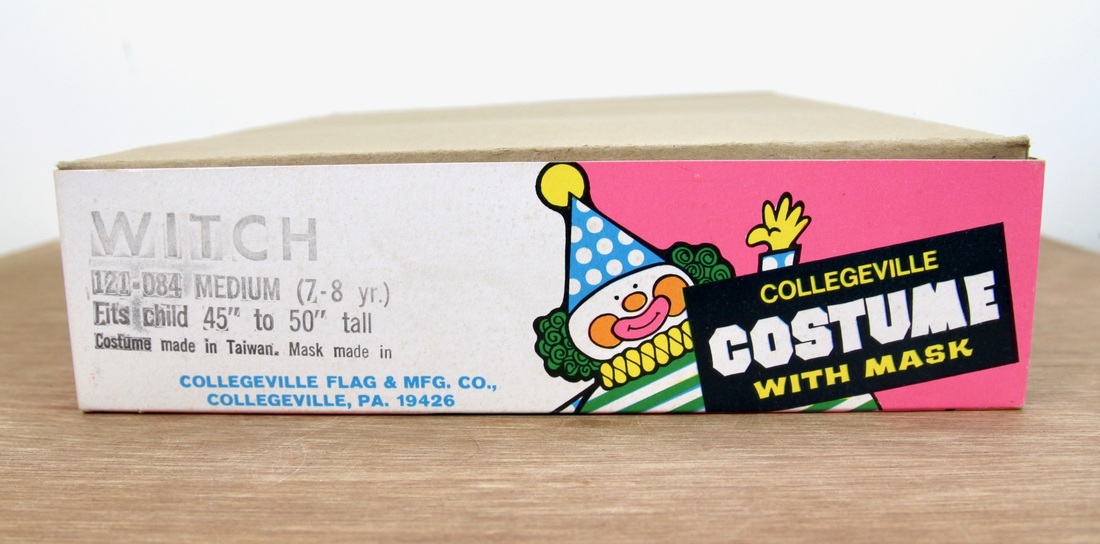 If you're unfamiliar with this genre of costume, it's quite simple. You get a plastic mask, and a plastic shirt/smock with an image of the thing you were supposed to be — not an image of the clothes your character would wear, but a picture of the entire character. So, so disappointing. 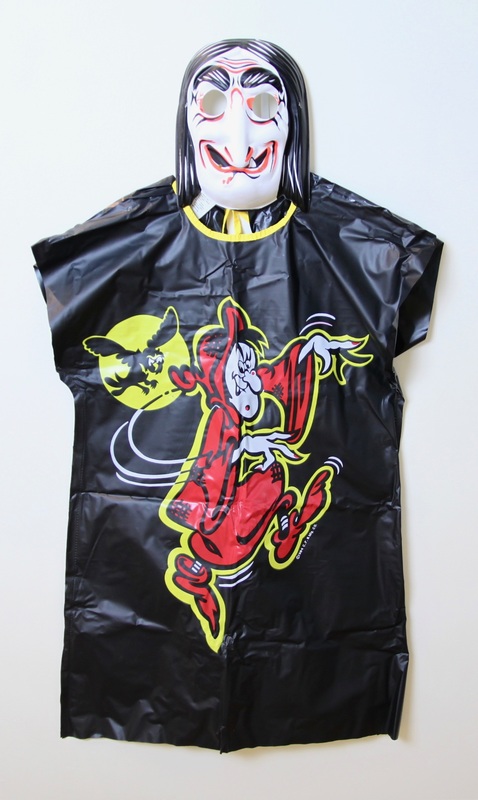 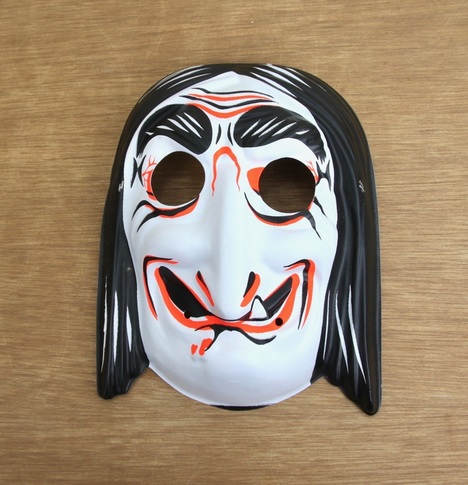 I think the mask is great, from a design and graphics standpoint. But, come on: Would a witch wear a shirt with a witch on it? It doesn't make sense. The witch on the shirt is wearing a red robe, just make the smock out of red plastic! I'd even be ok with it if you threw the owl on there.  I actually wore this one Halloween back in my 20's, when irony was at its apex. Wearing this tight plasticky smock thing and some leggings was the closest to a "sexy" costume as I ever wanted to get.
For more drug-store costumes of this sort, check out Plaid Stallion's Collegeville Costumes catalog from 1983. It is a delight. xo! I've been laid out with an energy-sapping cold for most of the week (which is why there haven't been new posts appearing here). Franklin has been enjoying my near-constant presence on the sofa. Here he is sleeping on my blanketed legs. 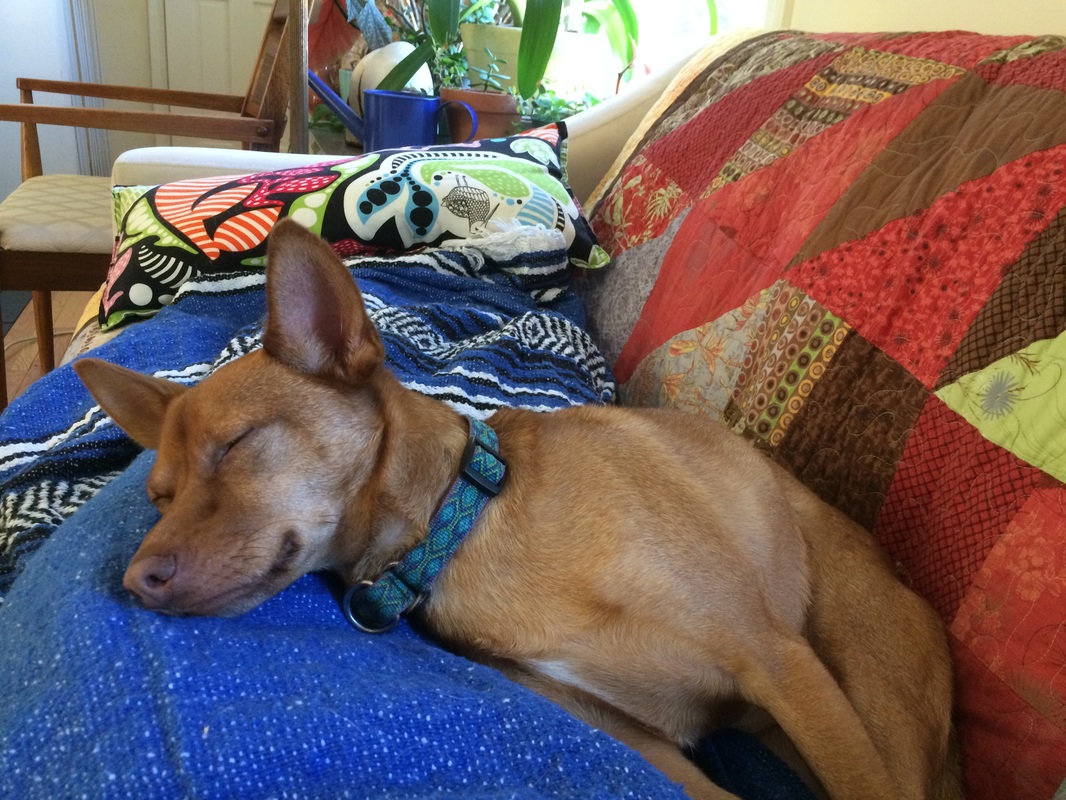 Here's to healthier days ahead! xo
Well, not the LAST warm days ever, but the last ones we'll likely get for several months. Gotta soak up all of the hammock time we can. 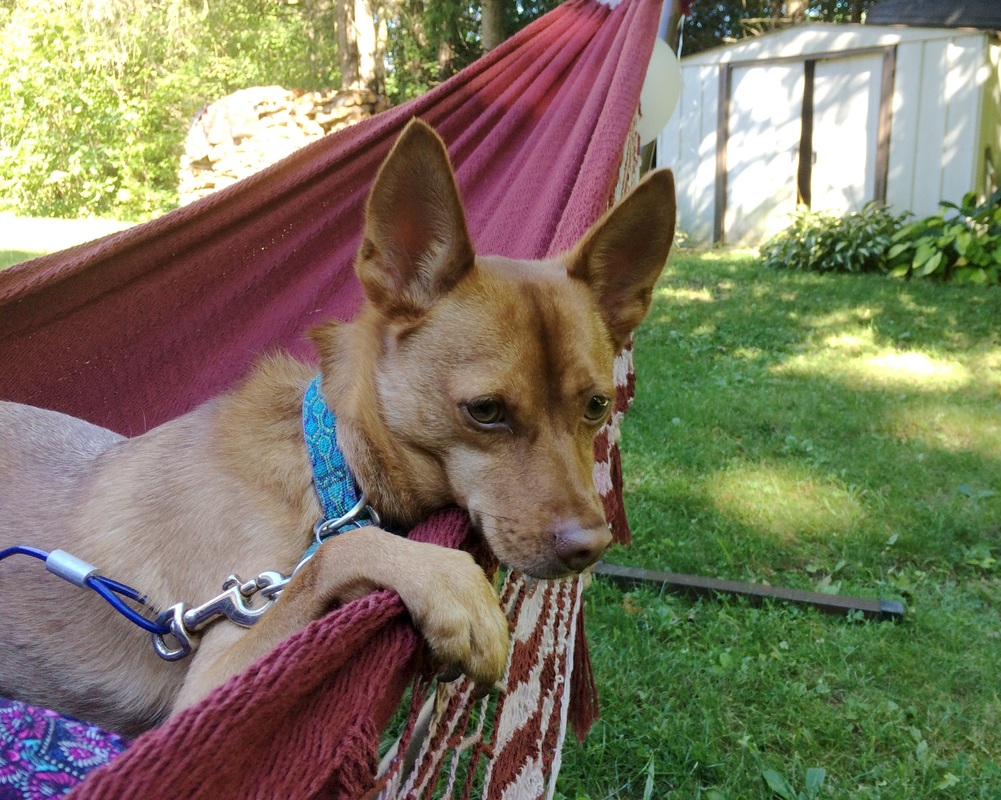 xo!
The printmaking from scraps chapter continues from yesterday! Here, Alkema gets into more traditional print-making materials, before going on to recommend using a tin can for rolling a print onto a surface. Sounds good, but make sure you tape up the sharp edges inside or you might slice open a finger or five. Also, I assume his version of tissue paper is more like today's newsprint paper — sturdier than flimsy tissue, but still relatively lightweight. 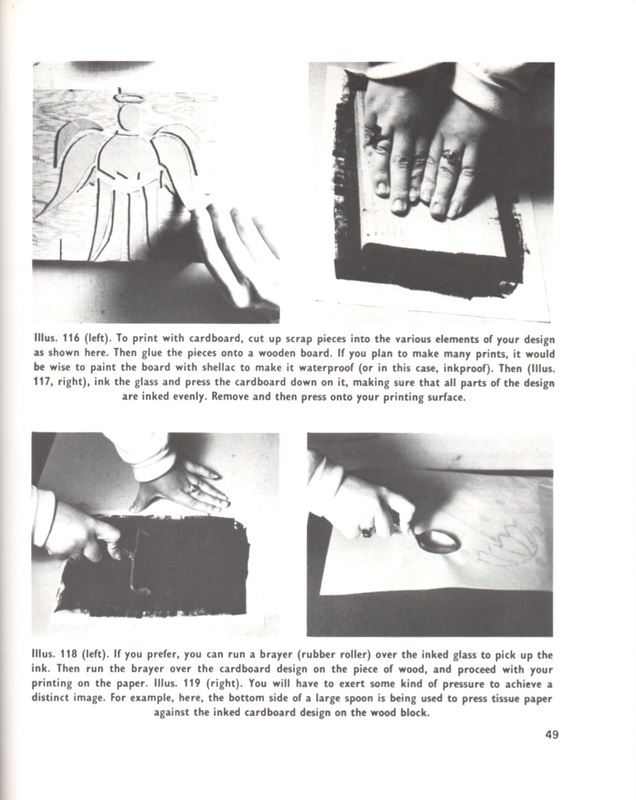  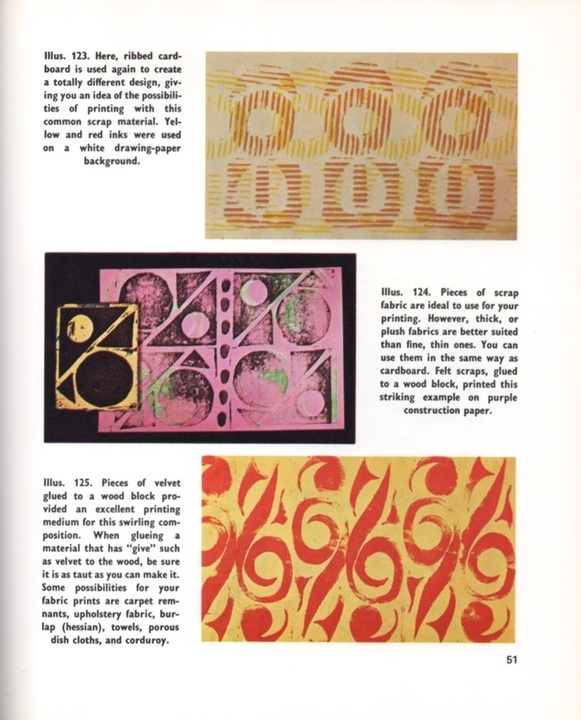  ["Semi-Boneless Hams"?]  I love this stuff. Lots of fun DIY Christmas gift ideas in here — for making cards and wrapping paper, but also for embellishing dish towels, placemats, tote bags and more.
xo! Here's another excerpt from our friend Prof. Alkema, of Alkema's Scrap Magic (c 1976). This time, it's all about making printed paper with items bound for the trash heap. I dig it. There are actually a lot of good ideas here, for both what things to use, and how to use them to make various patterns and shapes. (However, it's much more difficult to get your hands on plastic hair rollers than it used to be...) Take a look. 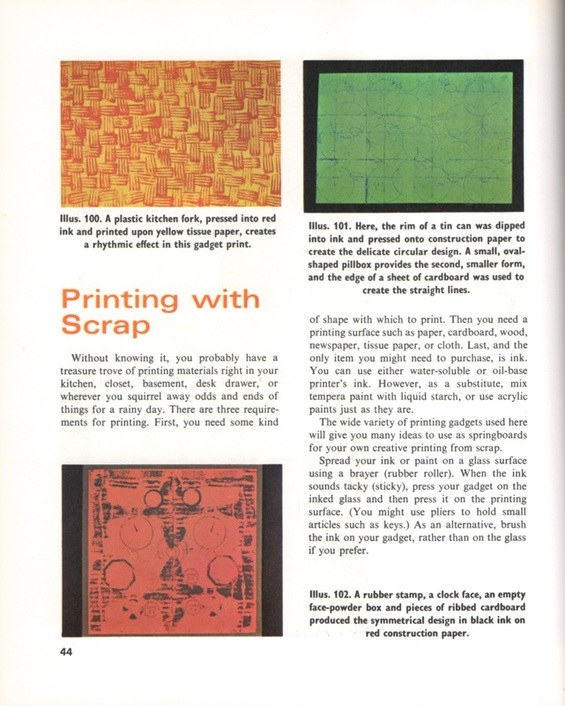 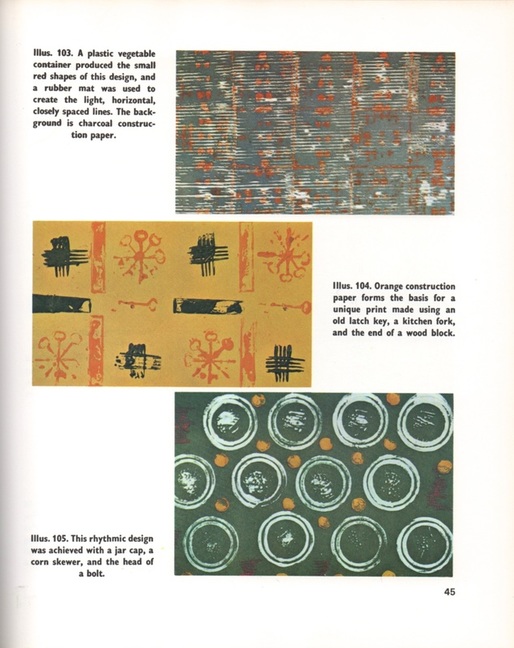 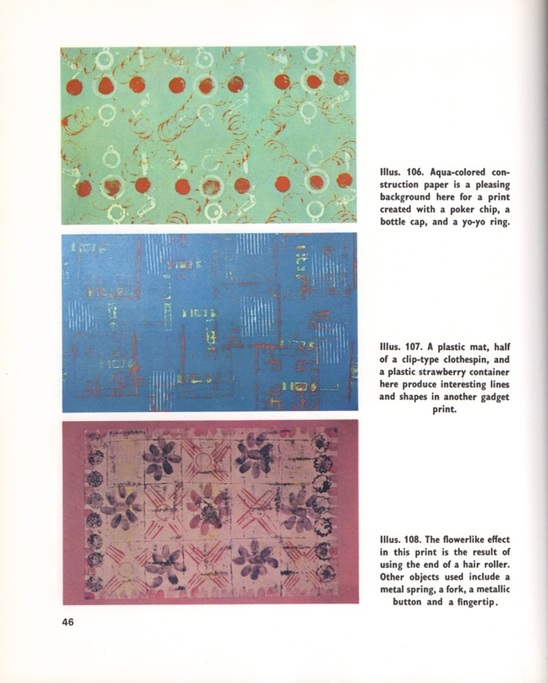 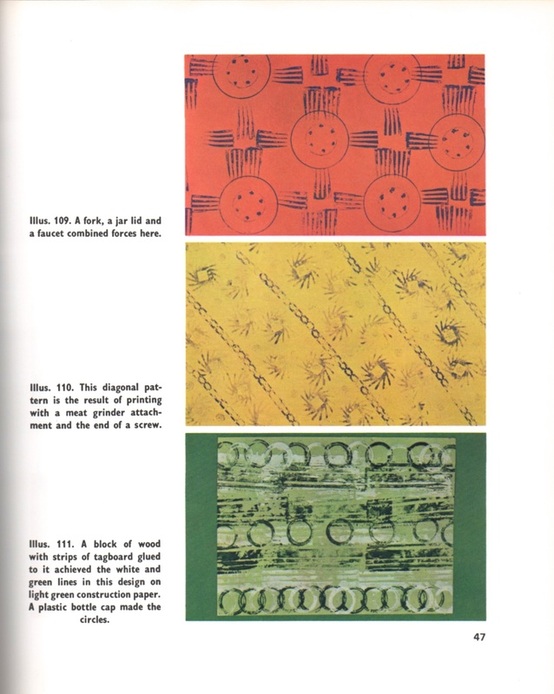 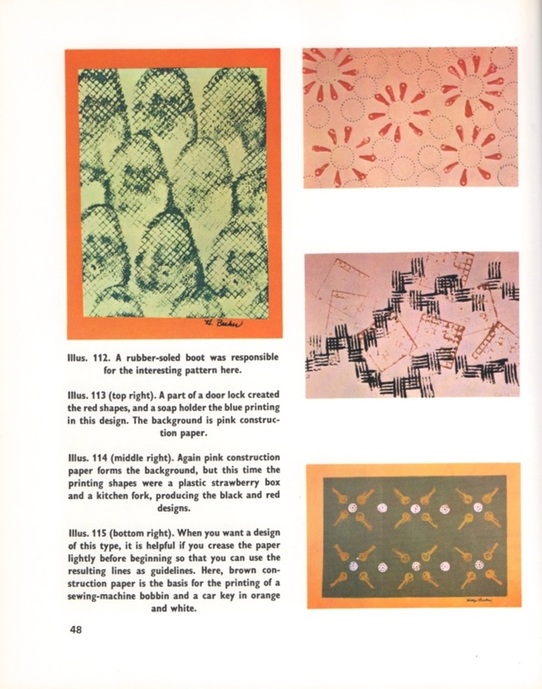 But wait, there's more! Part two of Alkema's "you can print pretty much anything" section will be coming up in a jiffy.
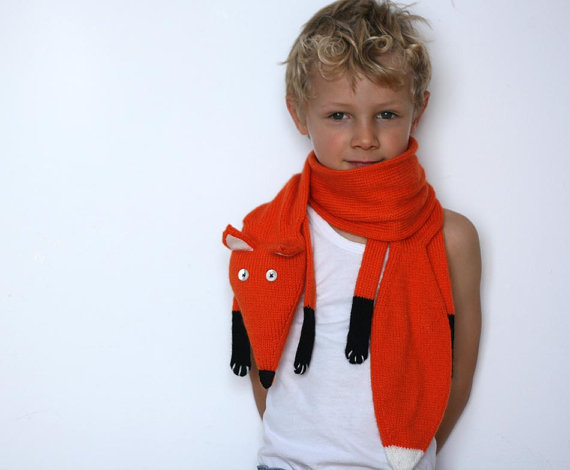
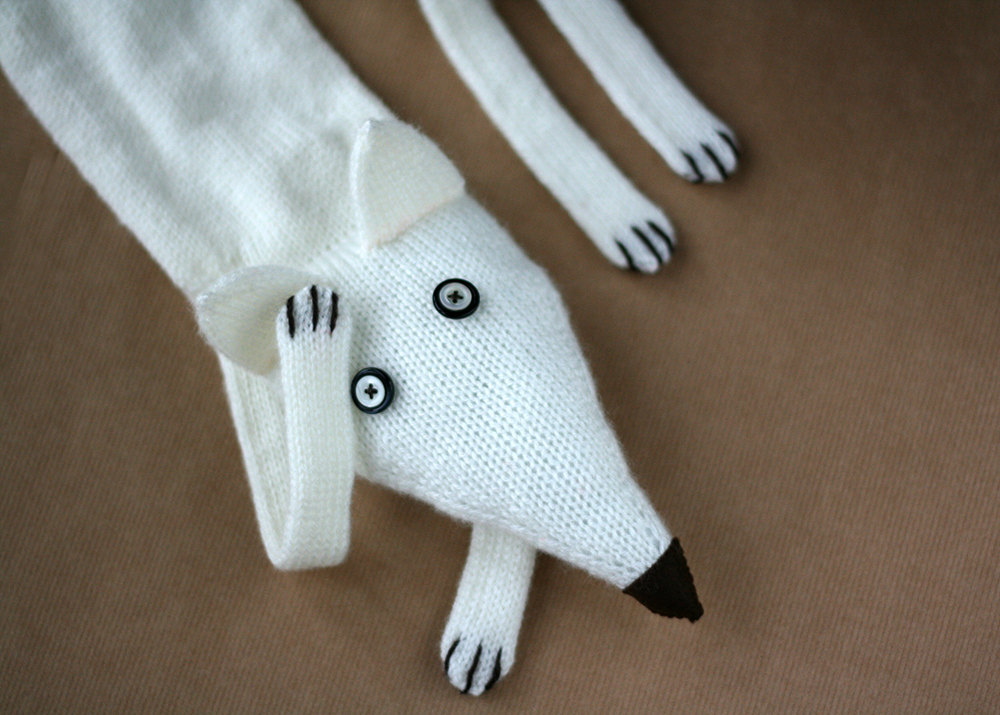
xo It's finally scarf weather again! I've been holding onto the link to this etsy shop for months now, and finally I can share its adorable, cruelty-free fox stoles with you. They're from TreMelarance, a shop based in Italy. Click on each image to go to its product's page for more info.
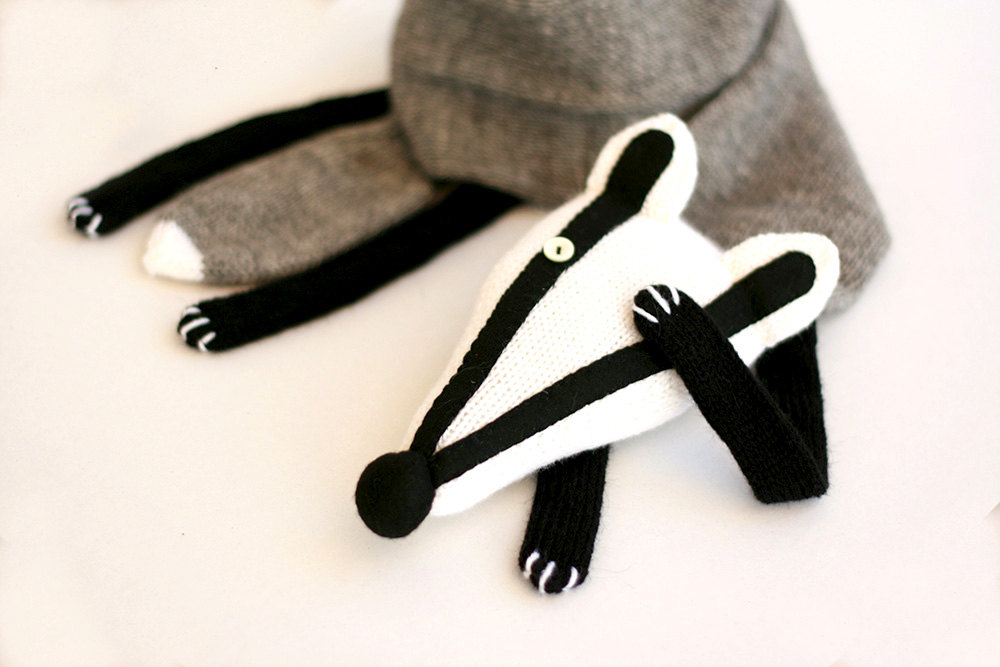
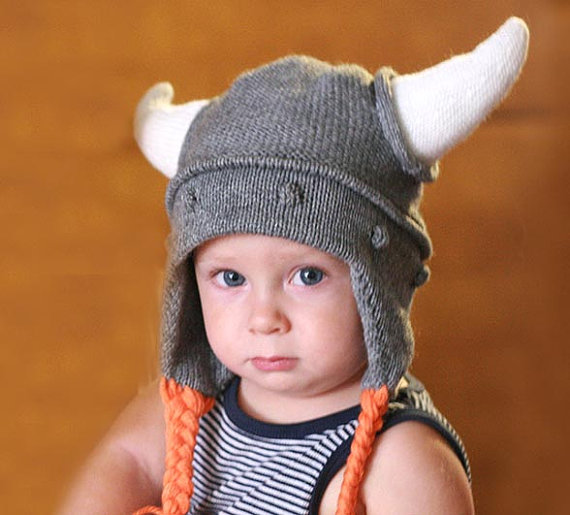
Katerina, the owner of TreMelarance, says these scarves are suitable for all ages, and I definitely agree. They're made with high quality acrylic, wool, or alpaca blend yarn. If foxes aren't your thing, she has badgers. And if scarves aren't your child's thing, she has adorable knitted caps for little ones.
|
Categories
All
Archives
March 2017
AuthorI'm Debbie Way, an artist and writer who enjoys making things. |


 RSS Feed