|
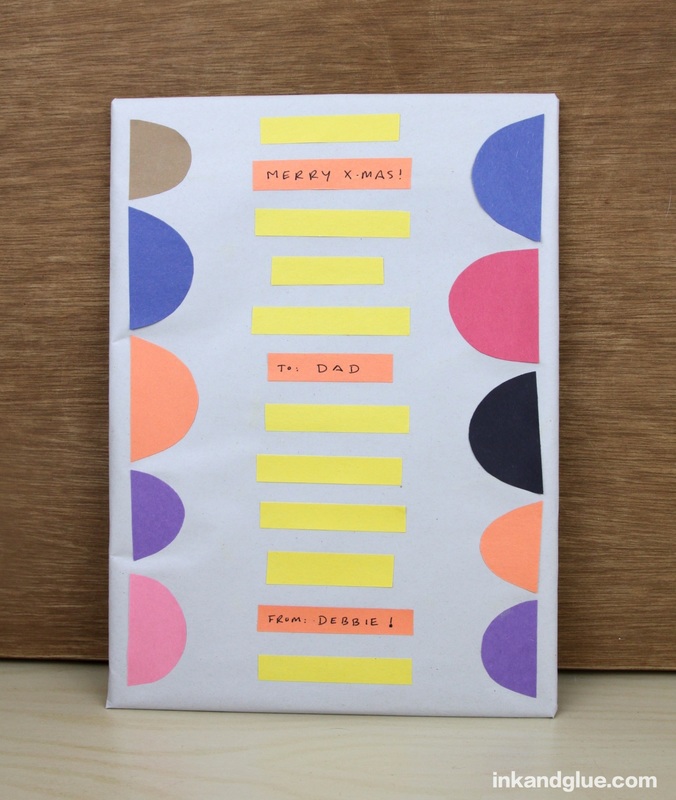
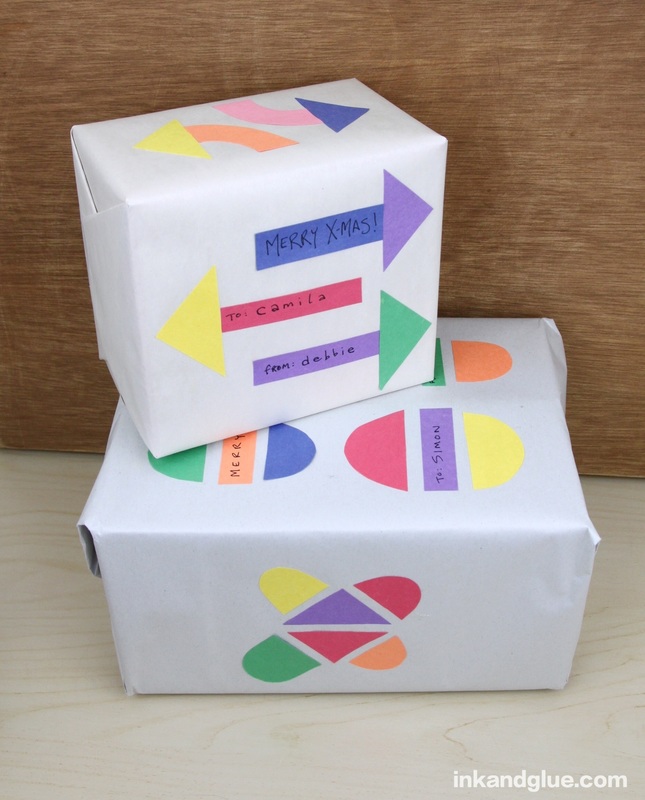
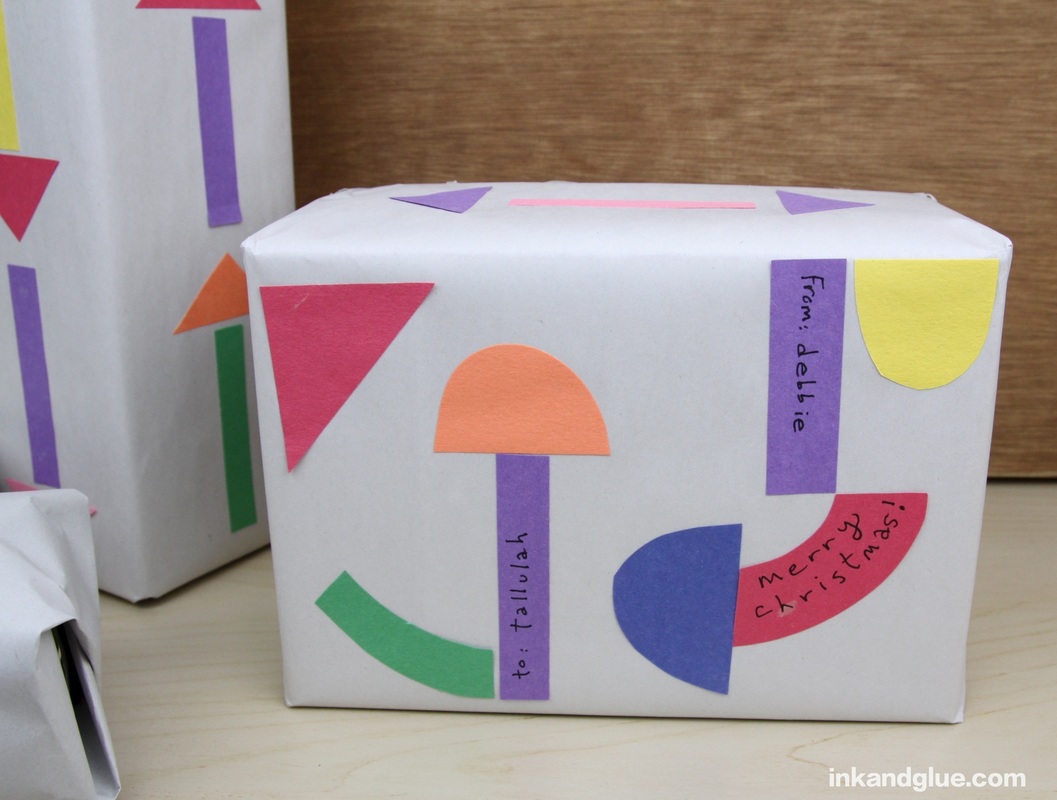
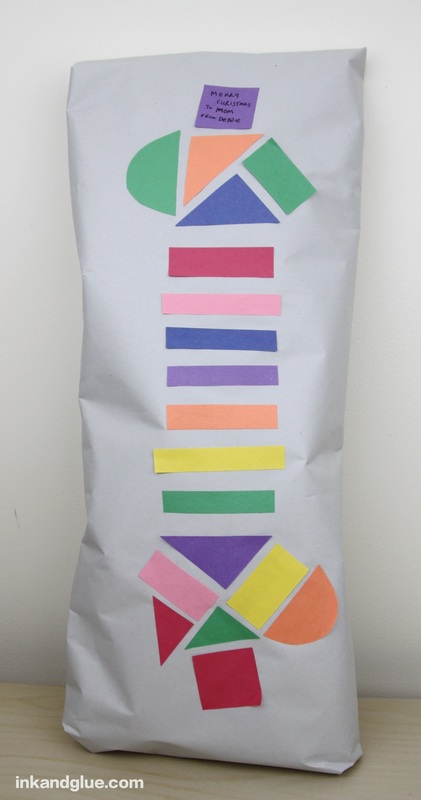
I truly enjoy wrapping presents. I like to add unusual embellishments or trims to my packages when I can, and when the presents all "match," that's even better. I have a bag full of construction-paper shapes that I prepared for the menorah craft I did a few weeks ago, so I thought up a good way to use them. (Some of them, at any rate; there's plenty left.) 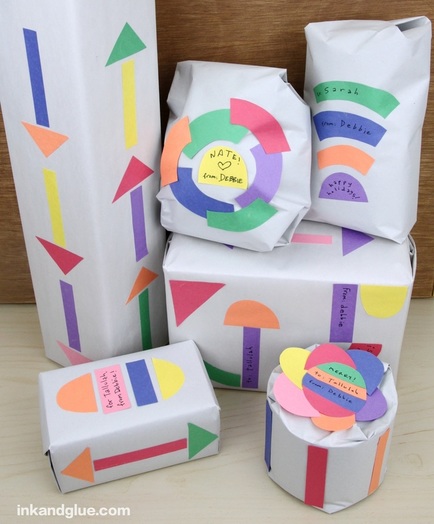 Collaged gifts! My original thought was to buy a roll of drawing paper to wrap everything, but it was prohibitively expensive. I say prohibitive, because I don't think it's worth spending very much on something that is meant to be torn to pieces. Instead, I went to Home Depot and picked up a roll of 70 sheets of packing paper. It's essentially newsprint paper, and the sheets are big enough to wrap almost everything I had, though for a couple of packages I had to tape two sheets together. I wrapped each gift in newsprint, then used glue stick to attach the paper shapes. I deliberately didn't want to create any complete pictures, opting to stay on the abstract side of things. I wrote the 'to: from:' info right on the shapes, which cut down on time, and (I think) looks cute.
They were a fun task to do while semi-watching TV, an activity I don't usually do without some handwork in front of me. Guilt-free TV watching, what a gift!
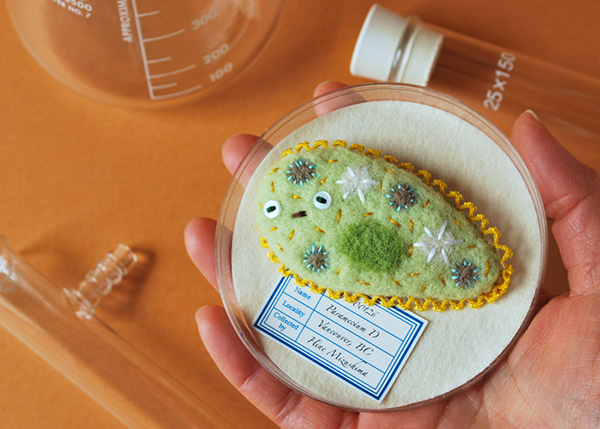
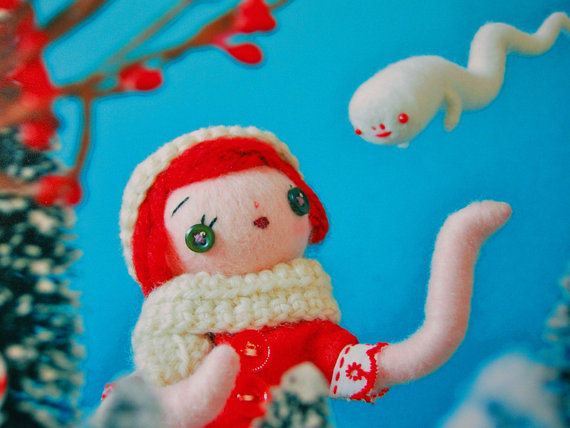
Happy holidays, everyone. xo 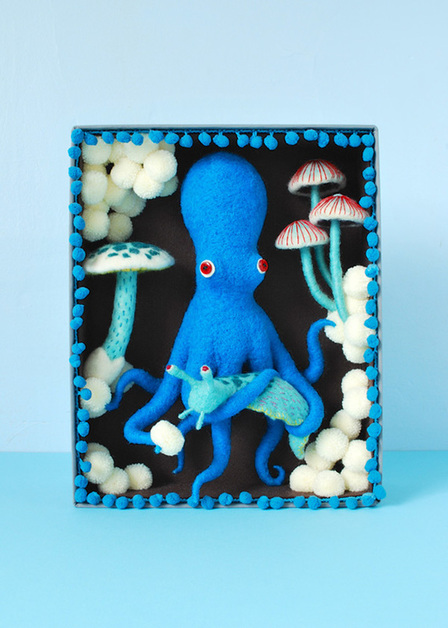 See her Have you met Hine Mizushima? She's a Japanese artist who has settled in Vancouver with her family. She makes amazingly detailed sculptures out of fiber: needle-felted wool, fabric, thread. If you or your kids are fans of They Might Be Giants' Here Comes Science, you may have already seen her work: she created the video for "Why Does the Sun Shine?" Not only is her work absolutely gorgeous and adorable, it has a slightly creepy side to it that I find appealing. See her sleepy giant microbe brooches, or her wintery print, "A Holiday Visit from Ectoplasm," available (along with many other prints of her work) on her Etsy site.
She builds dioramas, like tiny set pieces, for her creatures. I love this one of Space Cadet Izumi, "Lending a Friendly Ear." 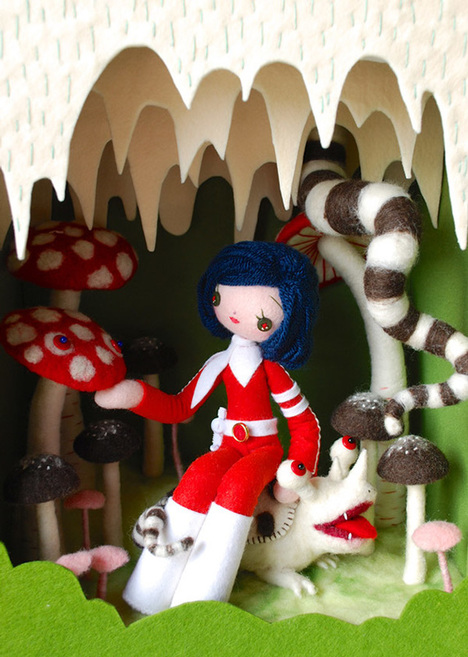 I have to end this post with what may be my favorite holiday decoration I've ever seen, the Octowreath. 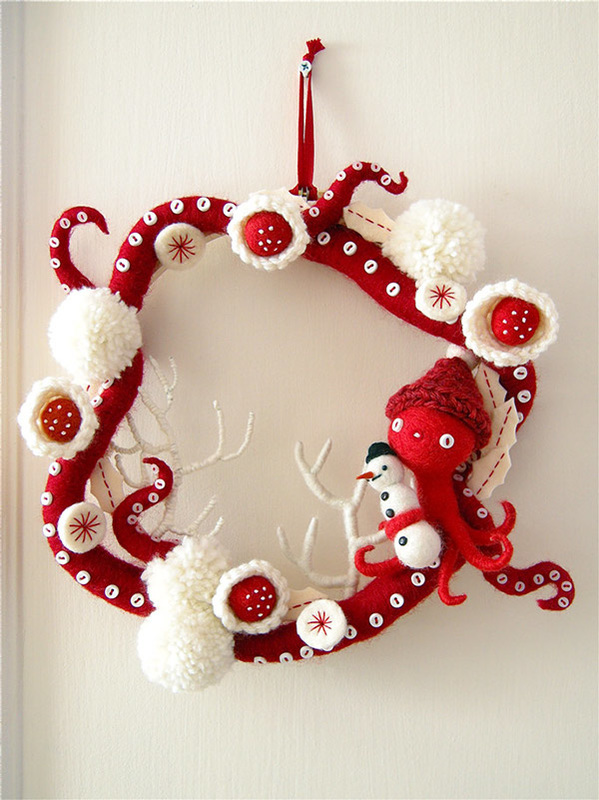 Want/need to see more? Visit Hine Mizushima's portfolio site, Hima's etsy shop, and her Society6 shop.
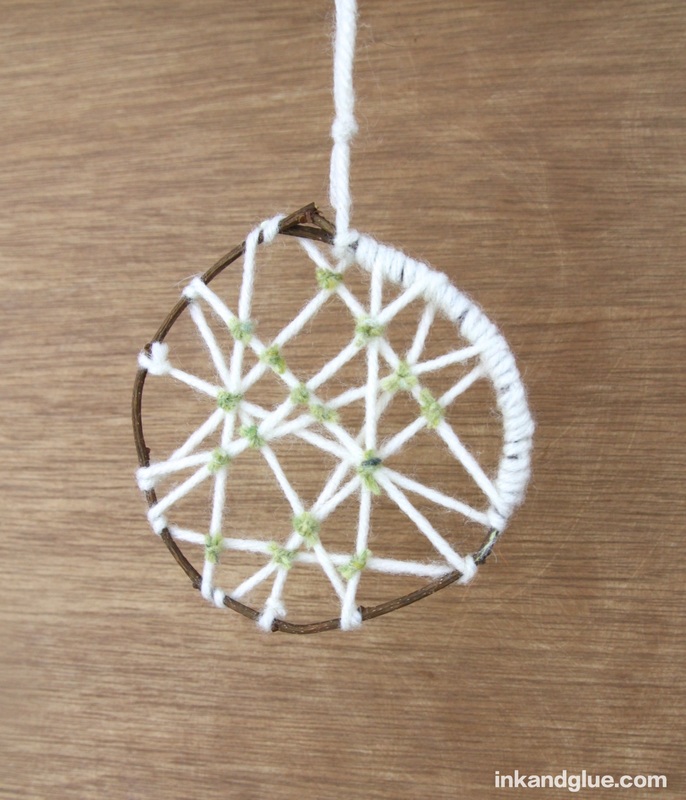
xo! I actually made these a little while ago, and decided not to create a how-to for them, because they're kind of persnickety to make. However, I am rather fond of them, and they seem somehow appropriate for the solstice, having been made with flexible twigs from the woods and wooly yarn. And weaving has a back-to-basics feel to it. So, I present them to you.
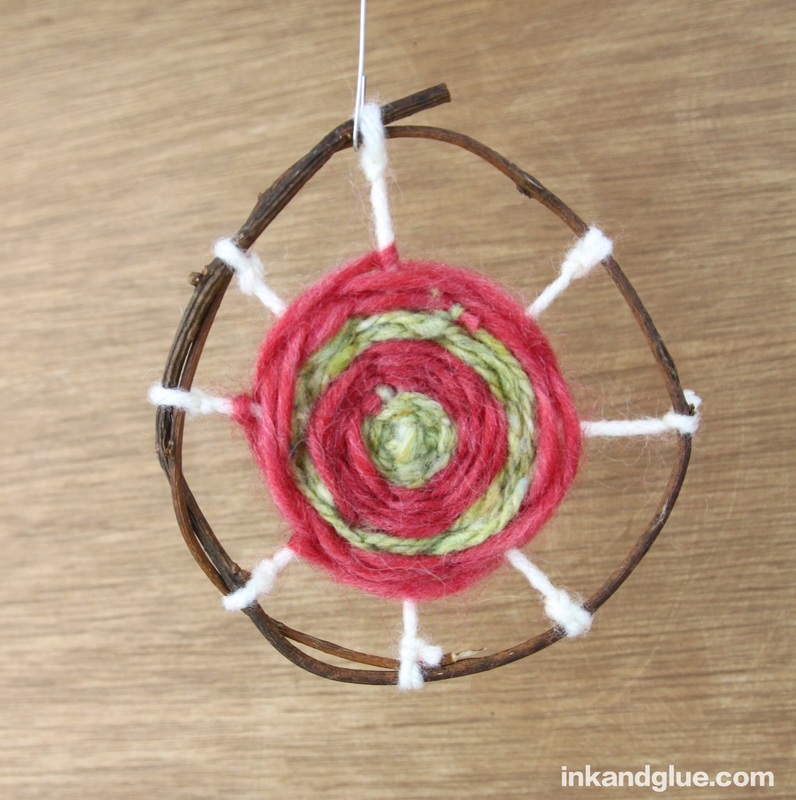
 Some directions/tips: Both of the vine-twigs I used were cut from a weedy shrub that lives near my house. For the criss-crossy web one, I carefully bent the twig into a circle, then tied an end of a ball of white yarn around the overlapping twig ends. I wrapped the yarn around the overlapping sections of the twig (that's the wrapped section you see above), then tied it off. Then I wound the yarn around the circle at random. When it seemed fairly full, I tied it off. Then I tied a knot of green yarn at the intersections of the criss-crossed white yarn. I trimmed the ends of the knot very short. 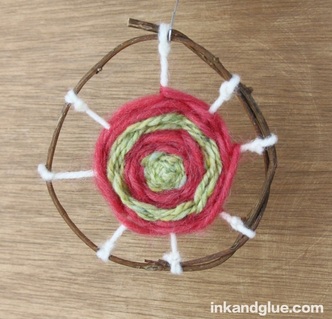 For the woven circle one, I bent the twig into a circle and just tied the ends together with one loop of white yarn. I tied the other end of the yarn to the opposite side of the circle, and then I did the same thing three more times, creating what looked like the spokes of a wheel. The problem with having an even number of spokes is that your weaving doesn't naturally alternate between over and under; it ends up like a god's eye, if you can imagine what I mean. If I did this again, I would tie a piece of yarn around the center of the spokes, and tie its other end to the twig circle, thereby creating an odd number of spokes. As it is, I had to skip a spoke each round in order to make it be a true weaving, and it was tricky to make it look neat. Anyway: Once you have your spokes, tie your weaving-yarn to the center, then start weaving around the spokes, spiraling out from the center. To change colors, just tie the new yarn to the end of the old yarn. If you use pleasingly-plush yarn, the knot is easy to hide with a poke. So there they are! Happy winter solstice! xo The holidays are always an incredibly busy time for me. I need to find the perfect gifts for my loved ones (I usually end up making at least a couple of them), there are events to attend all weekend long, and because it's getting colder outside and that makes me feel cozy inside, I end up deciding to bake (granola, this week). All of this is to say, yes, Franklin's a bit late this week. The fault is entirely mine. Here he is, in a rare snuggly moment. 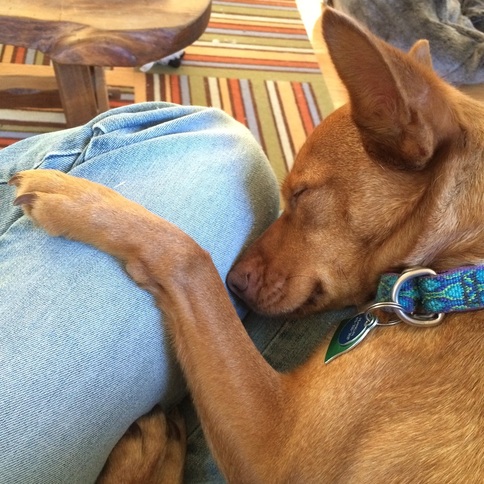 Happy lap naps to you and yours!
xo I was incredibly lucky to work with a highly talented, driven, and creative group of people for over 7 years, and one of the most creative and driven (and driven crazy by editor-me, I know) is Kimberly Stoney. She's been posting an ornament idea on her blog, The Tiny Funnel, and on Instagram EVERY DAY this month. And like all of her work, they are cleverly constructed, easy for people of all ages to make, and totes adorbs.
Remember my straw ornaments from yesterday? Kimberly was on the same wavelength a few days ago, unbeknownst to me; and, dare I say it, her pipe-cleaner joints are simpler than mine. Because she is the craft master.
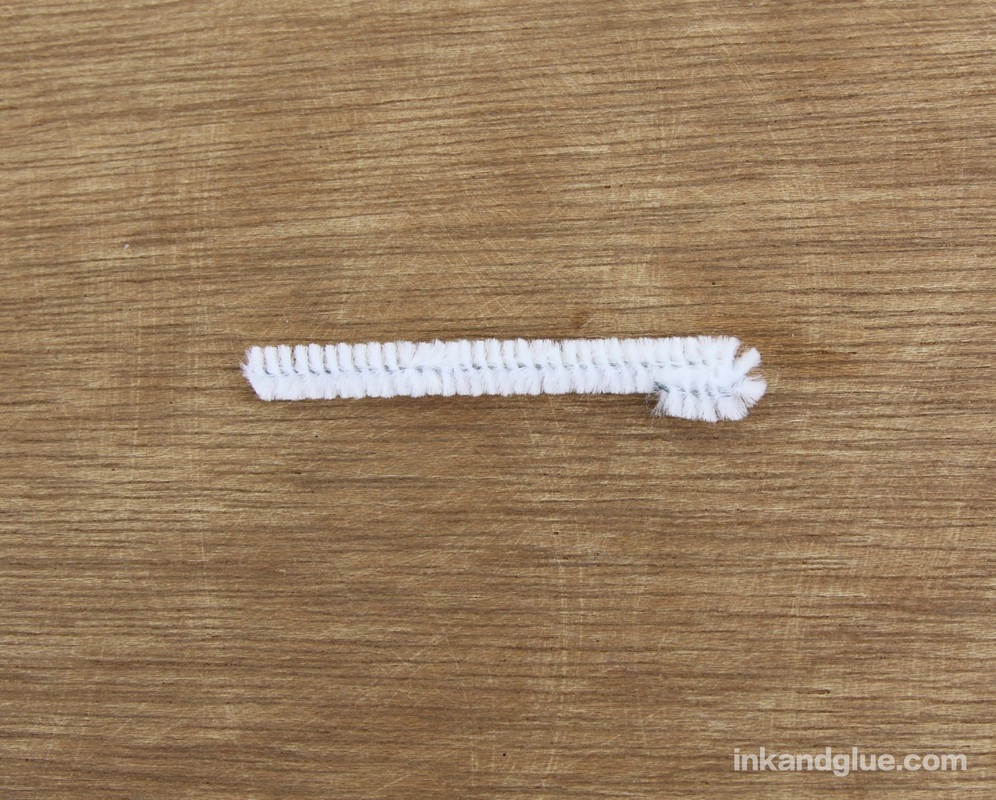
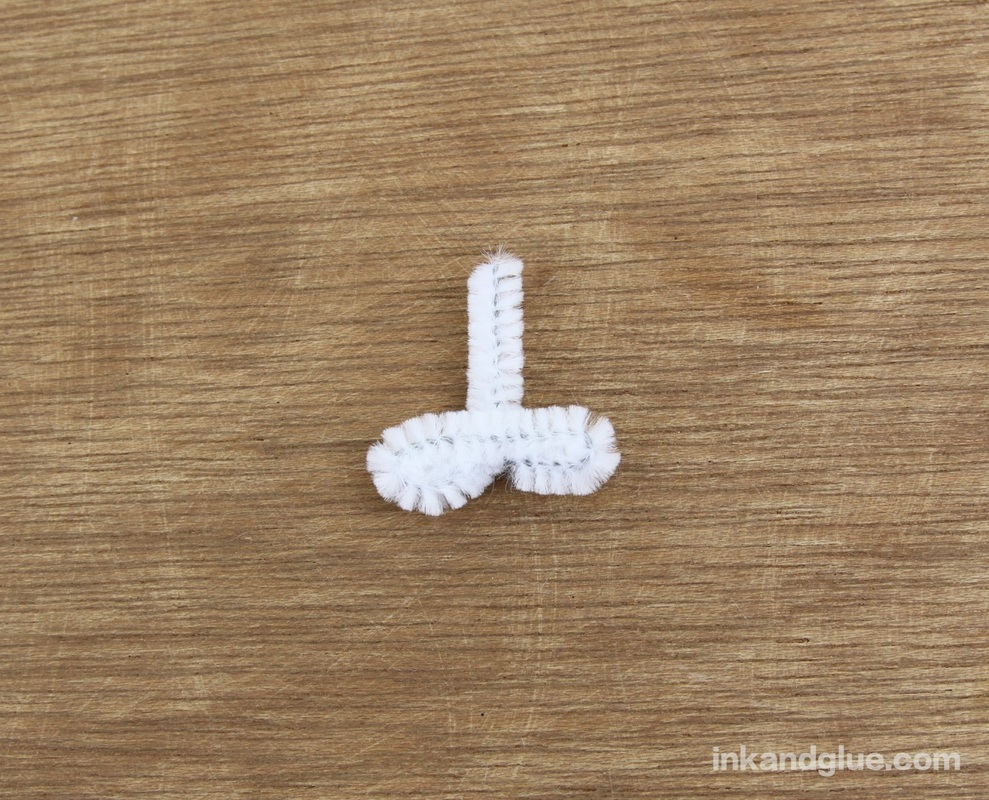
Go to her site now, and be inspired by the possibilities! xo 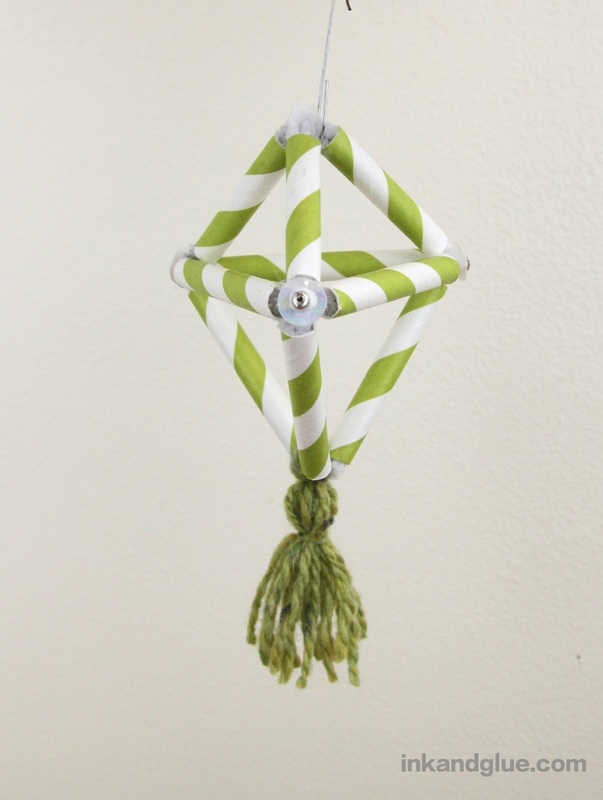 I can't stop making ornaments. I need an extra tree for them. (Actually, my family might end up with a few tied to their gifts...) The construction of this one is based on a learning activity from FamilyFun Magazine, though mine is much smaller. It's fairly easy to make, and once you prep the pipe-cleaner joints, your kids can experiment with different shapes for as long as they like. In fact, if DIY ornaments aren't your thing, this could be a building toy in and of itself; just leave out the glue. Start by cutting some straws into quarters. I had fancy paper straws I'd bought on clearance; plastic works just as well. 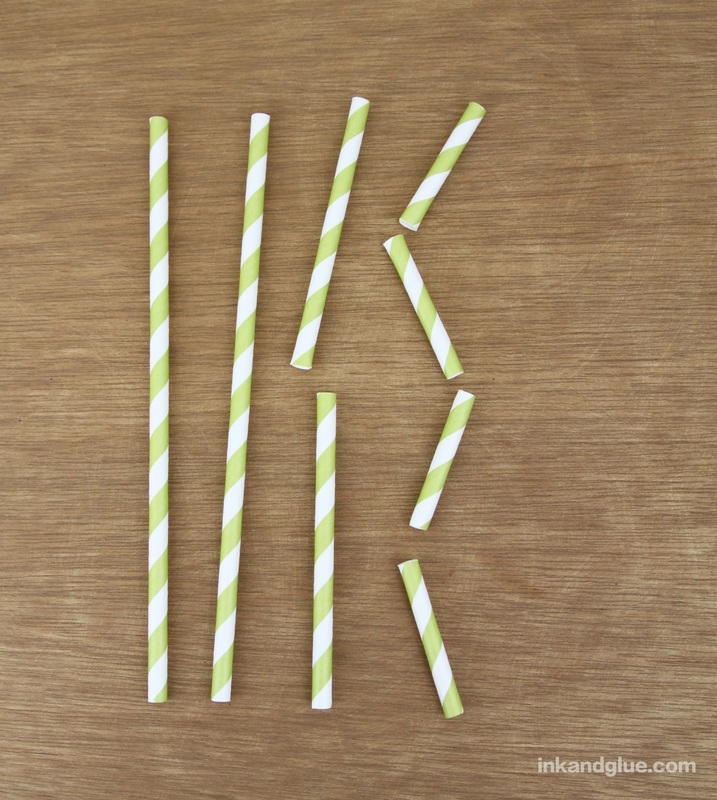 Once you have a bunch of straw segments, make the pipe cleaner joints. First, I'll show how to make a three-pronged joint: Cut a 3 (or so) inch length of pipe cleaner and bend over one end. Bend the remaining length in half, as shown.
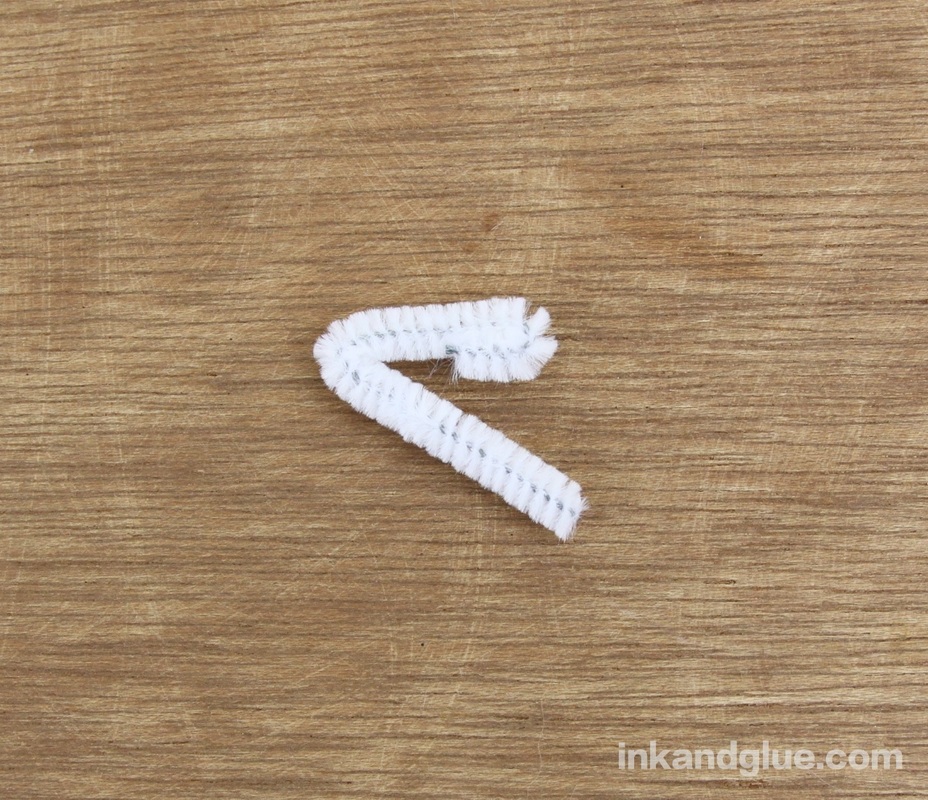
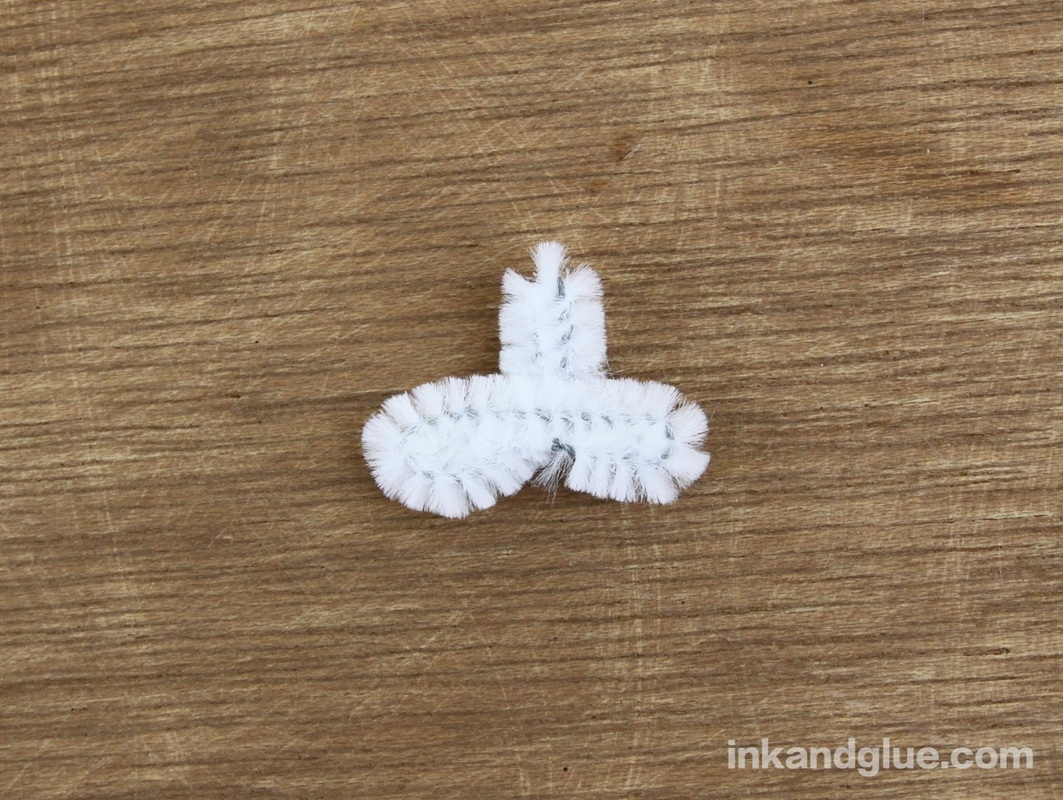
Bend the end up to form an upside-down T shape, then bend the very tip of it back.
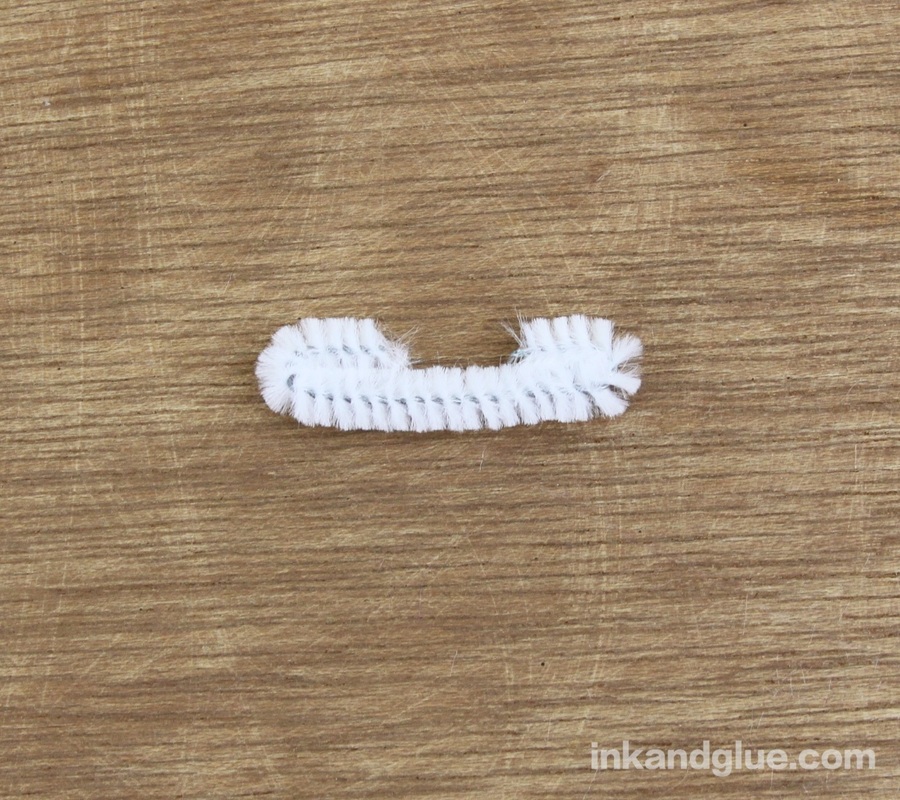
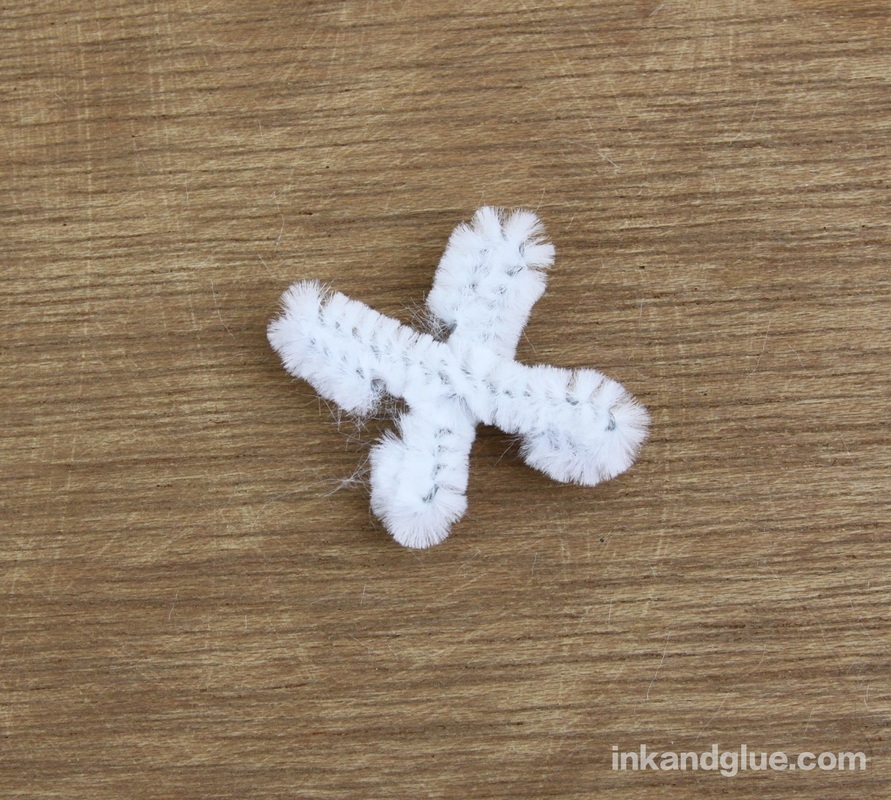
Slide a straw segment onto each of the three ends, and it'll look like this. 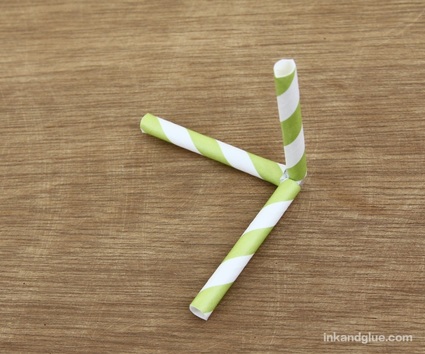 I found that the four-pronged joints were more useful for the shapes I wanted to make. Here's how to make those. Start with a 2-inch length of pipe cleaner, and bend over both ends. Do the same with a second 2-inch piece, then twist the two together at their centers. Easy-peasy!
Here's what that four-pronged joint looks like when ensheathed by straw pieces. 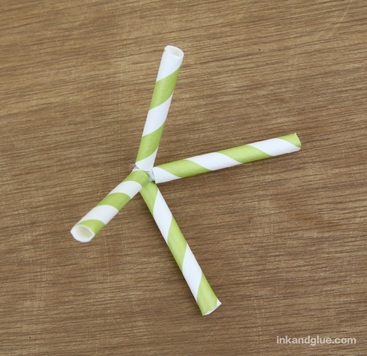 I used two 3-pronged joints and three 4-pronged joints to make my simple diamond shape. 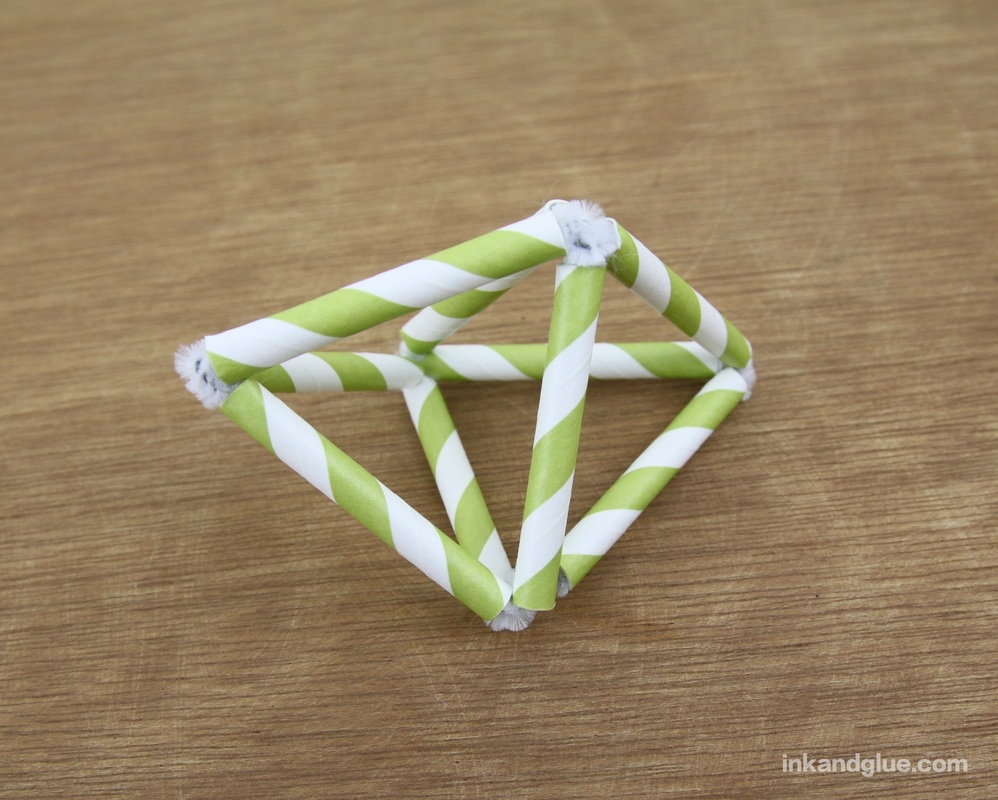 It actually felt too symmetrical, so I removed and trimmed the three straws at (what I decided was) the tip, and did the same, but a little shorter, on the three at the top. Better! Except, hmmm... Missing something. I had a spare tassel (made in the security envelope ornament post) so I tied it to the bottom tip. 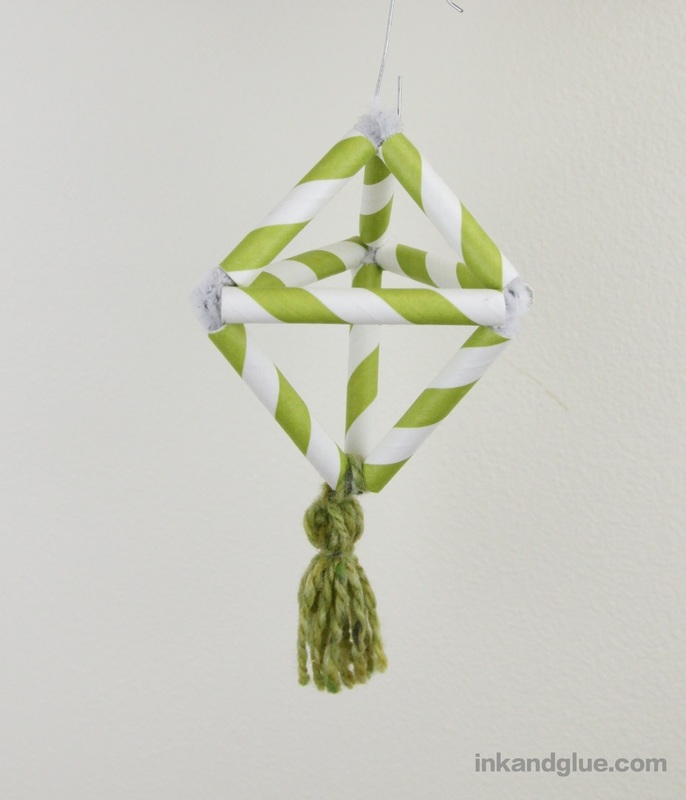 Getting there! I wanted to add some sparkle, so I glued white sequins and silver beads to each of the center joints. Now it's tree-worthy. 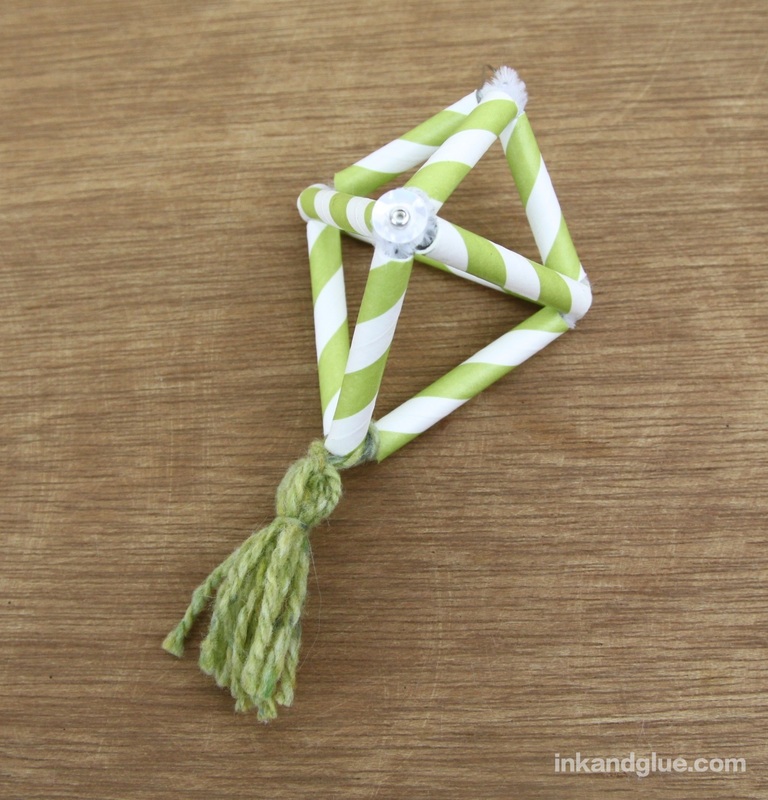 You really can make a lot of different shapes by varying the number of prongs in your joints and changing the length of your straws, though I'd recommend trimming straw lengths as a final step, just so they don't get mixed up with your regular length straw pieces. Nothing sadder than an accidentally dented-looking straw construction.
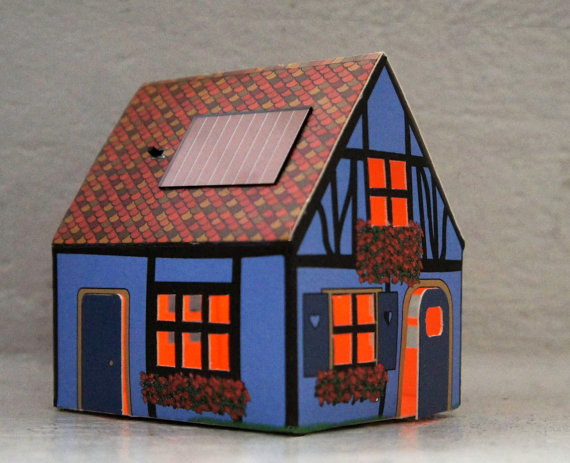
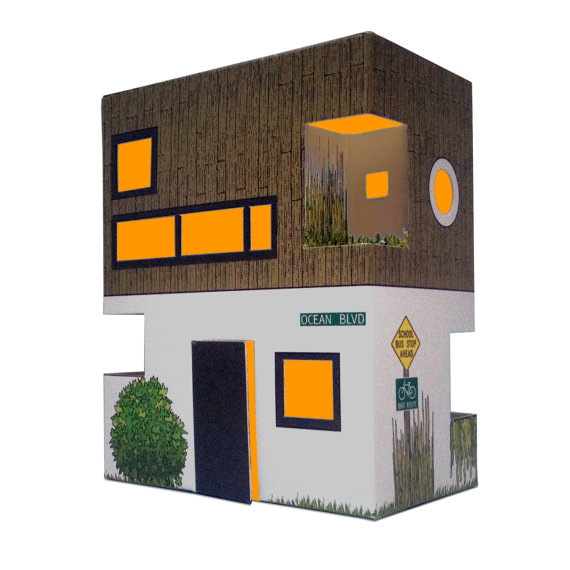
Have fun! xo I see more and more houses every year with solar panels on their roofs, so it makes sense our children's toys would reflect this new trend. Enter Casagami, a small company in Paris. 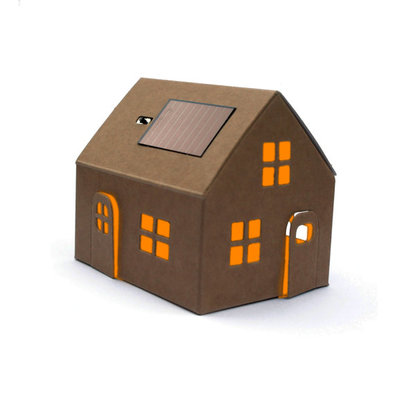 (As always, clicking on the image will take you to that product's shop page.) Casagami's tiny model homes are made of cardboard and shipped flat in an envelope, saving on shipping and energy costs. To make this even more of a feel-good gift, the cardboard can be recycled, and the company employs people with special needs. And, they're affordable; the basic model, shown above, is just $7.92 (though shipping doubles that amount, it still feels like a good price.) Place your assembled house on a windowsill and let it charge in the sun. Each hour of sunlight equals an hour of light. (There's an on/off switch.) They're meant to act as night-lights. I love the many different styles of homes they offer, like this Alsace chalet, and this ultra-modern dwelling.
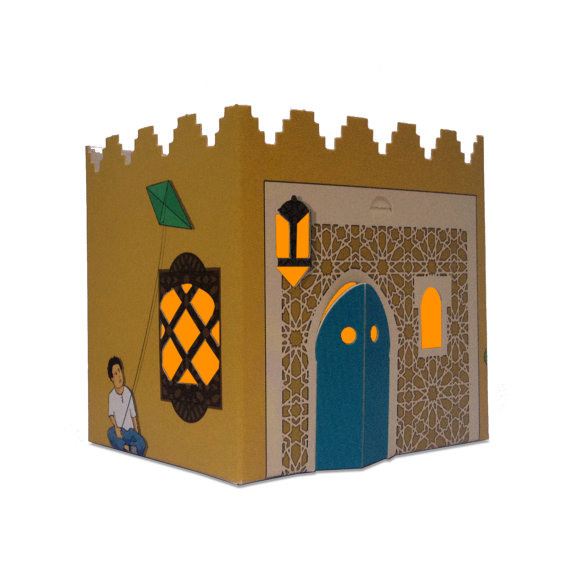
There's a Moroccan-inspired ryad, and a lovely castle.
For the extra-crafty kid, they sell a plain white house that's made for decorating. 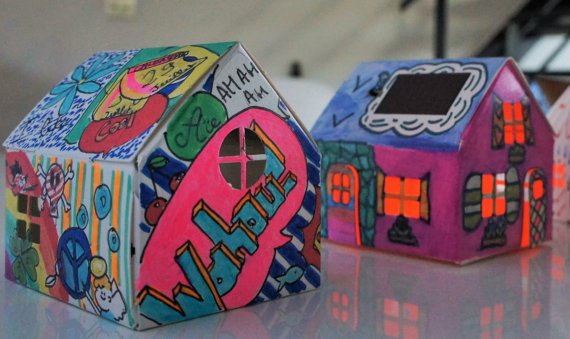 The company just came out with an "autogami," a solar-powered car! Like the homes, it's made of cardboard and packed flat. Very cool. 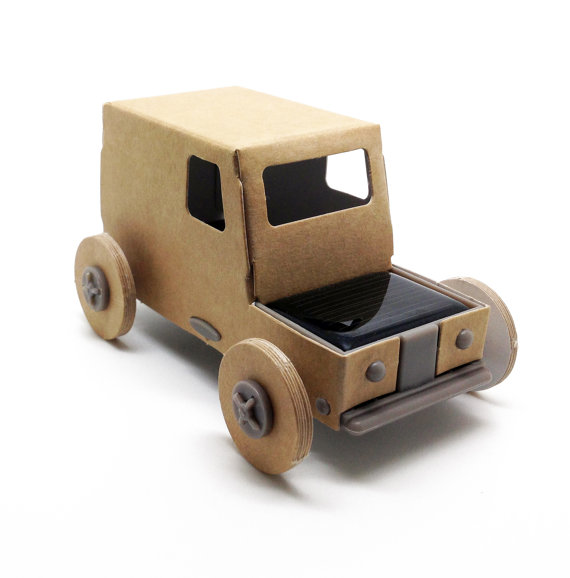 There's way more to see than I can share here, so go take a look!
xo My intention was to style this ornament in a super simple way for little kids, and I think it certainly can be that. But sometimes I can't help myself from adding some sparkly embellishment. And is there a more appropriate time to add excess sparkle to things than the winter holiday season? No, I say. No there is not. 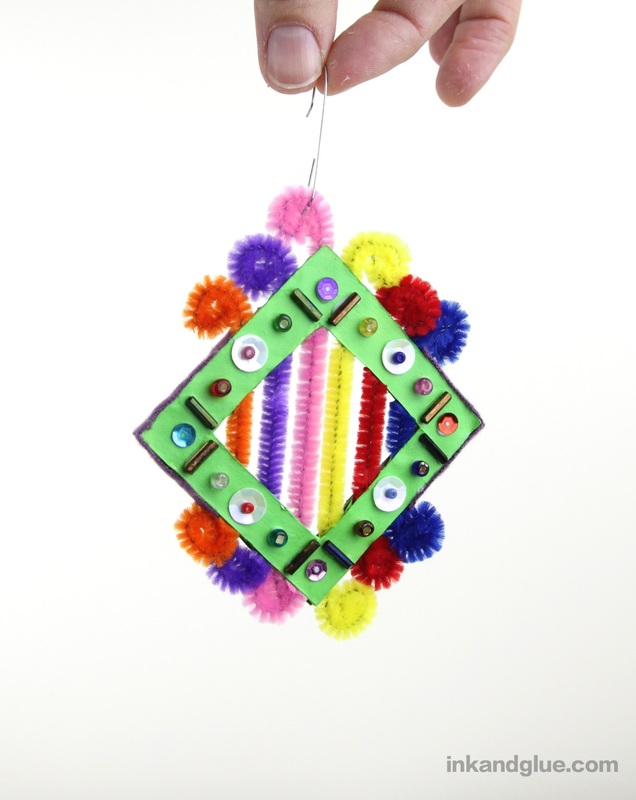 (The dried glue on my fingers is for extra realism.) To make this, start with a painted frame like the ones shown in my previous post about cardboard ornaments. You can sort of see that I painted the cardboard white first, before adding a coat of light green; you get better opacity and brighter colors that way. 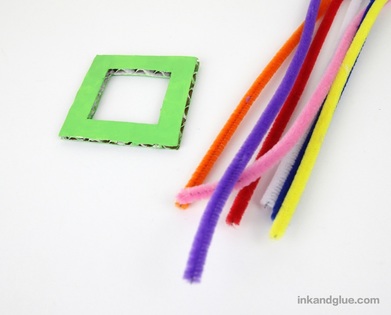 Insert the pipe cleaners into the corrugations/channels however you like. Bend one end of each pipe cleaner into a small loop or spiral. (I do this with just my fingers; pinch the end, then bend it by rotating your hand, then re-pinch and rotate your hand again, until you've got a spiral.) 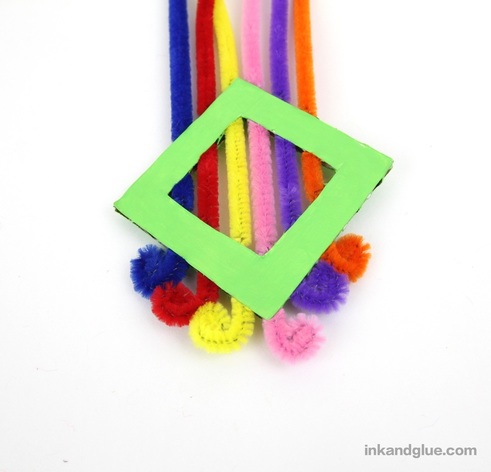 Cut the other ends of the pipe cleaners so that they're roughly the same length as measured from the cardboard frame, as shown. Pinch them into spirals like you did before. You can stop right now, if you like, or you can add stickers, glue on a collage of bits of paper, add adhesive-backed foam shapes -- whatever you have on hand.
I happen to have a decades-old stash of small glass beads and assorted sequins whose origins are lost to the mists of time. I find similar stashes at flea markets and tag sales, however, if you're into that kind of shopping (and you know that I am). So I made a simple pattern with them, using tweezers and tacky glue to place and adhere them. I also cut a scrap of purple flannel into strips and glued them onto the open sides of the cardboard shape. 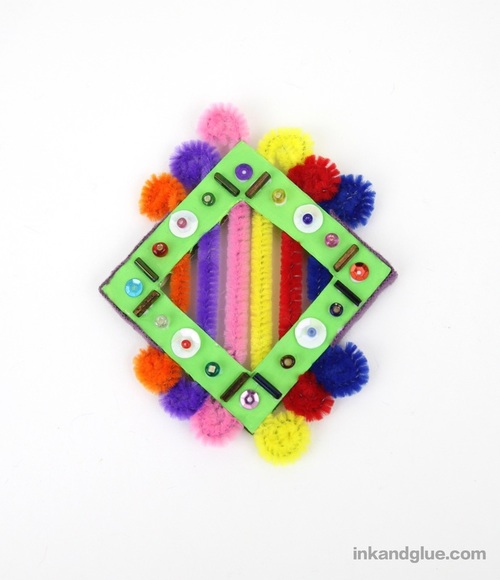 I could happily make fifty more of these and each one would be completely different. For an engrossing holiday party craft, make a dozen or so of the painted cardboard "frames," and set out bottles of tacky glue and bowls of paper and fabric scraps, yarn, beads, pipe cleaners, pompoms, felt... whatever you have. Leave it open-ended, and you'll be pleasantly surprised at what your young guests create.
xo It's deer-hunting season (shotgun edition), but that doesn't slow Franklin down; it just cramps his style, as I force him to wear the hated safety vest. I take him for hikes almost much every day, pretty weather or no. And it is very hard to get him to pause for a photo.  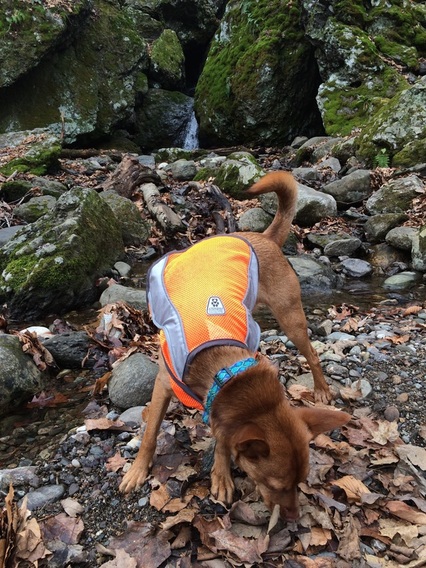 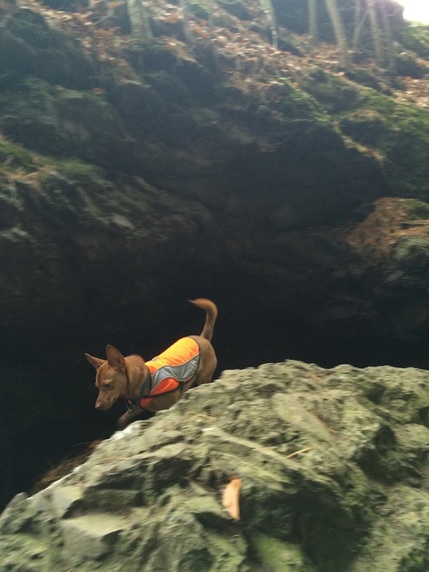 Here I tried to get him sit long enough to get him and that gorgeous waterfall behind him in the shot. I sort of succeeded, but only through sheer luck.  xo!
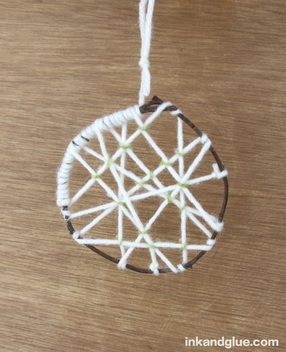
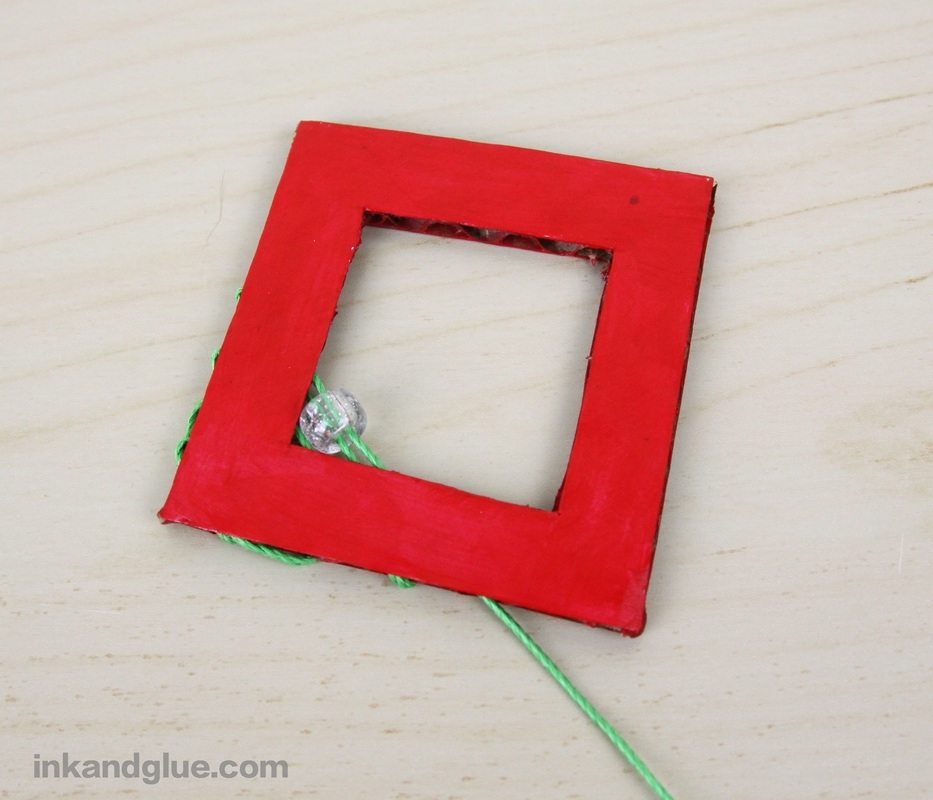
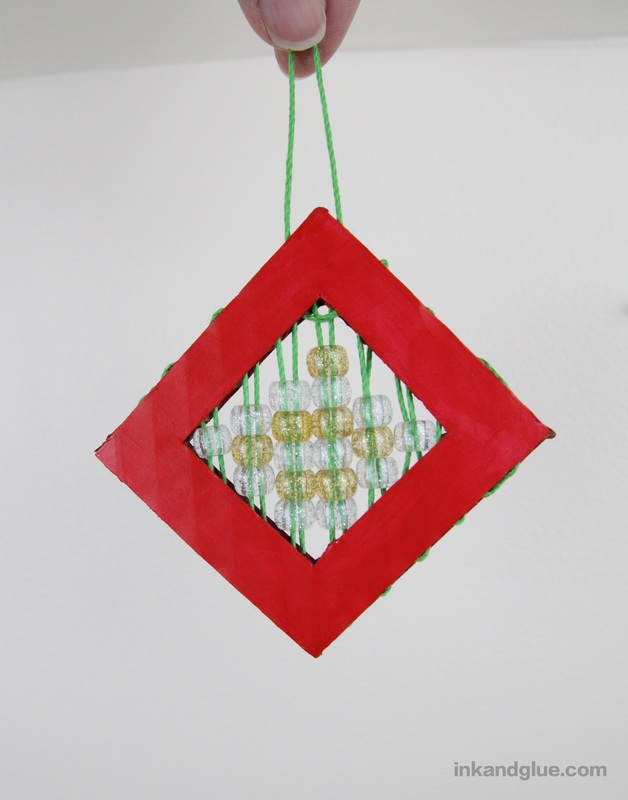
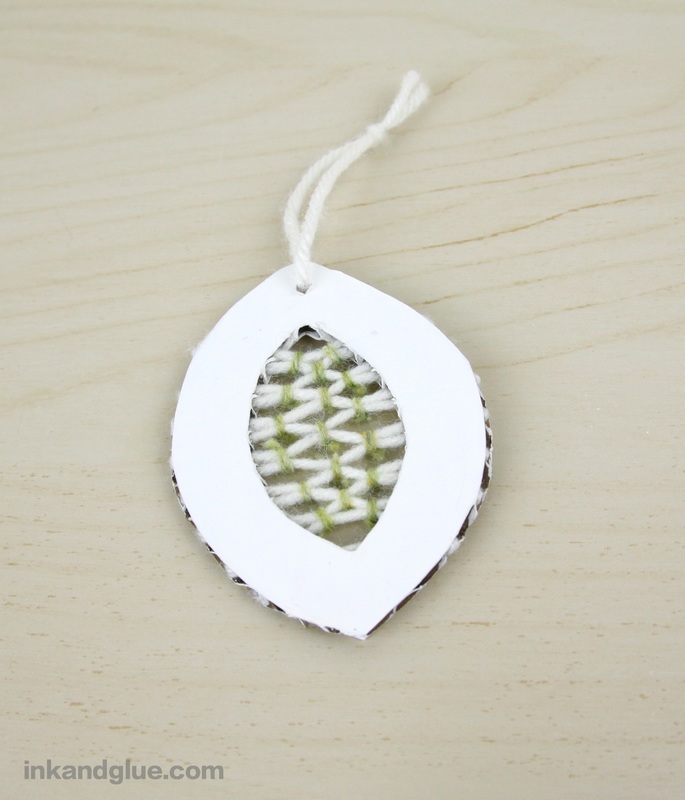
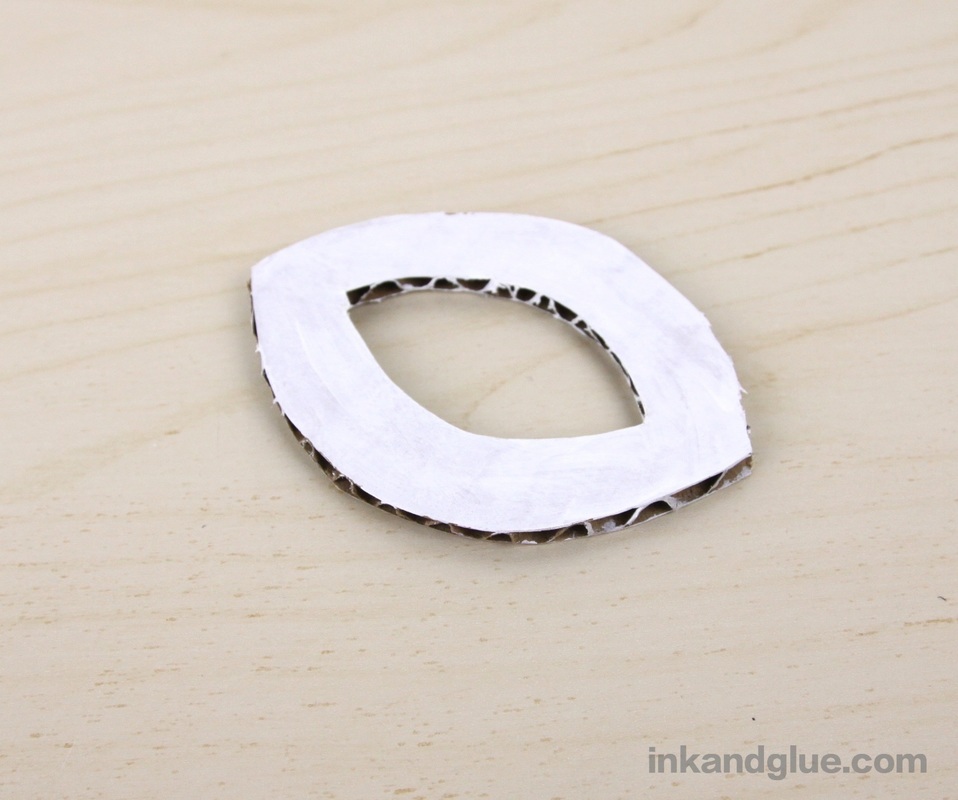
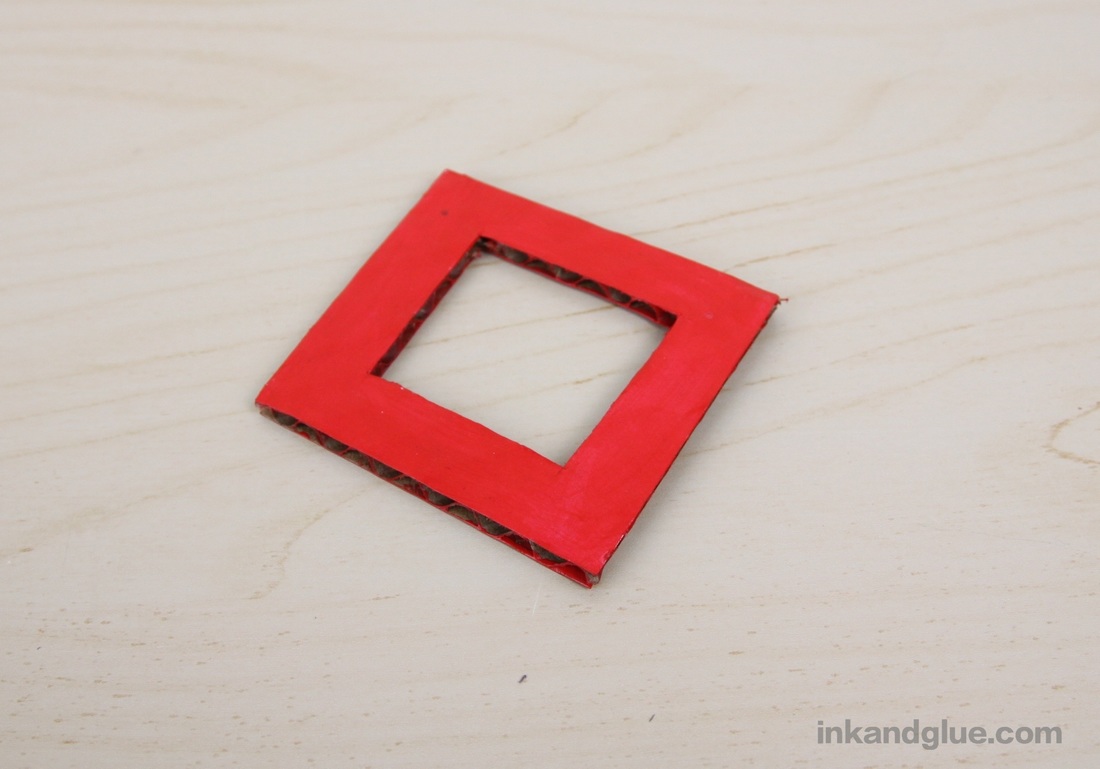
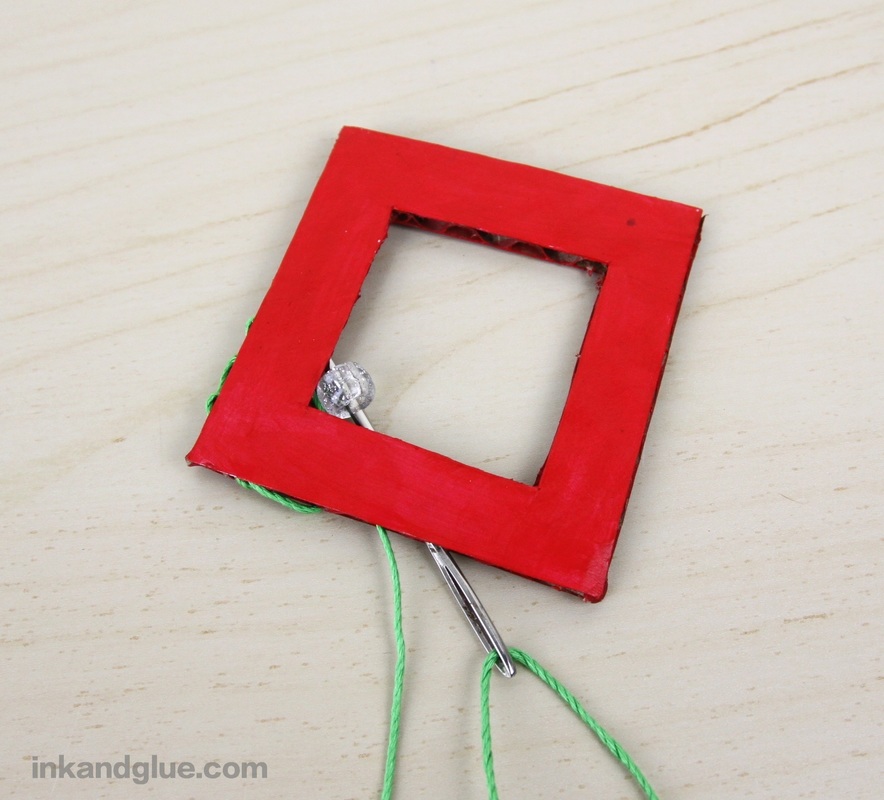
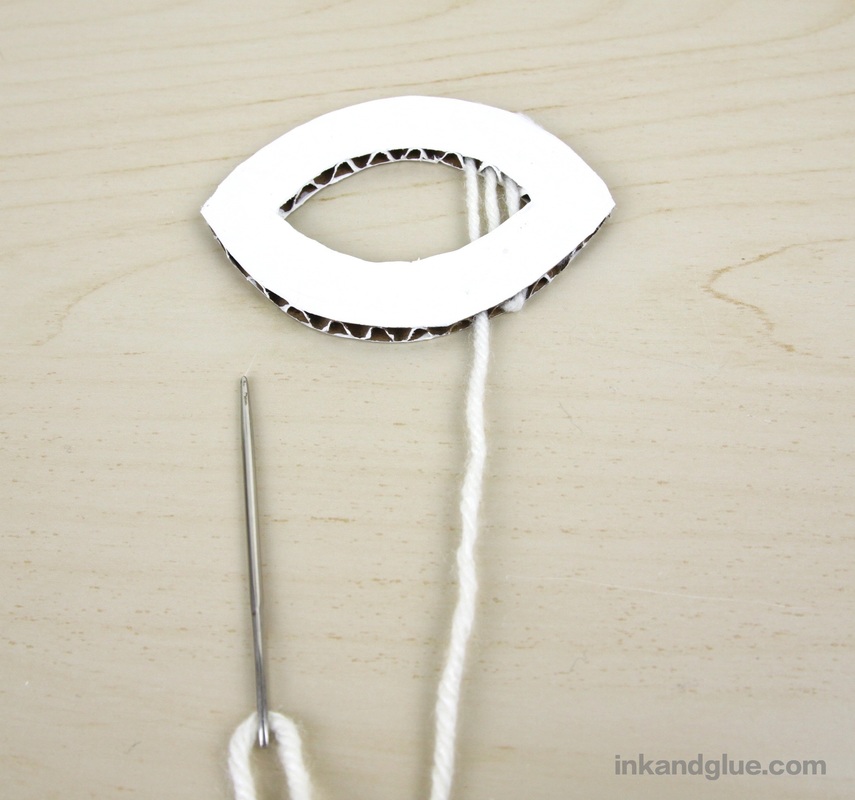
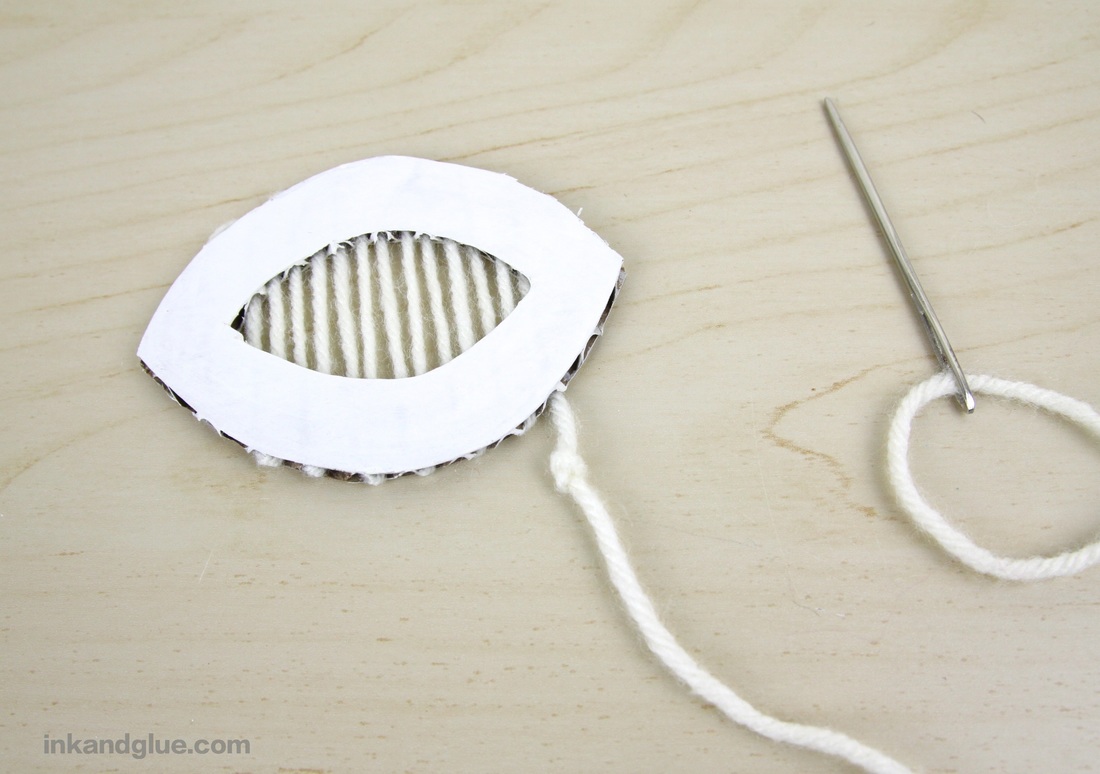
These ornaments are loosely based on an ornament my sister made when she was a kid, though these ended up quite different from hers. Inspired by the menorah craft, I wanted to use the corrugations (channels) in the cardboard to create a kind of miniature loom. Note that these are both best for older, more advanced kids; I have a younger-child friendly cardboard ornament that will be ready to share with you soon. First, I drew some shapes on cardboard; one is shown below. I added an arrow to show you which way the corrugations run, as this will be important later. You're essentially making a frame, so you'll need an inner and an outer shape. Use a craft knife (adults, or fearless and skilled older kids, only) to cut out the shape. 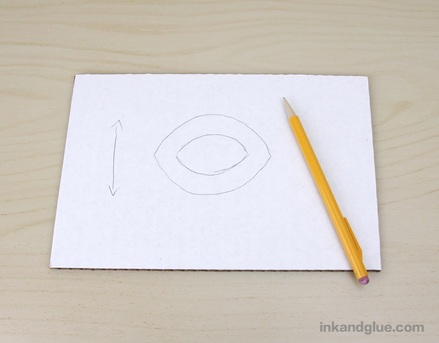 Paint the shape all over. Here are two of mine:
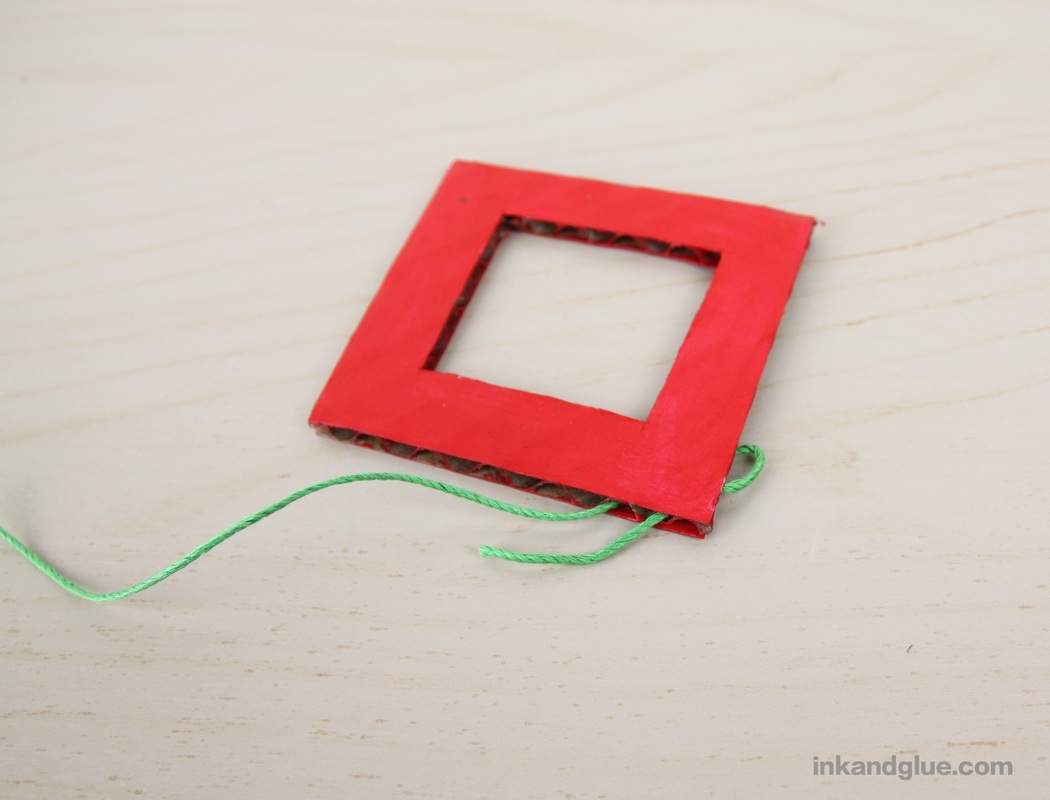
Now you're ready to weave! I'll show you how to make the red beaded square, first. Get a long, blunt yarn needle, and thread it with a few feet of cord. Insert one end of the cord through a corner channel, and out the neighboring one. Tie the end to itself to anchor the cord, then slip the excess cord into the channel.
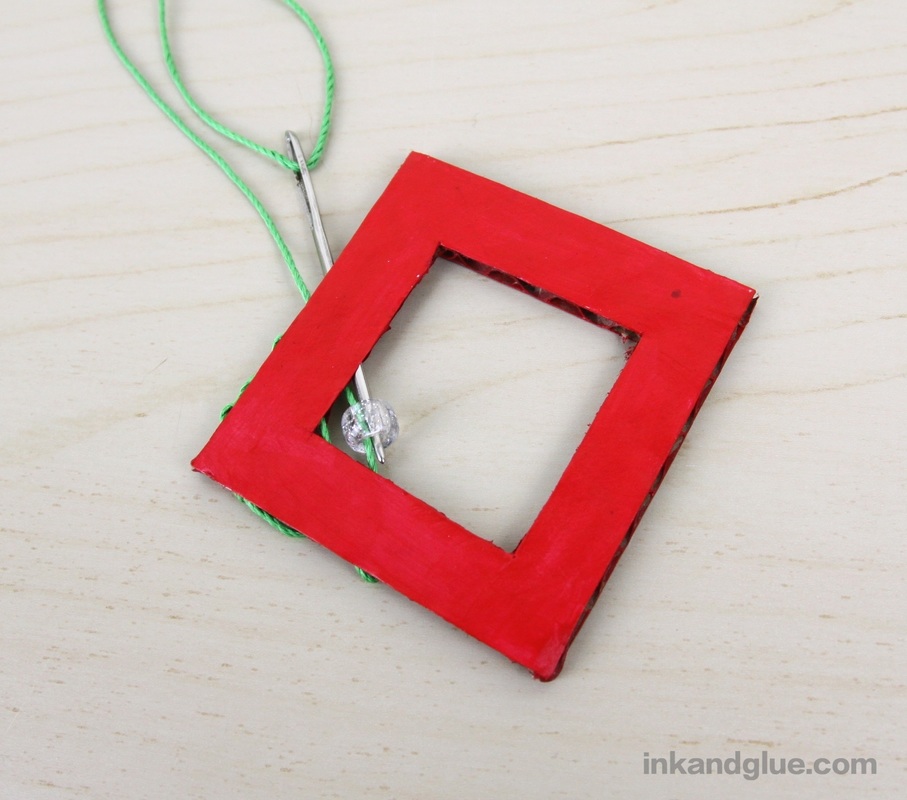
Slide the needle into a channel that travels through the closest corner of the open square. Thread on a pony bead, then pass the needle through the rest of the channel. Turn around and pass the needle through the next channel over, going through the bead again.
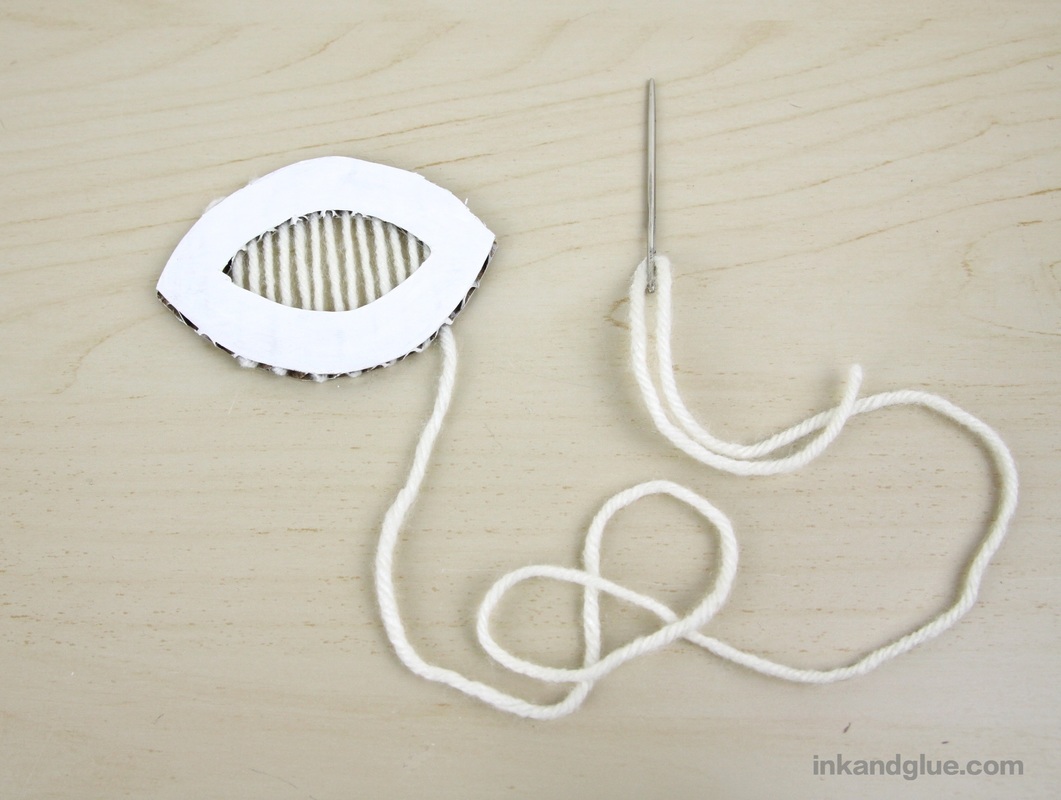
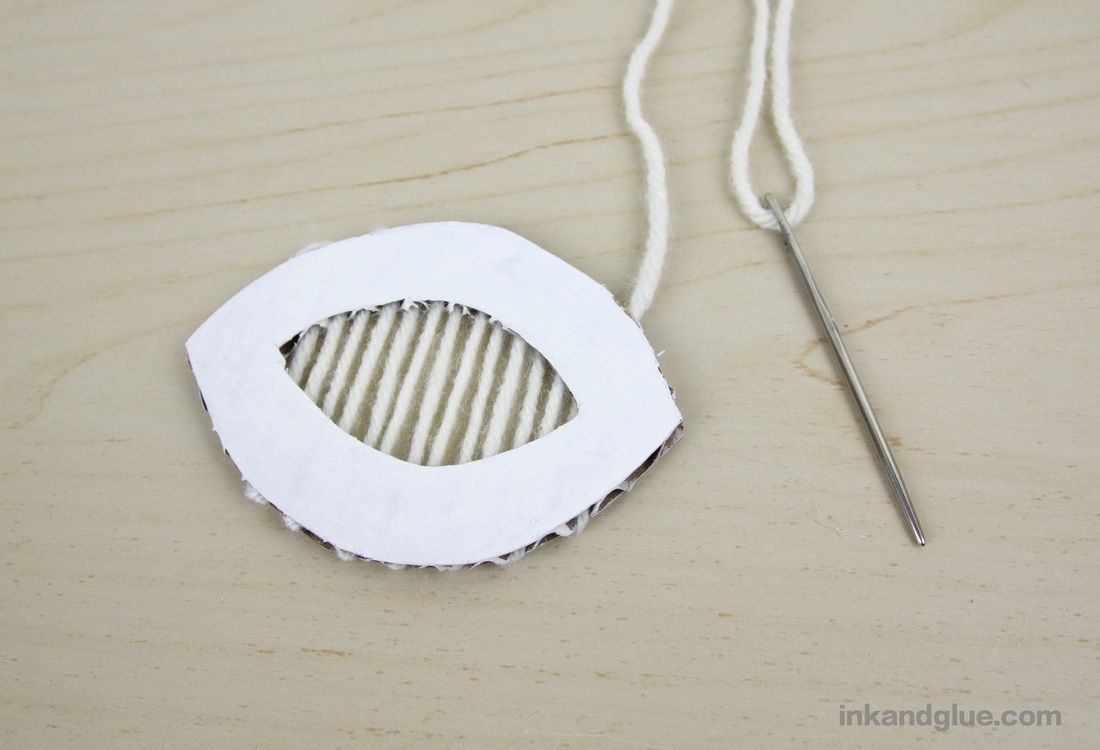
 Continue on in this way, adding two or three more beads as the space gets wider, then decreasing as it narrows. 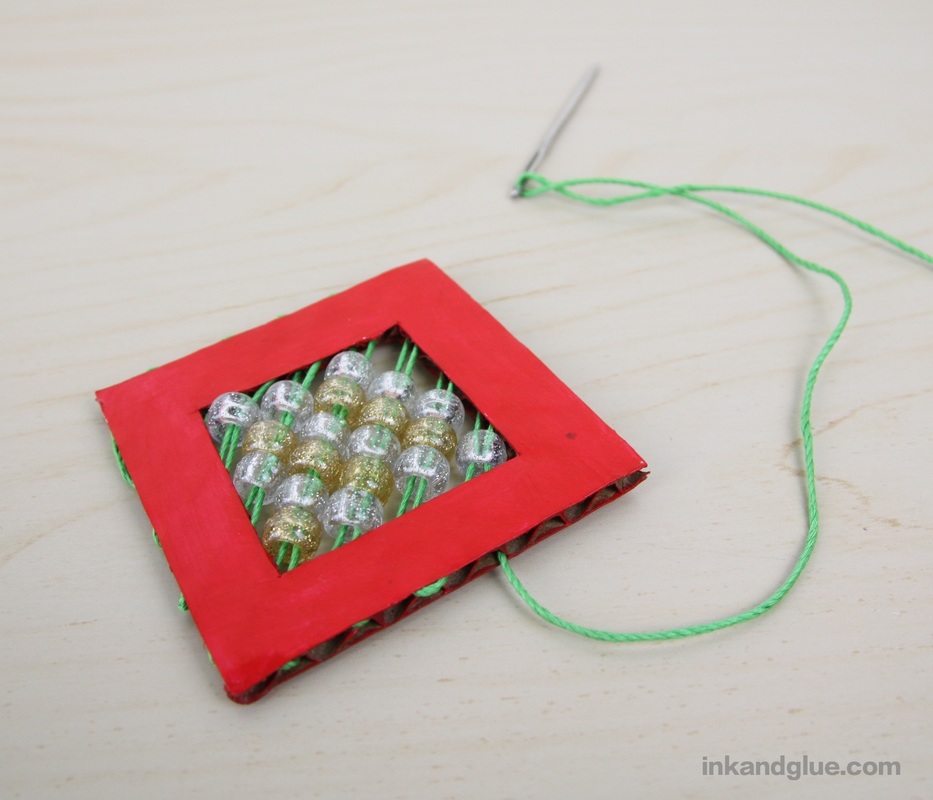 To finish, make a loop around a channel near the corner, knot it, and cut the excess cord. Tuck the end of the knot into the channel, and smoosh a bit of tacky glue inside. Tie on a loop for hanging, and you're done! 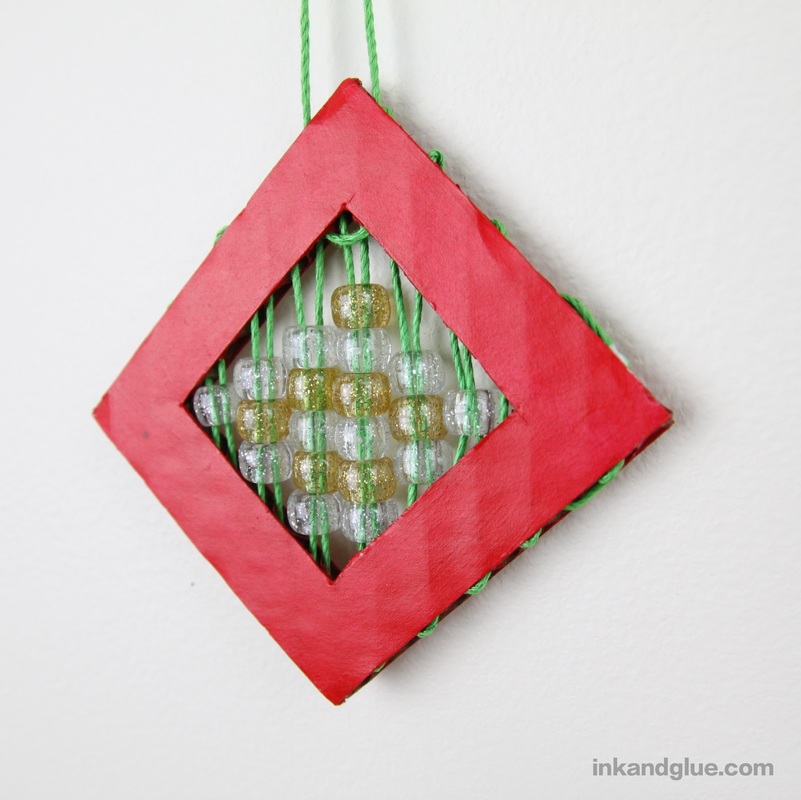 Now for the woven white oval. Thread a yard needle with about 3 feet of yarn, and knot the end. Pass the needle through a channel near an end of the shape, pulling through the yarn until the knot is a couple of inches from the cardboard. Dab some glue on the knot, and pull it into the channel. Let the glue dry (or keep going, but try to not dislodge the knot). 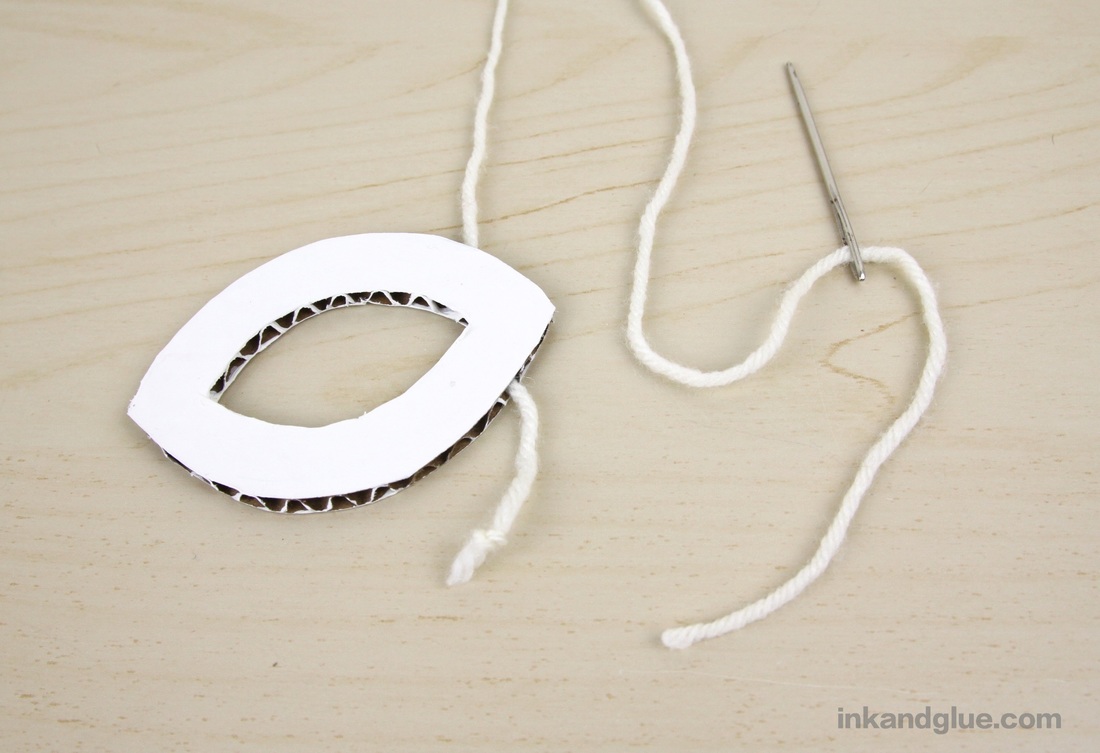 Pass the needle back and forth through the channels until the center is covered.
Tie a knot in the yarn an inch or so from the cardboard. Again, dab glue on the knot, and pull the yarn through a channel so the knot is hidden inside. Trim the excess yarn.
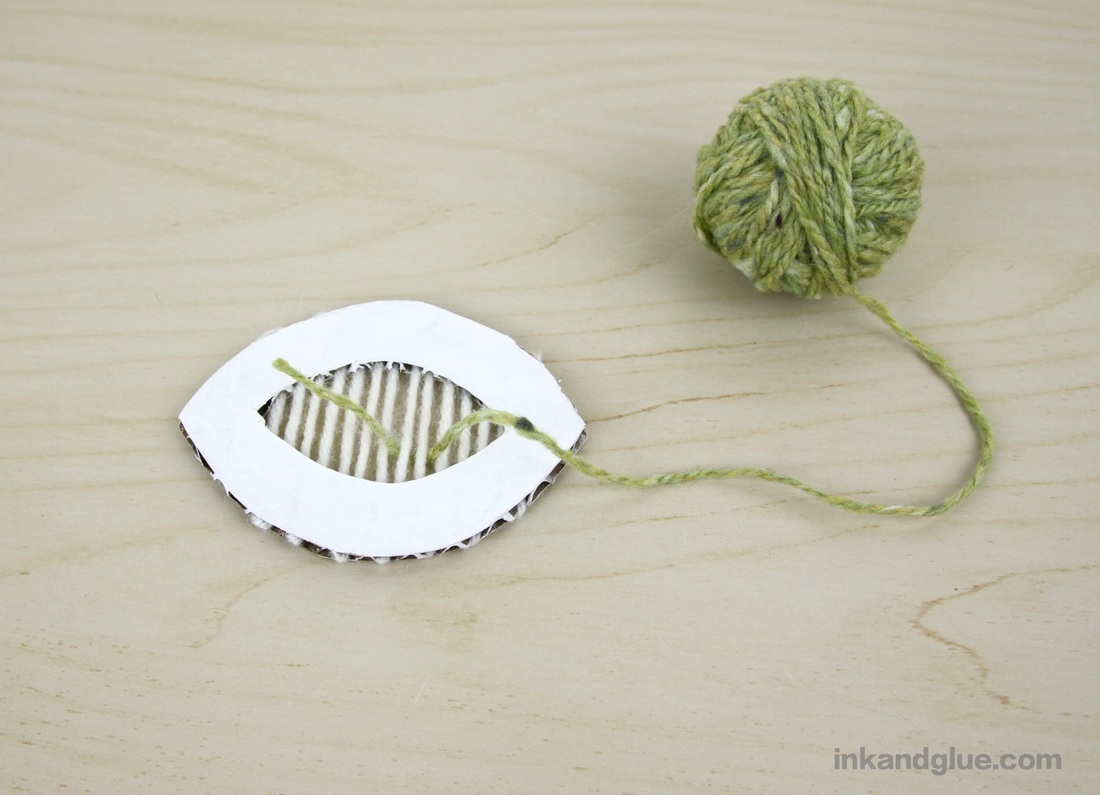
Now, you could stop right here, or embellish what you have in all sorts of ways: paint the cardboard, glue or tie fabric scraps to the yarn, glue on some beads or sequins. I decided to try a simple knotted design for a rustic and natural look. Slip yarn under two of the strands on the ornament, then double knot it, essentially tying the two strands together. Trim the yarn ends very close to the knot.
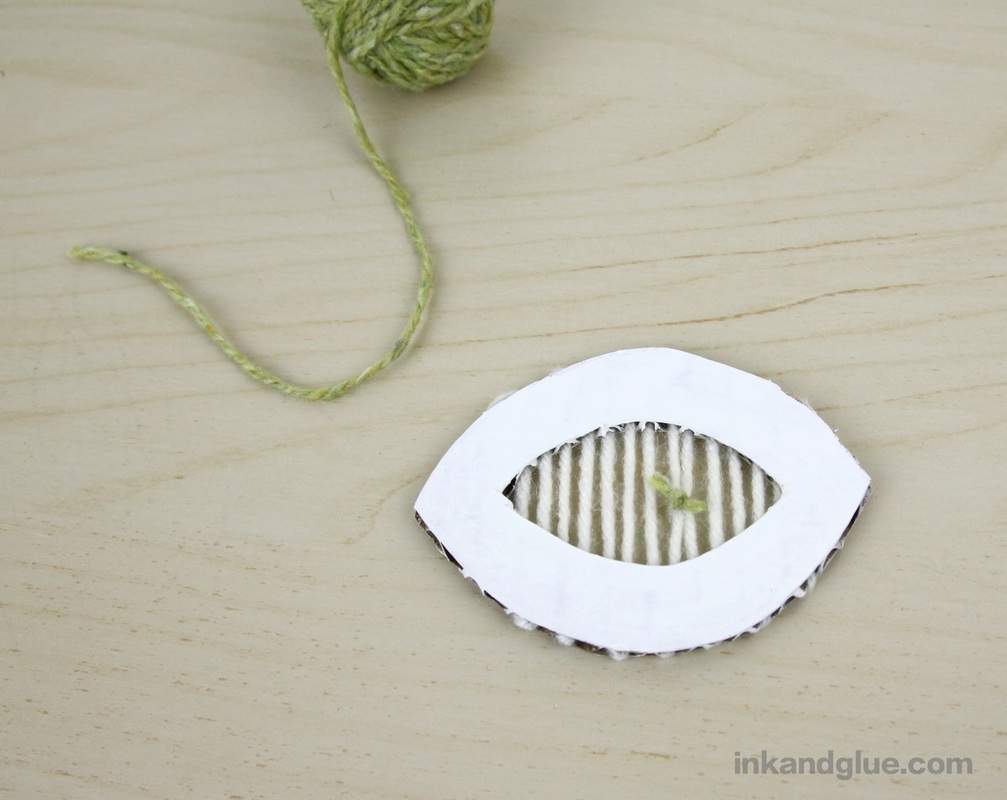
Add more knots to pairs of strands. I alternated which strands I tied together, which ended up giving me a fishnet pattern. Note, you can slide the knots up and down on the yarn strands, which makes slipping the tying-yarn into the ornament easier. 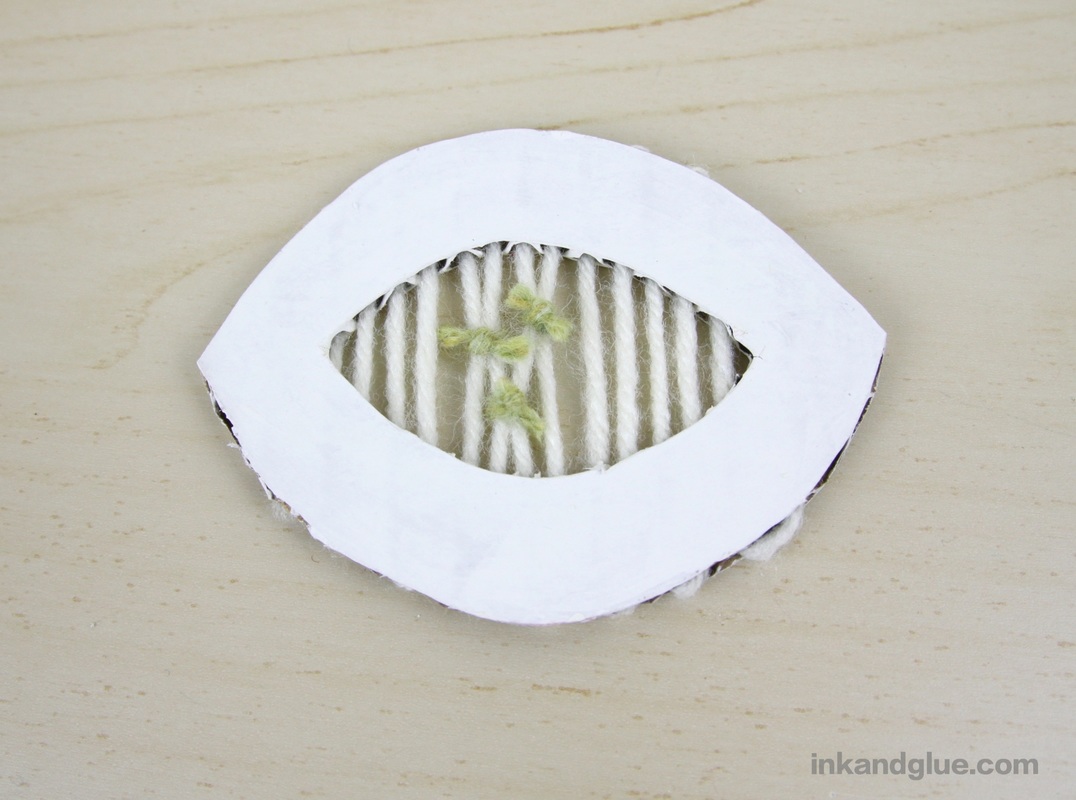 When I had tied to my satisfaction, I used the yarn needle to poke a hole at the top of the cardboard and thread a piece of yarn through it, so I could tie it into a loop for hanging. Here's how it looks, knotty-side up, all nobbly and wooly: 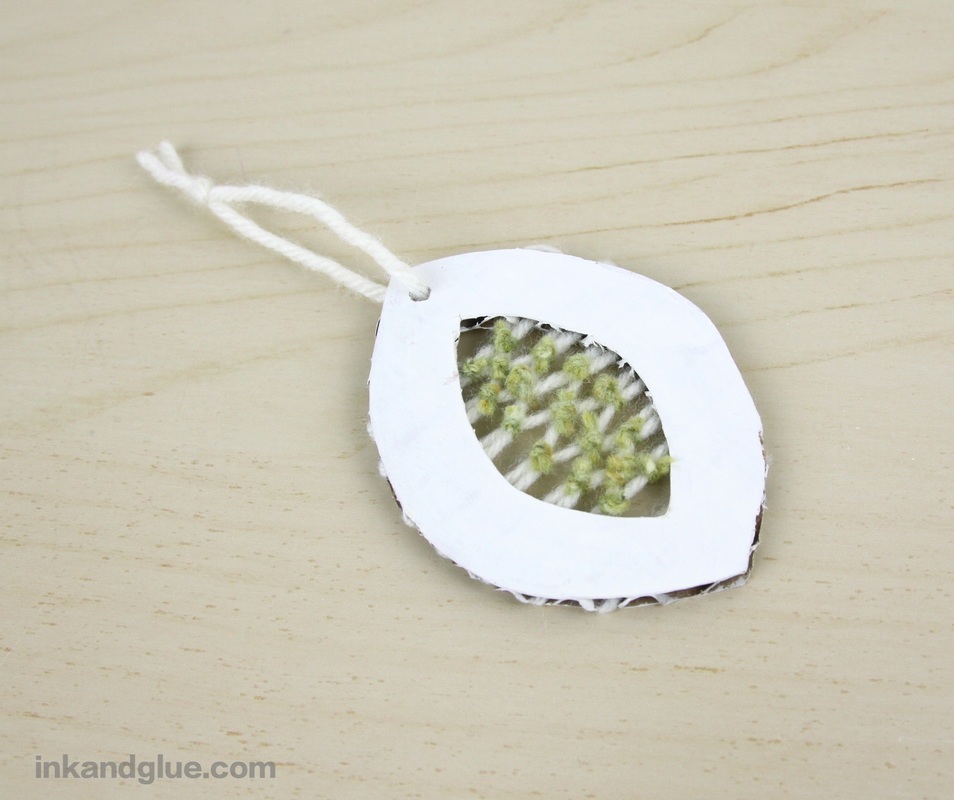 And here's the other side, which looks smoother and neater.  I hope I've inspired you to play with cardboard in a new way!
xo |
Categories
All
Archives
March 2017
AuthorI'm Debbie Way, an artist and writer who enjoys making things. |


 RSS Feed