|
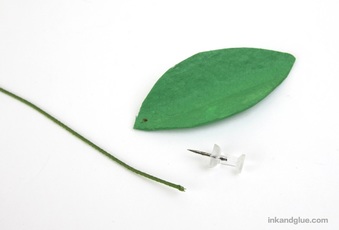
Spring is in the air, but it's not exactly in the garden yet. So, I took matters into my own hands and made my own colorful bouquet of flowers from an egg carton. 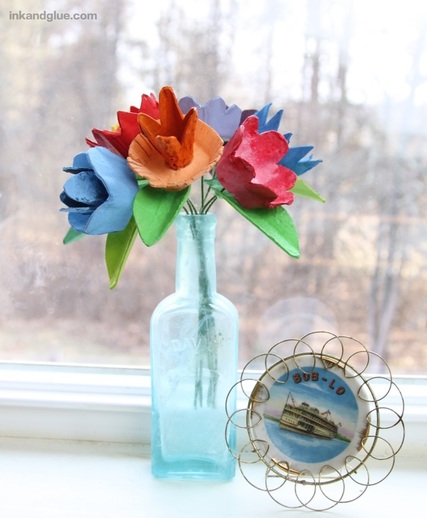 At first, I was going to glue the blossoms to something -- a piece of cardboard? A tin can? -- and have it be either a thing to hang on the wall, or a pseudo Easter basket. But in the end I went with a straight-forward, and more versatile, bouquet of stemmed flowers. Start with a cardboard egg carton. I used a combo of a craft knife and scissors to do all of my cutting. Cut leaves from the bent edges of the lid, as shown below. The flowers are obviously the cups of the carton; cut them out roughly from the carton, then shape the petals. Cut a few of the sticky-uppy posts for flower centers, too.
Play around with different shapes and configurations of petals. Here's what I ended up with. 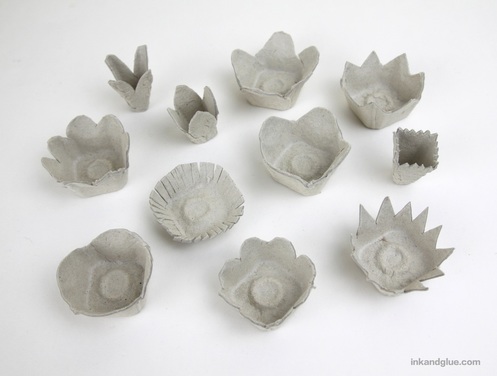 And now, you get to paint! Fun. I used acrylic, and for most colors I only needed one coat. 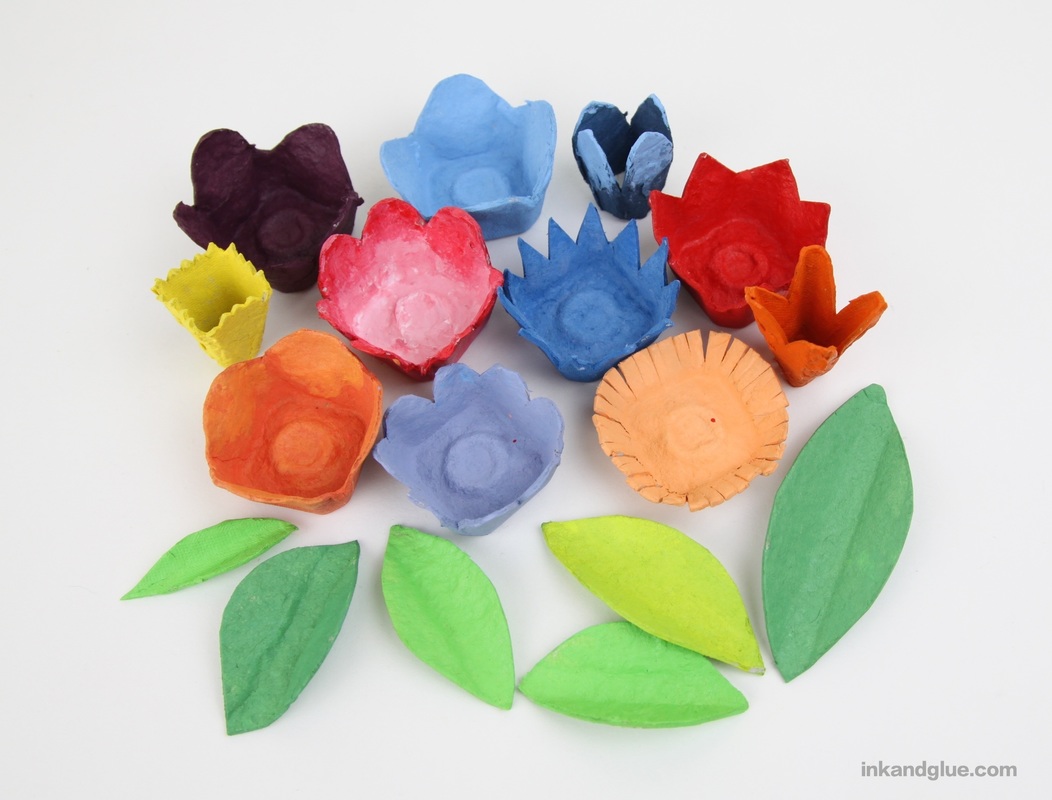
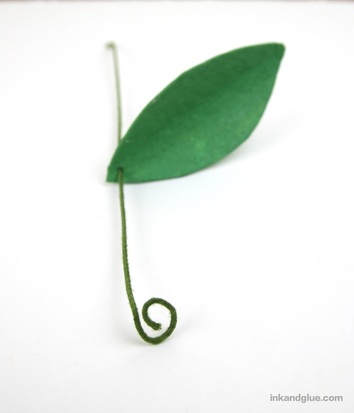
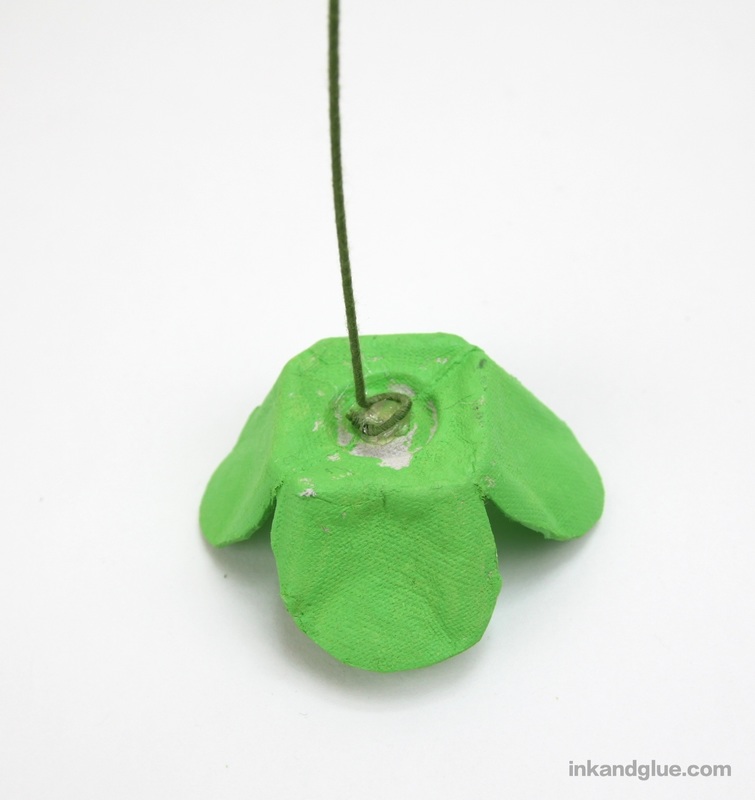
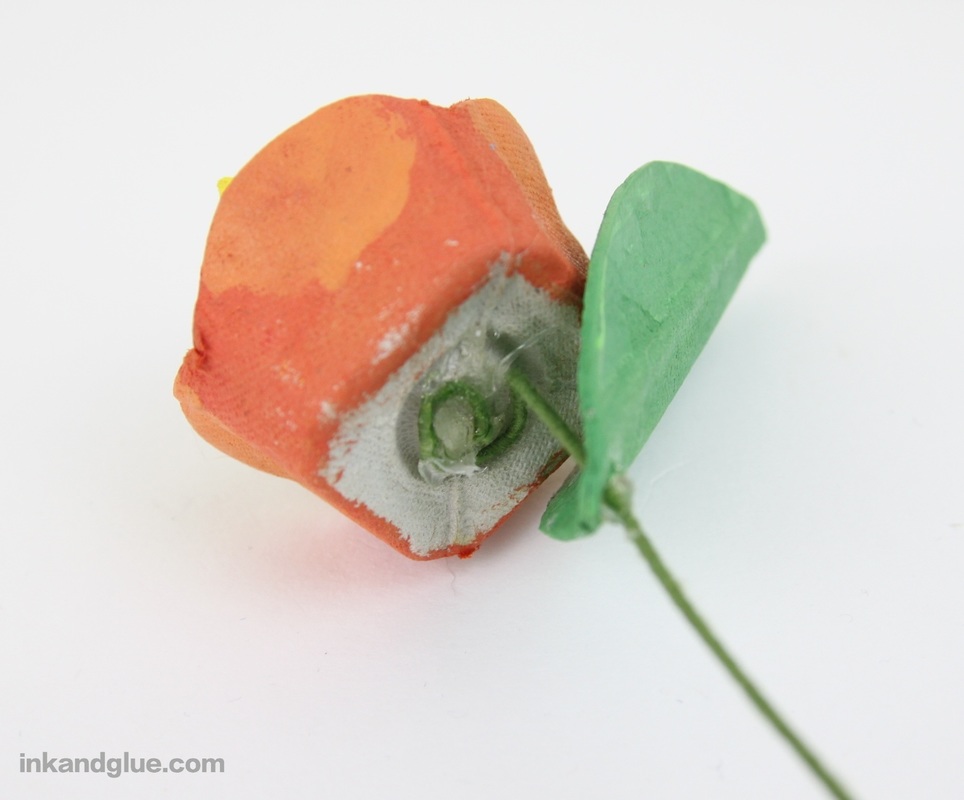
Now it's time to put everything together. I decided to try hot glue again, after a long absence. I have Problems with hot glue, problems that often end up with burned fingers and rubbery spiderweb strands all over the place. Not this time, I told myself. I am a pro, I affirmed. Smash-cut to me with two burn-blisters on my left hand, and stringy hot glue bits everywhere. Sigh. Yes, hot glue dries fast, but it just isn't as easy and safe as tacky glue. Anyway, here's how I made the flowers with hot glue. Substitute tacky for hot glue as you prefer; you'll just need to hold things longer (or lay them in place as the glue sets). First glue any inner blossom (made with an upright post from the carton) to its outer counterpart. Turn the flower over, dab a blob of glue on the middle of the flat part, and press the circle end of the wire into the glue, like you're an old-timey cowboy branding a horse. Hold as the glue sets. Slide a leaf onto the stem wire, and dab glue around and in the hole to secure it in place. All of this will be hidden so it's ok if it looks a bit messy.
Once all of your flowers are stemmed, and the glue is dry, gather them up into one hand to make a bouquet. Arrange them as you like, then wrap the stems together with tape. 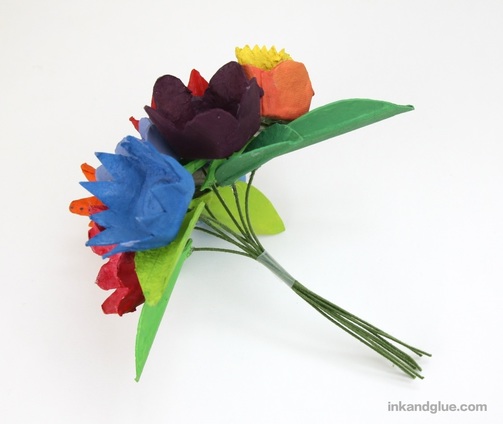 Put them in a vase of your choosing. I like using an old glass bottle for small bouquets. 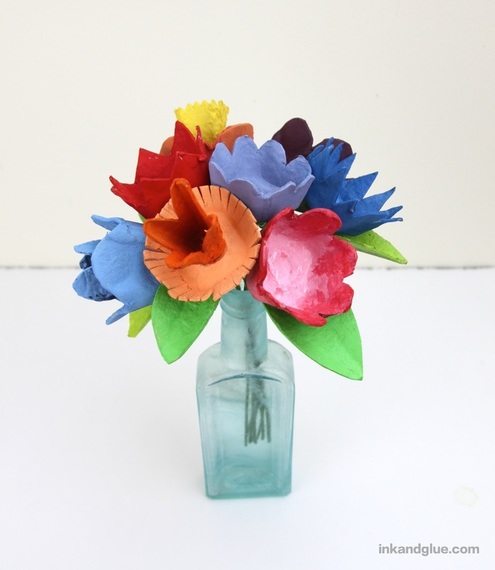 Turn this into a St. Patrick's Day project by adding a four-leafed clover. You could make all of the stems shamrocks instead of flowers, if you want to go all-in. 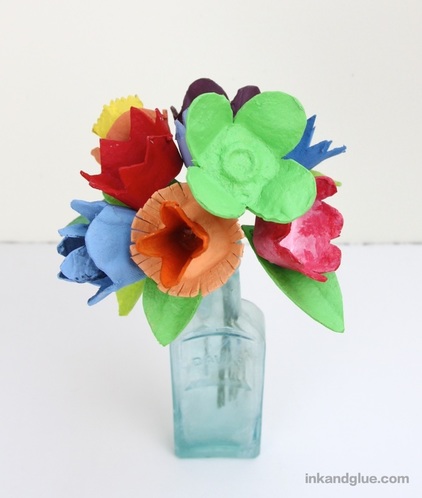 Happy almost-spring!
xo This project came about completely spontaneously, which is always a delightful occurance. My S.O. was cutting the bottoms off of a bunch of baby bok choi, and I noticed that the cut ends looked like roses. 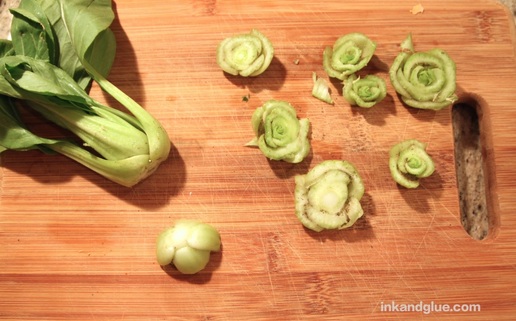 I've seen the chopped end of a bunch of celery used to make flower prints, so I thought I'd try a smaller version with our bok choi ends. I poured some red acrylic craft paint into a clean peanut butter jar lid (perfect for such tasks) and grabbed a couple of pages from pads of inexpensive drawing paper. 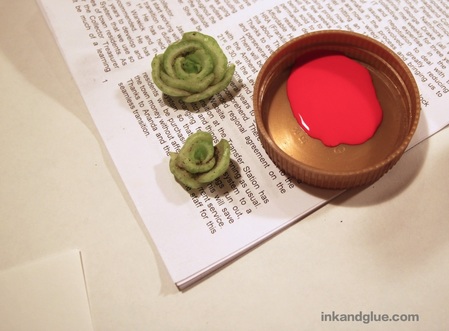 I chose two of the bigger, sturdier bok choi ends for this. If I had gone about this more deliberately, I would cut a little farther from the end, so I'd have something to hold onto. (And I'd wash the bok choi better. It was from a farm stand, so at least the dirt is local, and all natural!) As it was, I needed to stick a toothpick into the base for a handle. Using the toothpick, I dabbed the cut end into the paint. 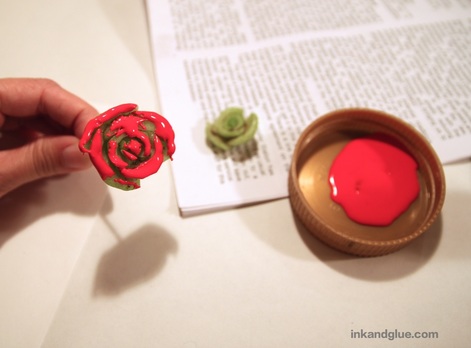 Then I just pressed the painted end onto the paper. It worked best when I rocked the end around in a circle so all of the edges made contact with the paper. I usually got two or three flowers from each dip into the paint. I also tried to rotate the bok choi as I added more prints, to make the flowers look scattered and random. I think the paper came out looking pretty good! 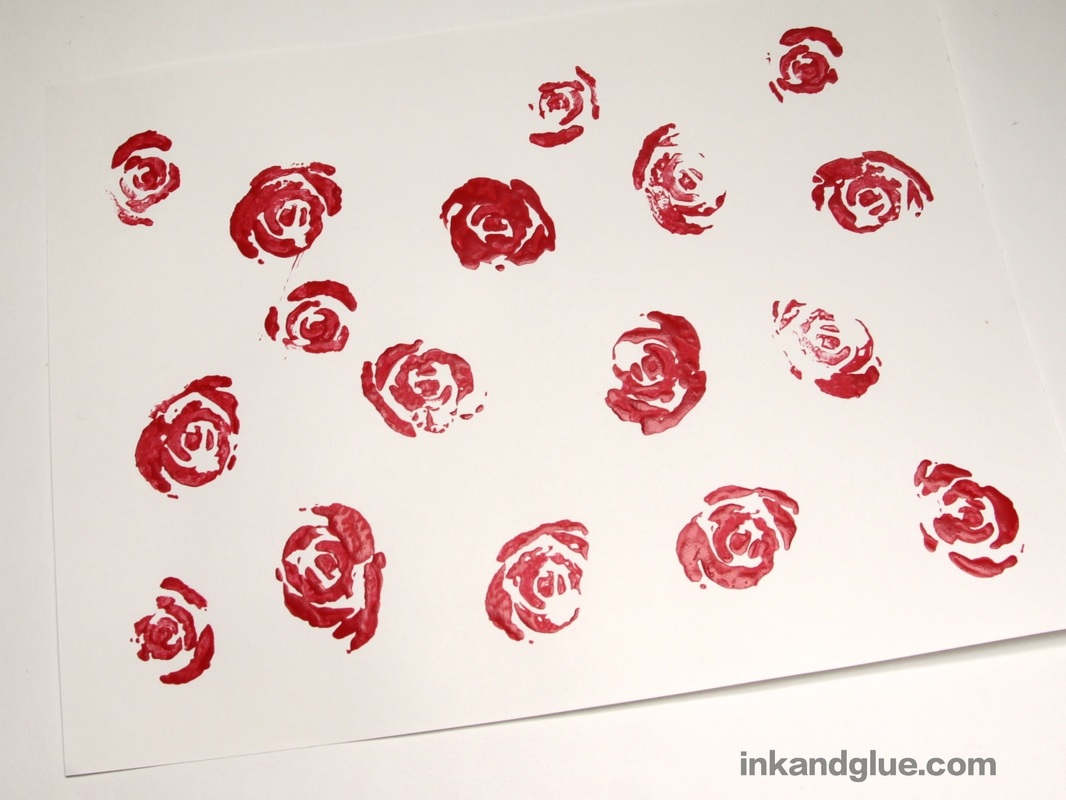 It sort of reminds me of old-fashioned block-printed wallpaper. I might add some leaves, using a stamp made by cutting a leaf shape out of felt and gluing it to a block. This makes lovely wrapping paper, or you can use the technique to make homemade cards.
Here's to impromptu art exploration! xo I had some "beads" left over from my previous cardboard necklace, so I thought I'd try combining them with one of my most favorite materials, pom-poms. Yes. 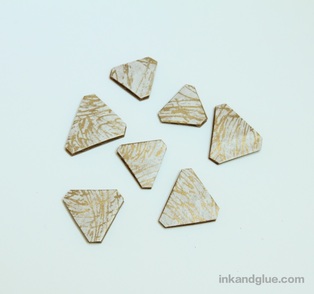 First, I trimmed the corners from the triangular beads, just to try a different shape. These look a bit more crystal-like, I think. 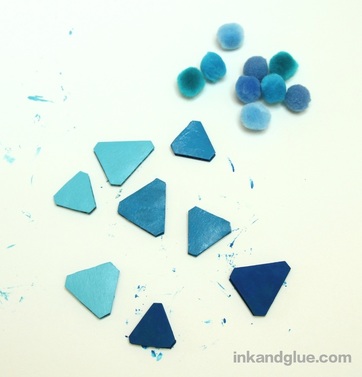 Then, I took a look at my bag of pom-poms. (I feel every home should have a ziplock bag of pom-poms, in case of emergencies.) I happen to have several different shades of blue, so I figured I'd paint the cardboard beads in a range of blues, too. Then, I laid everything out the way I wanted to string it. This helped me figure out which beads in the lineup will be at the center of the necklace. 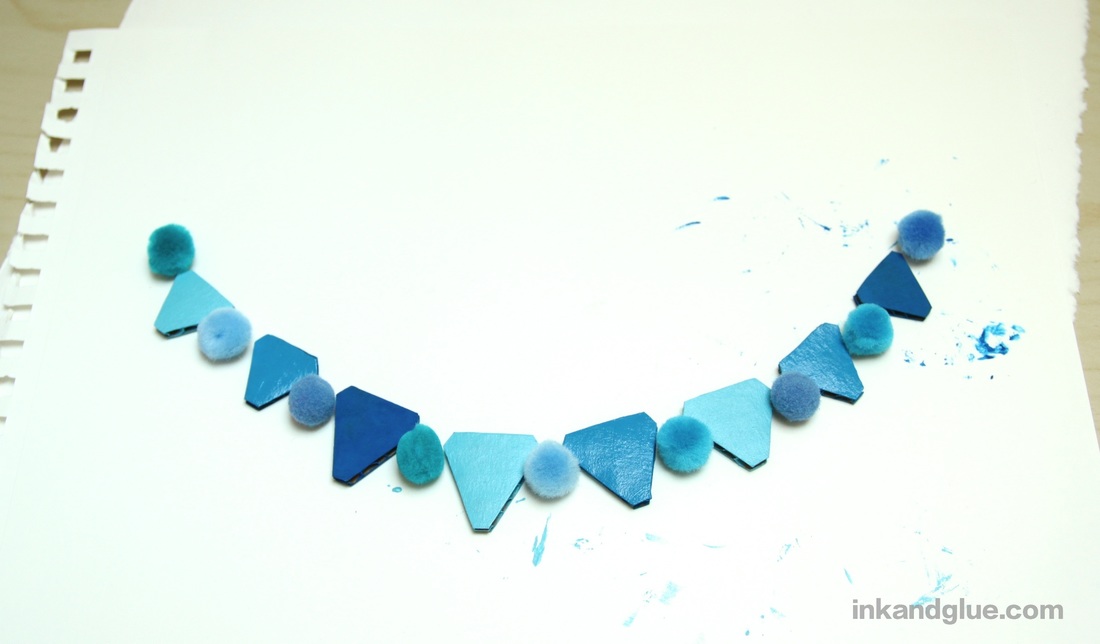 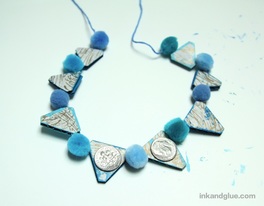 Because this necklace is made solely of super-light-weight materials, I wanted to weigh it down somehow. I glued two dimes to the backs of the two center beads. I recommend doing this before you string everything together, which as you can see, is not how I did it. (This photo also illustrates why you should always paint first, decoupage second.) 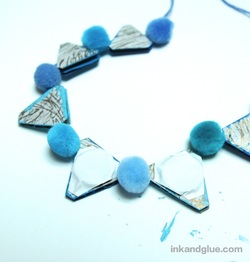 I cut small pieces of regular white copy paper to match the shapes of the two be-coined beads. I coated each paper bit with glue, then smoothed it over the coin and the back of the bead. This will help the dime stay right where it is. Now it's time to put it together. You do need an actual embroidery needle for this project; a yarn needle isn't sharp enough to go easily through a pom-pom. I threaded mine with embroidery floss, because I have a rainbow of colors on hand. Knot the end of a long-ish piece (about 20 inches), and thread on a pom-pom, then a cardboard bead, then another pom-pom, and so on. Just make sure to both start and end with a pom-pom; the poms stay tightly on the string and they'll keep your beads from sliding around. The finished piece: 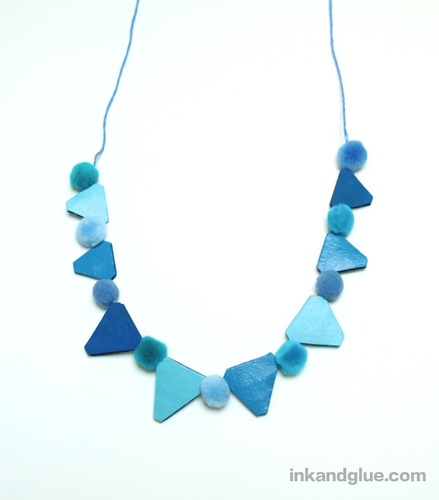 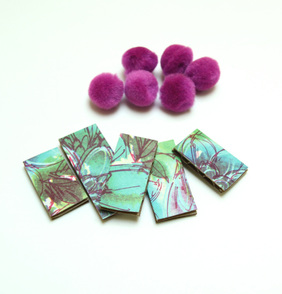 But wait, there's more! I had a few of the other decoupaged beads left, so I made a third necklace with the alternating-pom-poms scheme, below. 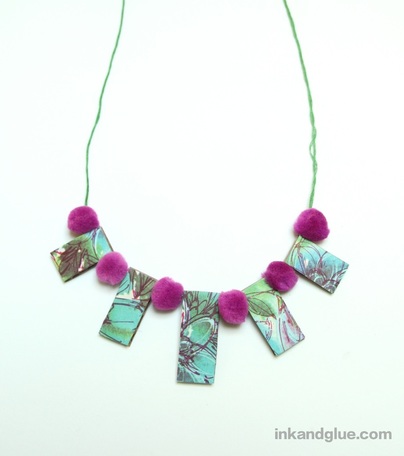 Something about working with such inexpensive materials really opens me up to trying more off-beat color and pattern combos than I otherwise might. I hope you get a chance to make your own cardboard bead necklace. They are truly fun!
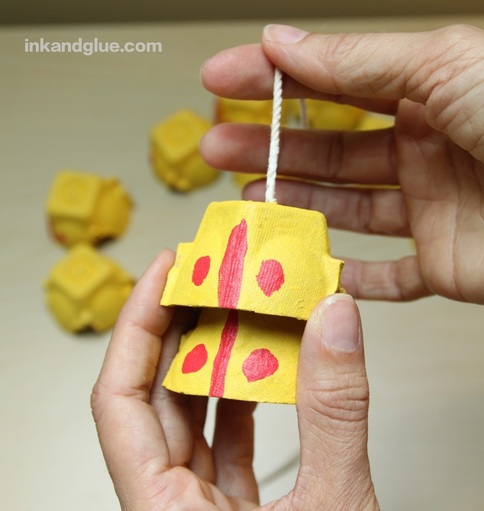
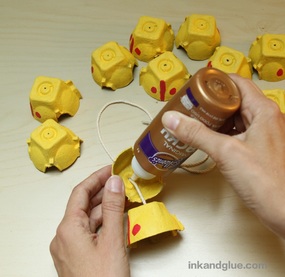
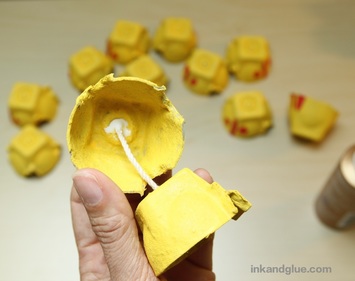
xo 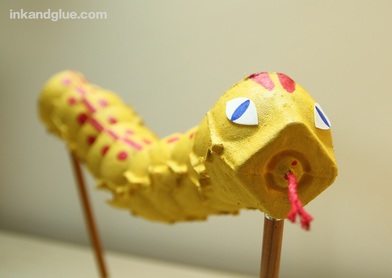 I wanted to create a snake toy that could bend and curve as well as an actual, live snake. I started with egg carton cups, since it's one of those materials that's free (this is a theme in my work), easy to find, and also easy to cut, glue, and paint. After some trial and error, I came up with this vibrant yellow serpent. You and your kids can make one, too. The process is straightforward but has a couple of tricky moments, so grown-ups should be on hand to assist beginners as needed. First, dissect a cardboard egg carton. I cut mine apart with the help of a craft knife and scissors. Trim each cup so they're roughly the same-ish. Then, paint them. I like acrylic paint for this because it provides a nice, opaque coat. I painted mine inside and out because I wanted them to look good for the blog, but it's fine to skip painting the inside. 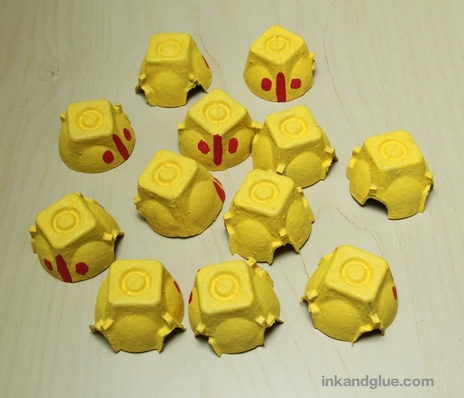 Next, use a push pin to poke a hole in the center of each cup. Wiggle the pin around a bit to widen the holes.  Thread a steel yarn needle (I got mine at Joanns years ago; they're cheap) with sturdy cotton string or twine — the kind you get at a hardware store. Cut the length of the string to 12 to 16 inches, and knot the end.  Going through the inside of the cup, thread the first section — what will eventually be the tail — onto the string. 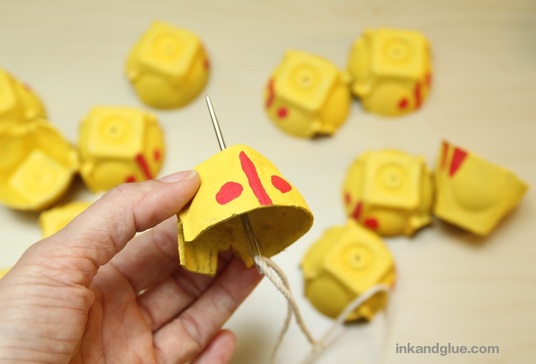 Pull the string all the way through so the knot is nestled inside. Dab a generous glob of tacky glue around the knot. 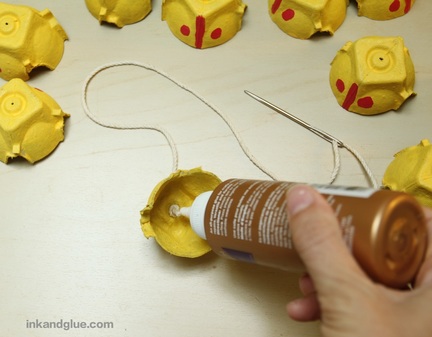 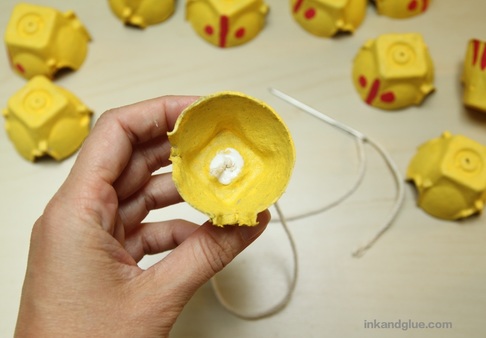 Thread the next section onto the string, sliding it to within an inch and a half or so of the first. 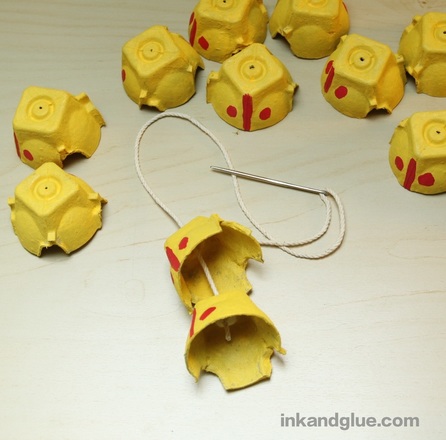 This is the awkward part: dab a nice glob of glue around and inside the hole of the second cup. Then, slide the cup down the string a bit, so it's sort of overlapping the first cup. (When the glue dries, the cup will be adhered in its place on the string.)
 Continue with the rest of the cups. For a head, I painted one of the cups differently from the others, so I put that one on last. Adjust the spacing of the cups on the string as needed, then let it dry somewhere it won't be touched by an impatient child and/or used as a toy by a curious cat. 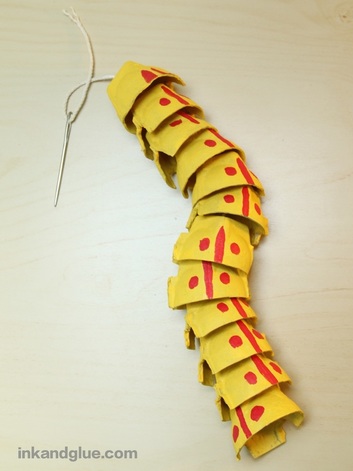 Trim the end of the string to about an inch from the cup. You can choose to knot it closely to the cup, or coat it with paint and separate the strands a little for a forked tongue. Glue on paper eyes (mine are Sharpie marker on scraps of watercolor paper). 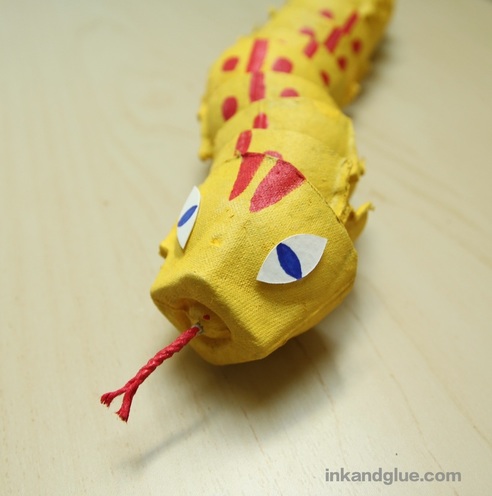 Now, you could stop right here, and you'd have a perfectly functional, wiggly snake toy. It's not really designed to survive lots of hands-on contact, so I suggest adding some sticks and making it into a puppet. Use a standard hole punch to make a hole at the base of the first and last cups. 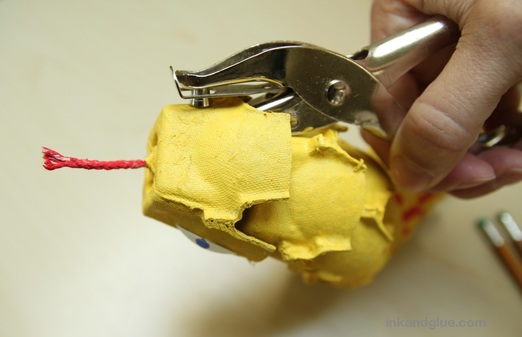 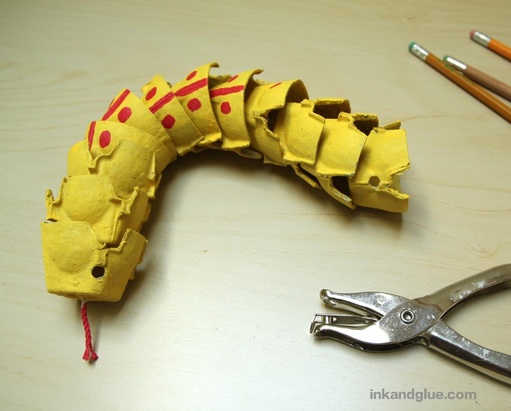 Gently insert the eraser end of a pencil into each hole. A quarter-inch dowel would also work (and would probably look more sophisticated), but I had pencils on hand. 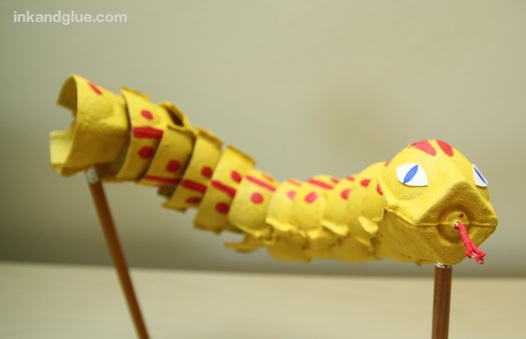 And here she is! This snake is super flexible, and is easy to move and slither all around the house. 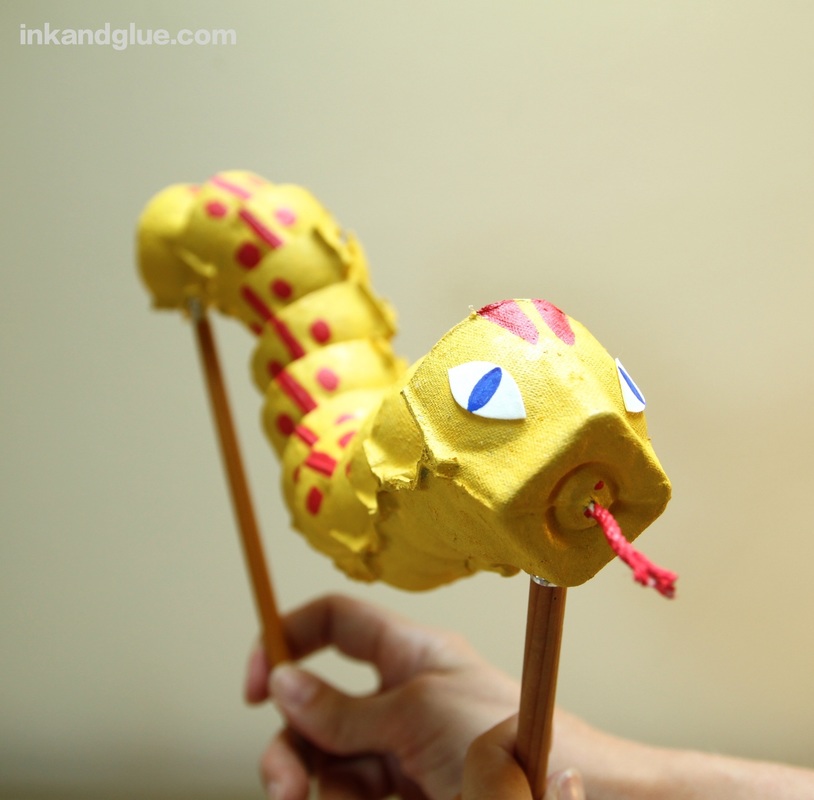 Thankssss for sssstopping by!
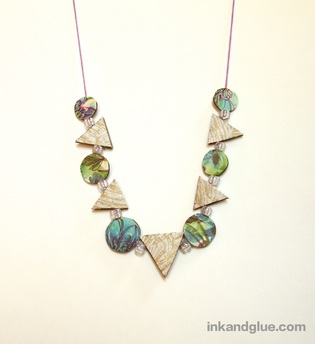
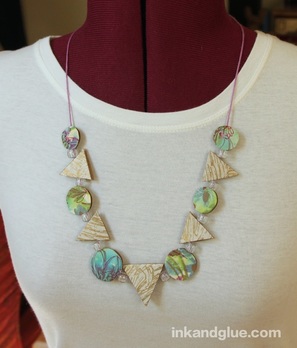
xo 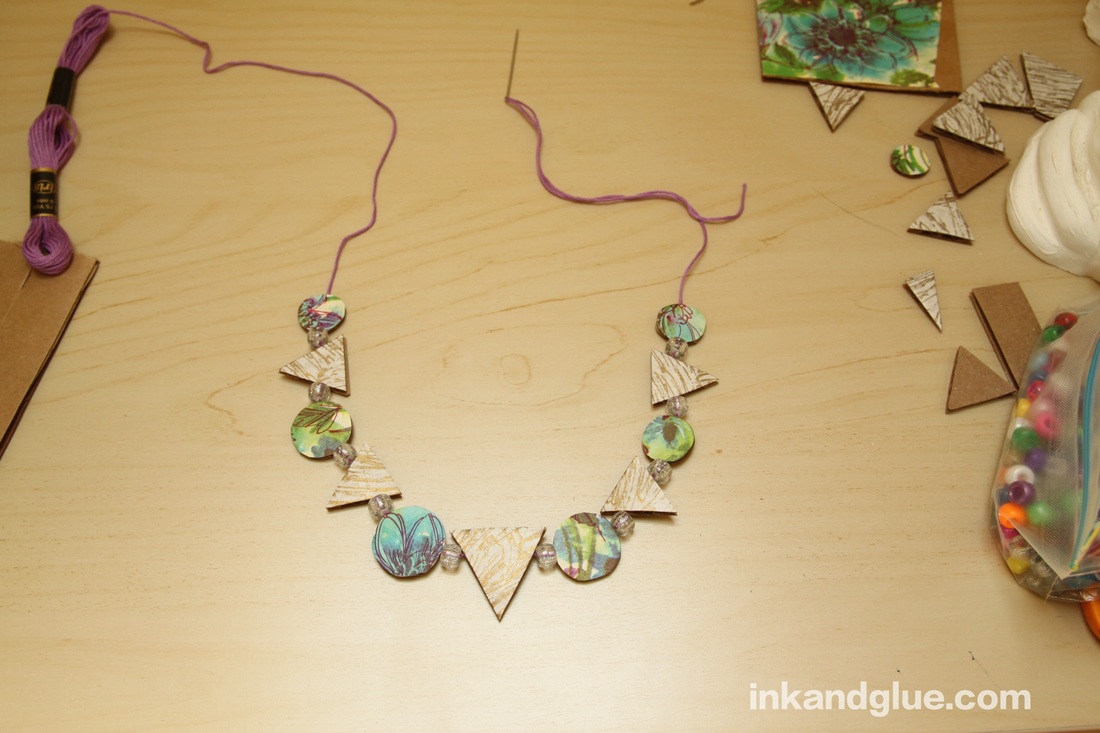 Corrugated cardboard is such a fun, stress-free craft material. It's free (ask for a box at a grocery or liquor store), it's sturdy, it takes paint/marker/pen well, you can cut it and glue it and stand it on its edge... I could go on and on. I've been thinking recently about ways to utilize the corrugations — the channels, or flutes, inside a sheet of cardboard — in crafts. Those channels happen to be plenty wide enough to fit an embroidery or yarn needle. With that discovery, and my love of "statement" jewelry, I had myself a plan. Start by brushing a thin layer of Mod Podge (you could also use white glue, though you should be extra careful to use only a thin, even coat) onto a piece of corrugated cardboard. Smooth a piece of decorative paper, such as a scrap of vintage wrapping paper, on top. 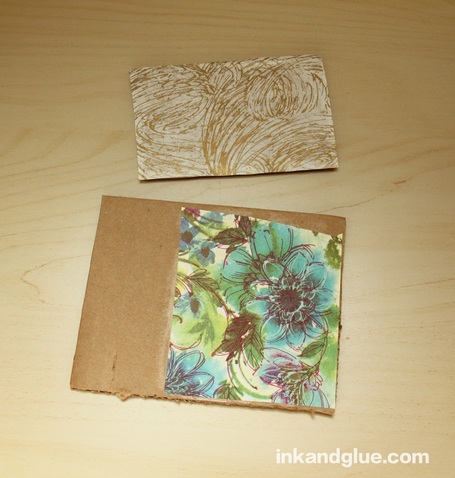 Let the Mod Podge dry completely. If you'll be doing this project with kids, make a few of these panels in advance of your crafting time so they won't have to wait. Then, cut the panels into "beads." I went with a geometric look with one of the panels, cutting a strip into triangles. 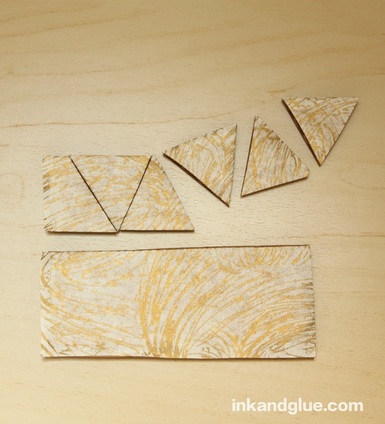 When cutting out the beads, pay attention to how and where the channels are running. If you make your bead too small, there won't be a complete channel for stringing it. Too large, and you won't be able to pull your needle through the other side. My beads ended up ranging in size from about a half-inch to one-and-a-half inches wide. 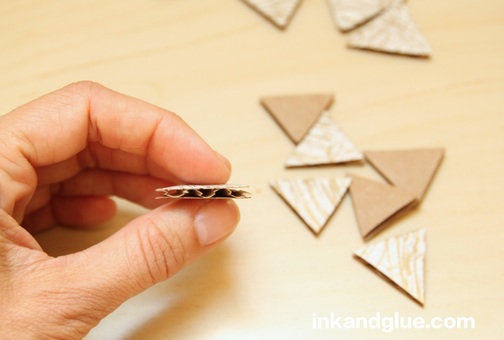 I could have stopped right here and used just a few of these beads for a minimalist look. (I used embroidery floss and an embroidery needle. A yarn needle would have a dull, more kid-friendly point.)  But, I had this other panel just waiting to be cut into beads! I chose free-form circles for this set. If you'd like a more exacting look, trace a bottle cap on the unpapered side and cut out the shape. 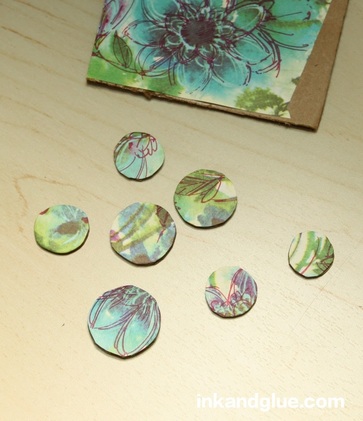 Then, I laid out the cardboard beads and arranged them to my liking. 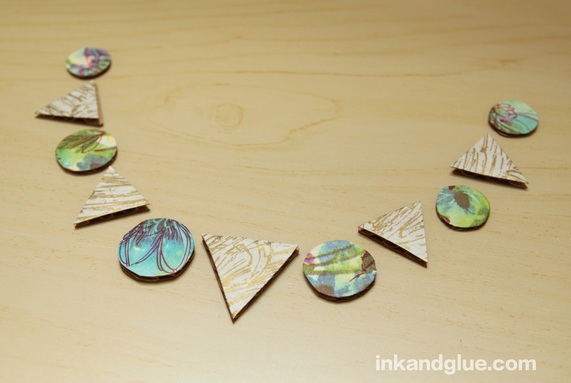 I happened to have some clear, silver-sparkly pony beads, so I used them as spacers between the cardboard ones when I finally strung it all together. I recommend using at least a few "real" beads in order to give the necklace a bit of weight so it won't go flying around while you wear it. If you'd rather go with an all-paper look, add weight by gluing a penny or a dime to the back of your center bead. 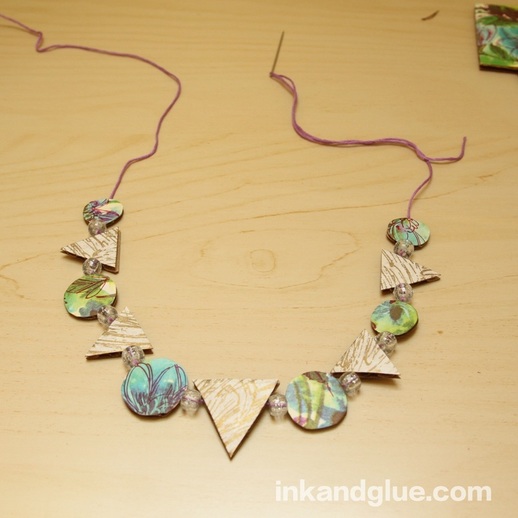
This craft is easy for a wide range of ages and abilities to do, and the finished product can make a great gift!
This post is about color registration boxes. You know, these: 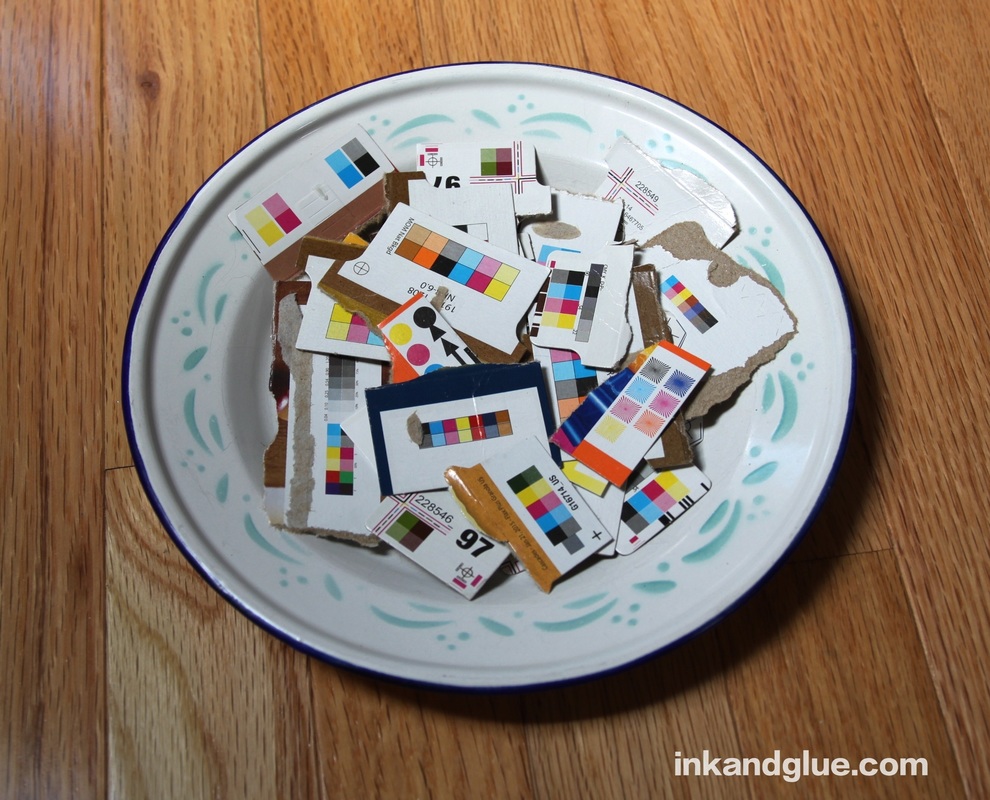 Apparently, in the package-printing business, they’re officially called Process Control Patches, or Printer’s Color Blocks. Slate had a “What’s That Thing?” column about them. I was one of those kids who found merely sitting and eating cereal unbearably boring, so I would read every inch of the cereal box, inside and out. These miniature pop-art canvases were always a delight to find tucked under a glued-down flap. Now that I am a bona-fide grownup, I flatten my cereal (and cracker, and tea, and tissue) boxes for recycling, and that process makes it easy — almost too easy — to tear off and save the little color-block tabs. So, now I have a bunch, as you can see above. But, for what? I didn’t want to alter them too much, since I think they’re visually interesting on their own. However, they don’t get a lot of views in my kitchen junk drawer. I decided to treat them like the blocks they are, and build a 2D city. First I trimmed them all with a craft knife. A child could use scissors. Or, to avoid mixing kids and blades altogether, trim the blocks into simple rectangles yourself before giving them to your child. 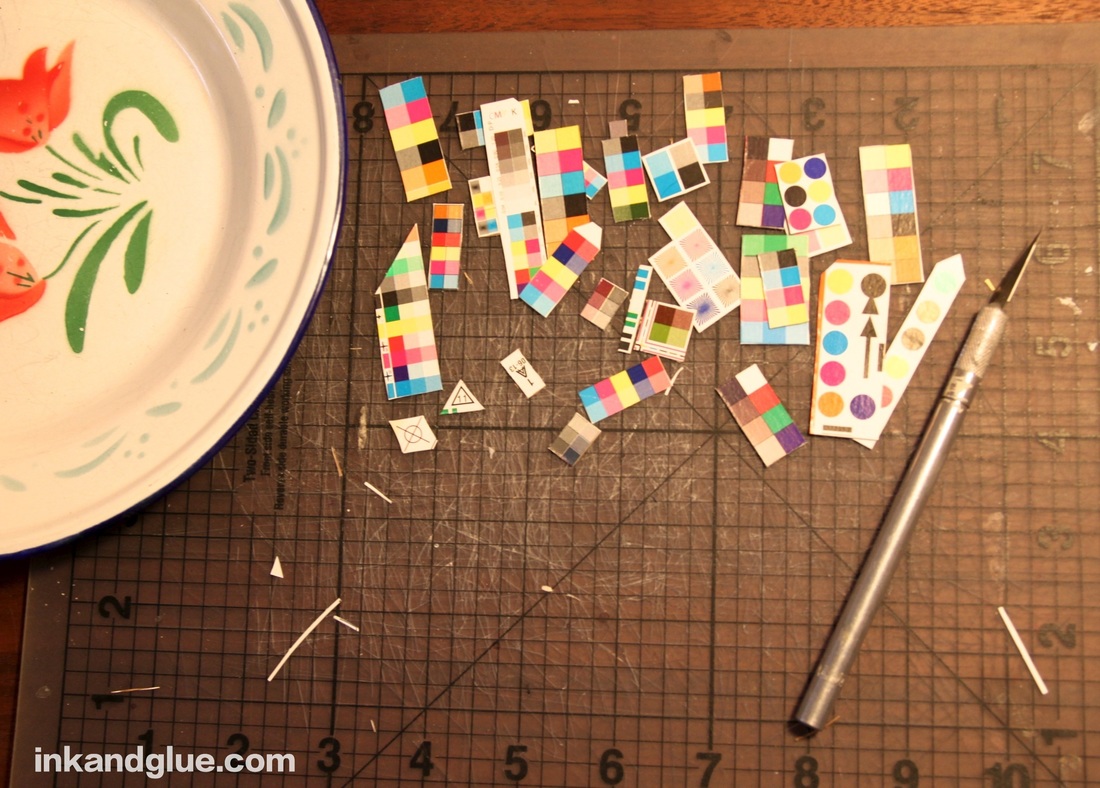 Then, I played around with them on a sheet of thick watercolor paper. You want to use a heavy paper whenever you're planning on gluing things down; regular paper warps and ripples and gets all crazy. Here's my first attempt: 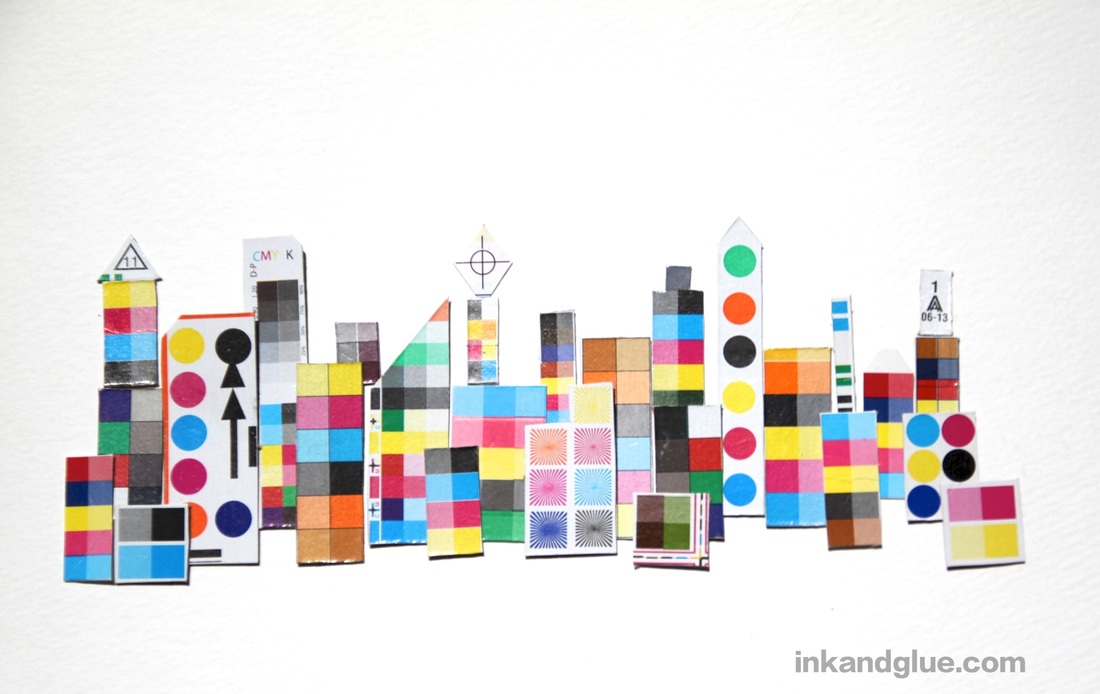 Kinda fun, right? I had cut out a few of the other registration marks to add steeples and roofs, which breaks up the roof line, as it were. But since so many of the blocks have a white border, I thought a darker background paper was in order. So, this: 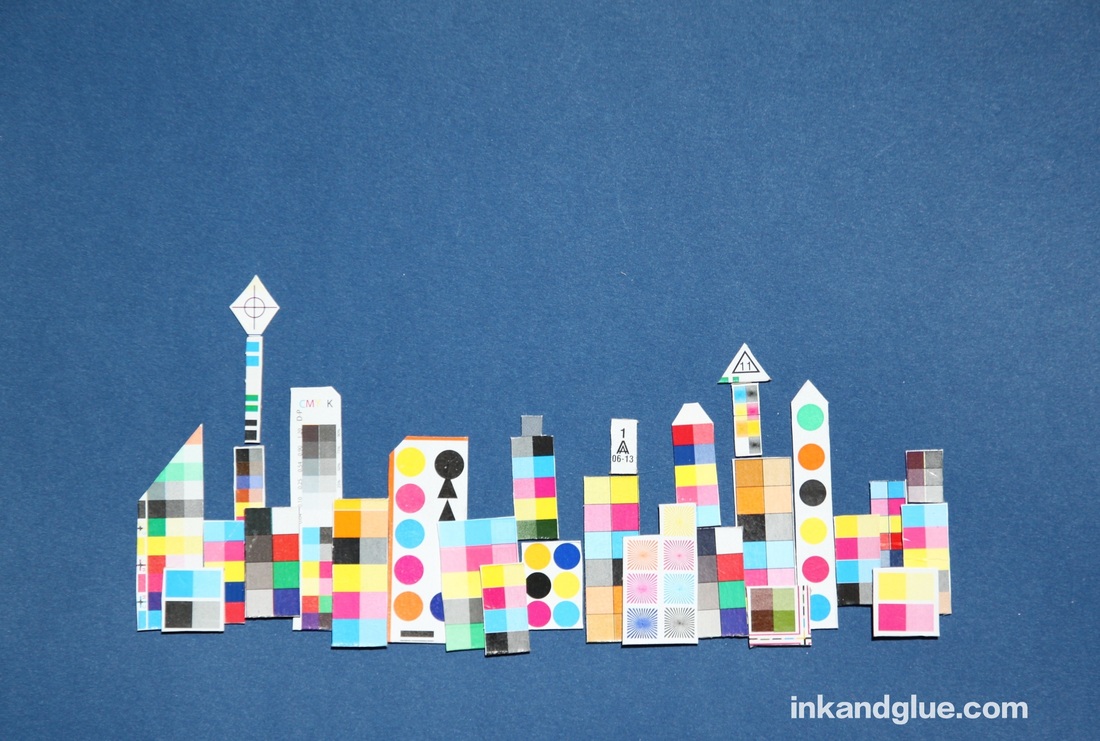 Nice! It's now a city at night, and the bright registration mark squares become glowing windows.
I glued this one down, using Uhu All-Purpose Adhesive. It's like a clear tacky glue, but it doesn't dry quite as fast as regular (i.e. Aileen's) white tacky glue, making it good for exacting people like me who need to nudge things a little after they're glued down. I hope I've inspired you to at least take a look at your cartons before you toss them — you can find art in surprising places, if you're open to it. xo |
Categories
All
Archives
March 2017
AuthorI'm Debbie Way, an artist and writer who enjoys making things. |
 RSS Feed