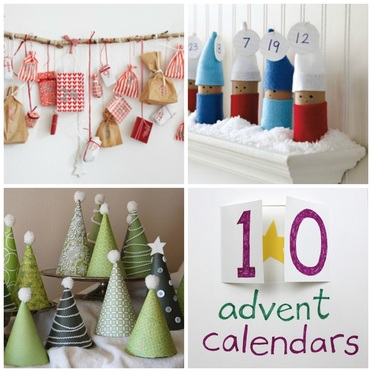
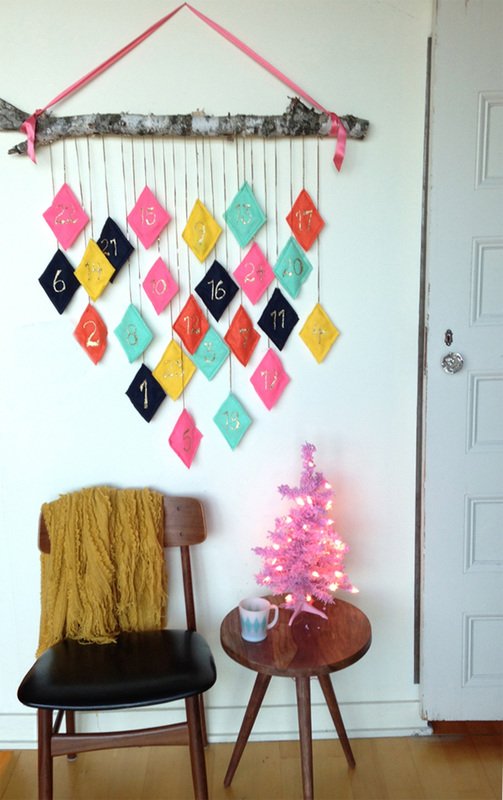
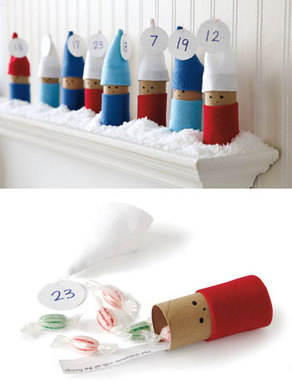
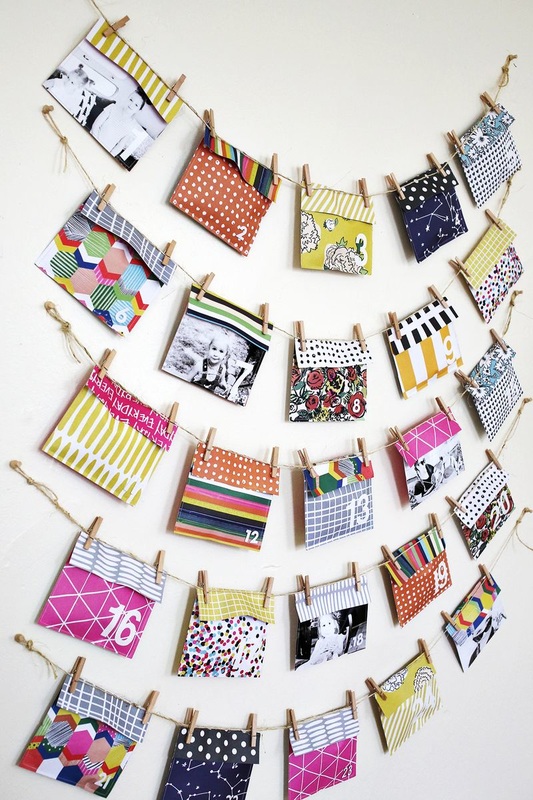
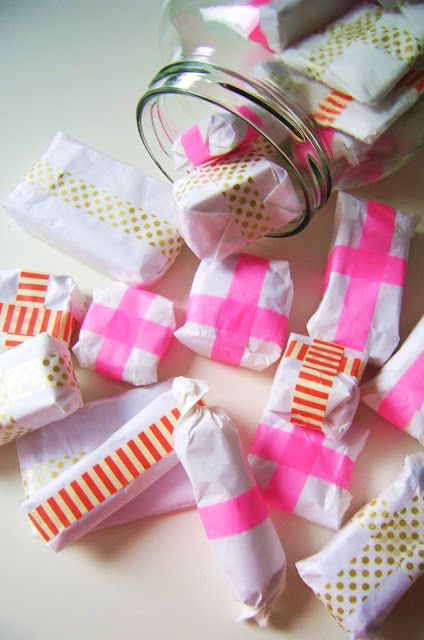
 I love an advent calendar that gives a small surprise each day. It really makes the season feel special, and sates, temporarily, the growing hunger for presents. If you don't want to give small toys or candy, try a joke written on a slip of paper, or a coupon for something ephemeral, such as, "you choose the next family movie," or "it's time to decorate cookies!" These ten DIY advent calendars are the best (IMHO) I've found online. They are in no particular order. As you will see, none require a tremendous amount of time, money, or skill. (Want to make a traditional, all-paper advent calendar with windows to open? There's a template for that, thanks to the wonderful Small Object.) Let's count 'em up!
Enjoy these numbered days!
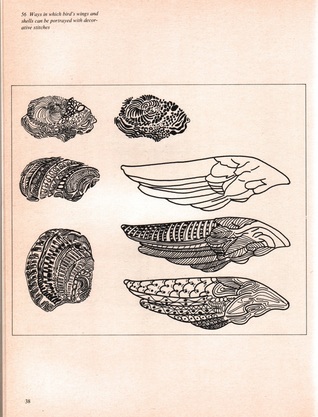
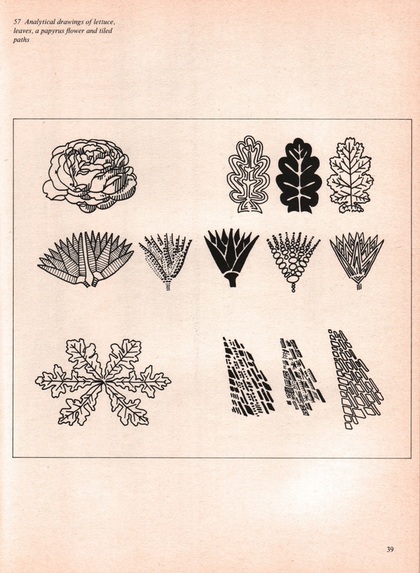
xo 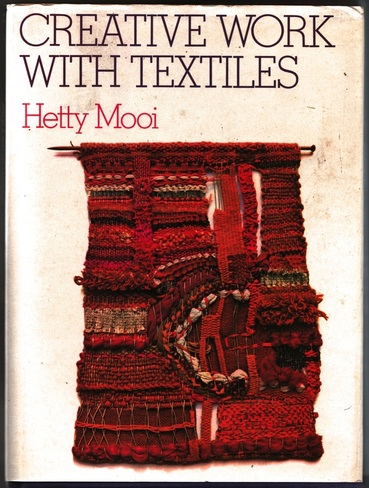 I scored this hardback at an artists' studio sale for a mere 25 cents. It was published in 1975, which is still inside, but nearing the edges of, my design sweet spot. All of the macrame, and macrame-like projects, give off a sweet hippie/groovy earth-mother vibe. You can buy a vintage copy here; it looks as though it only had one printing. 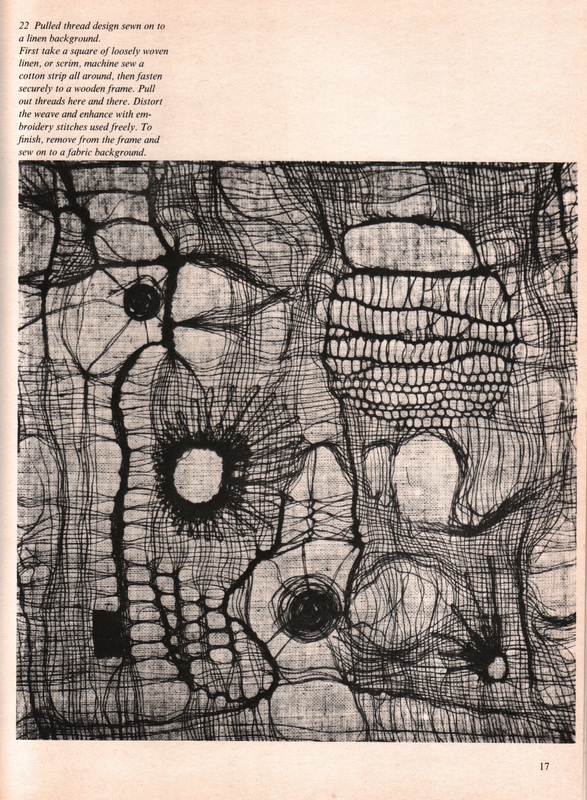 Most of the photos and illustrations are in black and white, and the projects are, for the most part, meant for the adult with serious amounts of focus and free time. However, I found a couple of projects and exercises that would be both fun and thought-provoking for a child to do. One is shown above. You could simplify the project by using duct tape to secure the edges of a square of cheesecloth to a board or a canvas, then play with the weave by cutting and pulling out some strings, tying others together... It might look terrible, but the worst that can happen is you decide to not to keep it, and peel off the tape and toss the cheesecloth. Not too terrible an ending for an hour or so of creative exploration. Then there's this idea, which could be done with any medium. 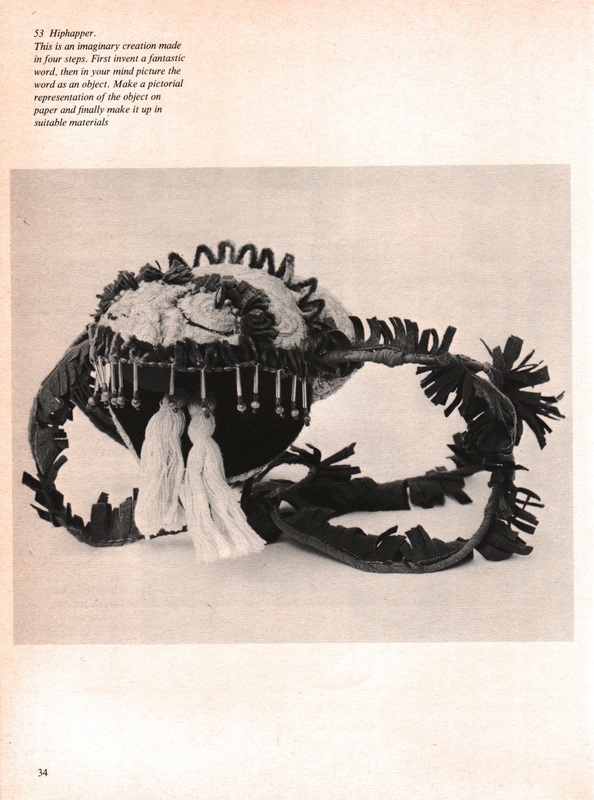 If you can't read the above caption, it says, "Hiphapper: This is an imaginary creation made in four steps. First invent a fantastic word, then in your mind picture the word as an object. Make a pictorial representation of the object on paper and finally make it up in suitable materials." That project is in a chapter called "Design" which has some great ideas for ways to start looking at the world as an artist. It also suggests some exercises that gets the reader practicing making images more abstract, distilling them to their cores. All of the is written in this oddly formal, passive voice, so I'll try to distill the basic messages at the end. A few excerpts: "Try out the following exercise. Look closely at the leaves of a tree, noting the outside shape and the pattern of the veining within that shape; touch and appreciate the texture of the bark; study the changes of colour within an area. Now make a small sampler in any medium to bring out the character of some aspect of the tree which you have observed. Repeat the exercise with a stone, noting its overall shape, whether the surface is smooth or pitted like a crater. Find a suitable technique in which to convey your impressions. Man-made objects, too, can serve as a starting point for design: for instance a wrought iron gate, the pattern of tiles on a roof or windows on a wall. The main thing is to always be aware of one's surroundings, making mental notes to be filed away for future reference." ... "After an object has been looked at and touched, an attempt should be made to transfer the experience to paper (ie to make a design based on impressions gained while handling the object). This will not be easy at first, but a start can be made in quite a simple way and confidence will grow with practice. "Start by basing a design on the veining in a stone or the grain in a piece of wood. Although it may seem alarming at first, make the drawing boldly, say with a felt tip pen on a large piece of paper. Start in the centre of the paper with one firm, unbroken line. If this proves to be incorrect resist the temptation to start again, and put in the next line, and the next, until the drawing is complete. The original piece of wood or stone serve only as a starting point and need not be copied slavishly. Keep your mind open to any chance effects which may be produced and learn to make use of them. [...] As a more advanced exercise take, for example, a thistle, and try to convey in stitches not the actual appearance of the thistle, but the prickly feeling which it suggests. This will entail finding the right materials and searching for the most expressive stitches to convey the prickly sensation." A simplified version of the above: Look at and touch a chosen object such as a leaf, or a stone. Examine the texture, colors, surface, patterns. Make a piece of artwork (in any medium: drawing, painting, collage, etc.) depicting one aspect of your object. Next, after further studying the object, draw it in marker using big, bold lines. Finish the drawing even if you feel like you've messed it up. The key point is to treat the object as just a starting off point; don't try to faithfully reproduce it . I like how the patterns the author comes up with are so Zentangle-ish:
"Another way of building up a design is to cut out a few geometric shapes, such as circles, and arrange them on a background, sewing [or gluing] them down when a satisfactory arrangement has been found by trial and error. A more complex pattern could then be evolved superimposing a linear pattern on the solid circular patches. Full use should be made of any chance effects which occur in the development of the work. " There aren't any images given to accompany this activity, so I chose a couple of inspiring images that could, conceivably, be the end result: 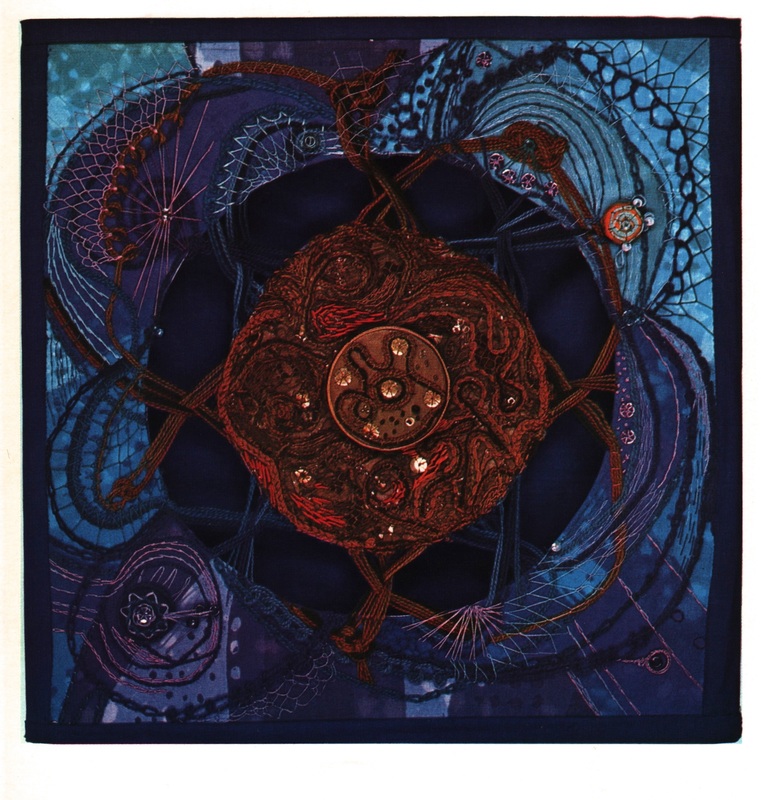  I hope you get a chance to do some creative exploration today!
xo British product designer Duncan Shotton has a playful way of looking at ordinary objects — pencils, sticky notes, soap dispensers, thumb tacks — that makes you look at them in a new way. Take these Rainbow Pencils, where the colors are in the shavings, not the lead centers. 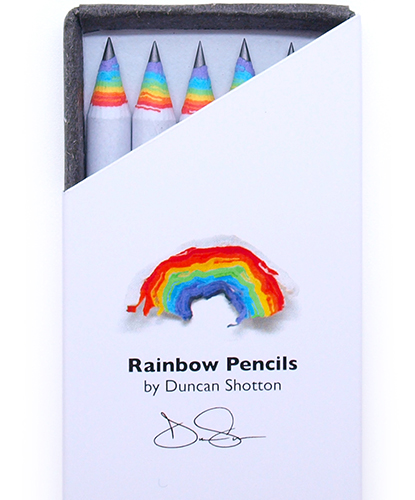
There's way more to explore on Duncan's online store. He's in the U.K., but ships to the U.S. for a reasonable rate. Go see!
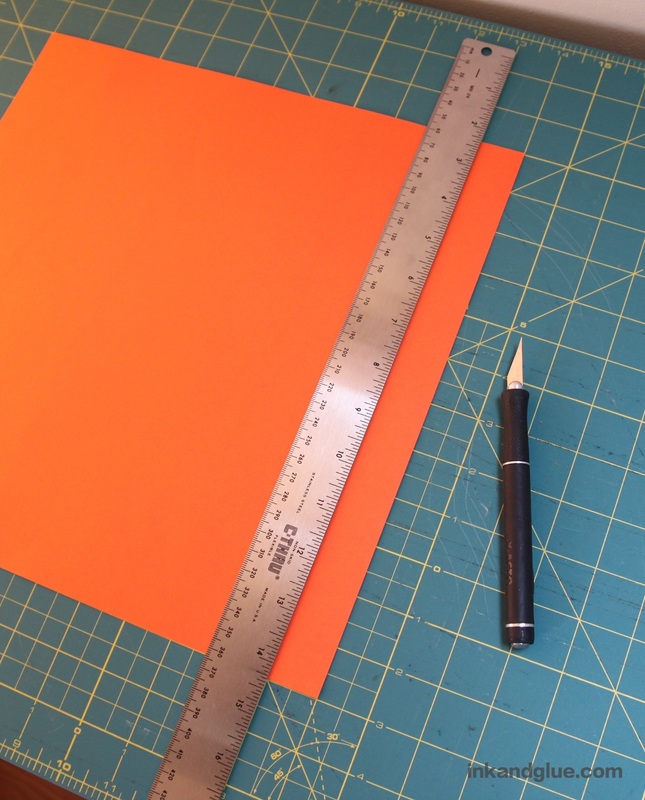
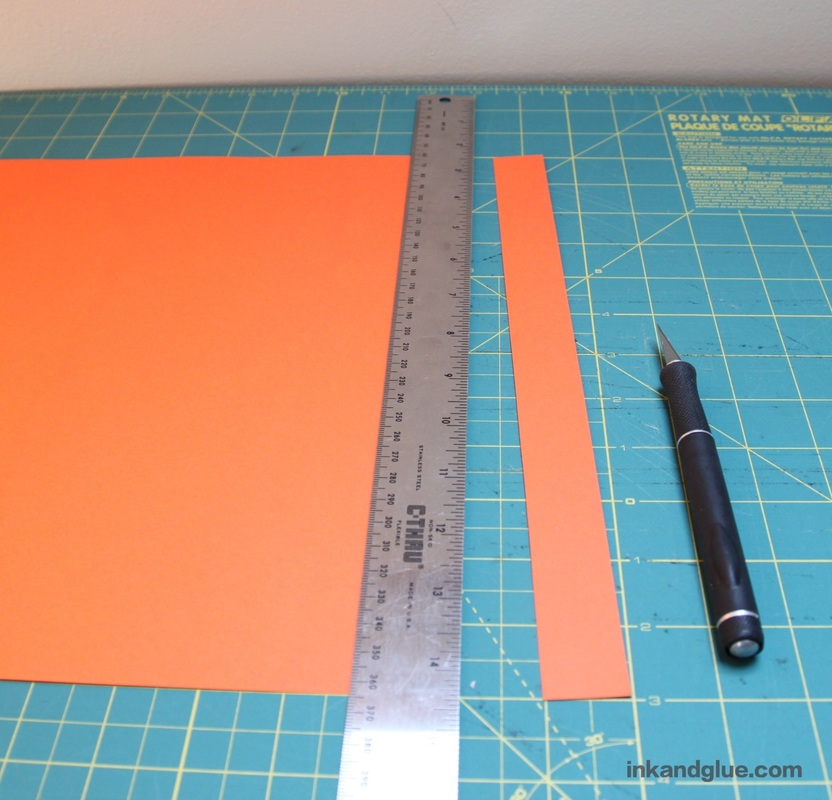
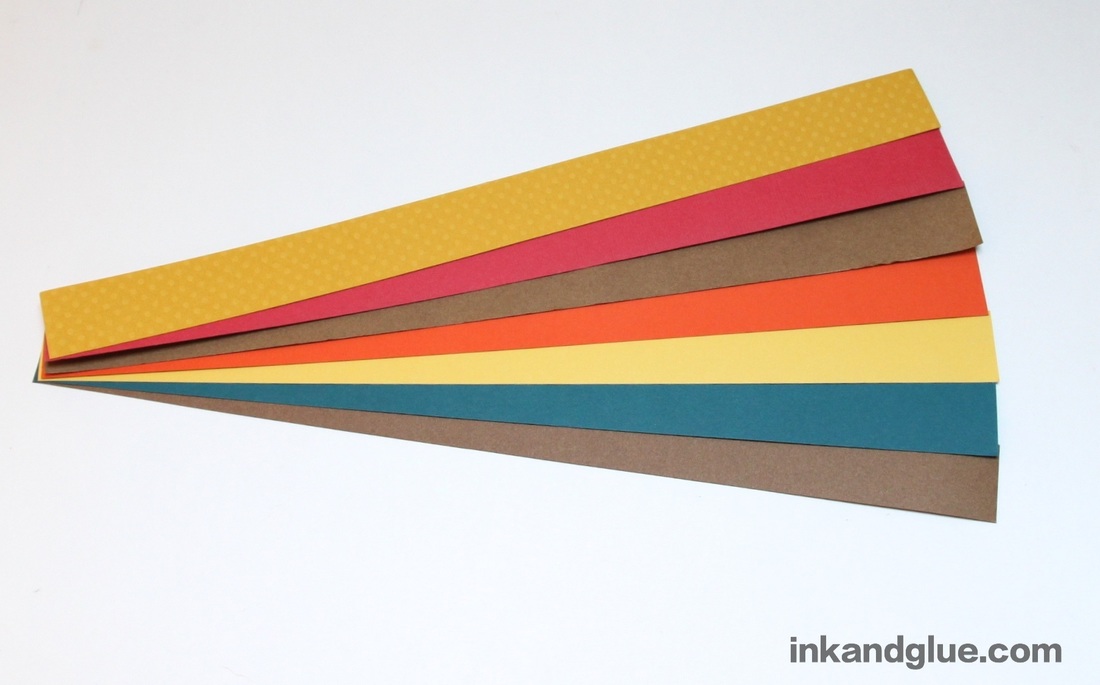
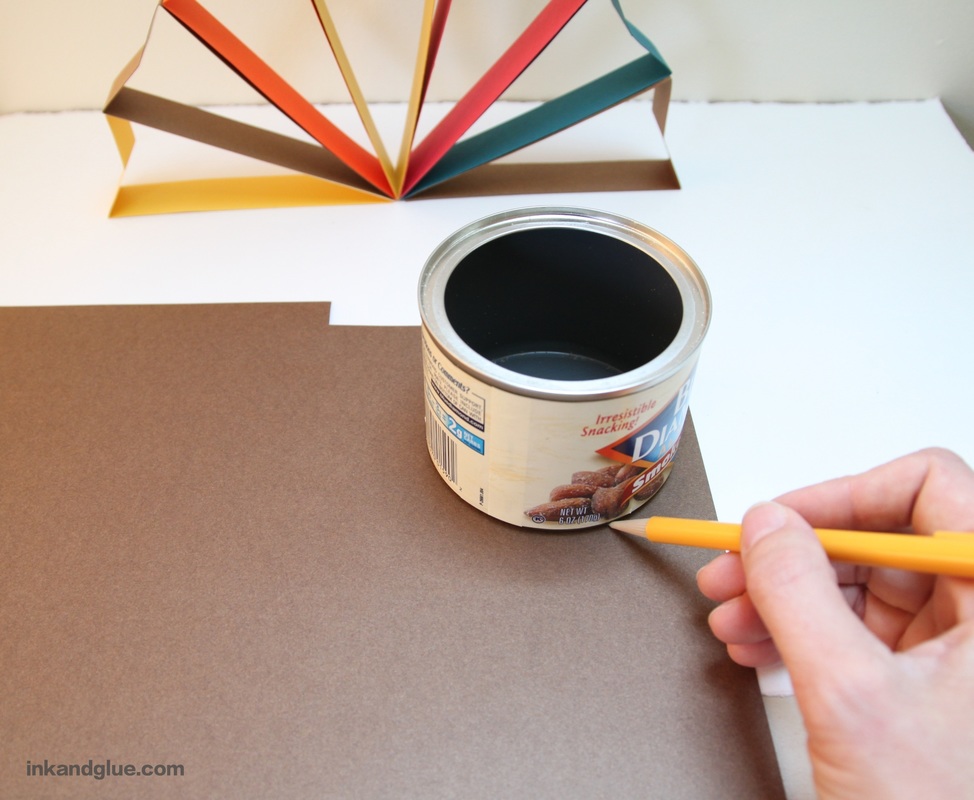
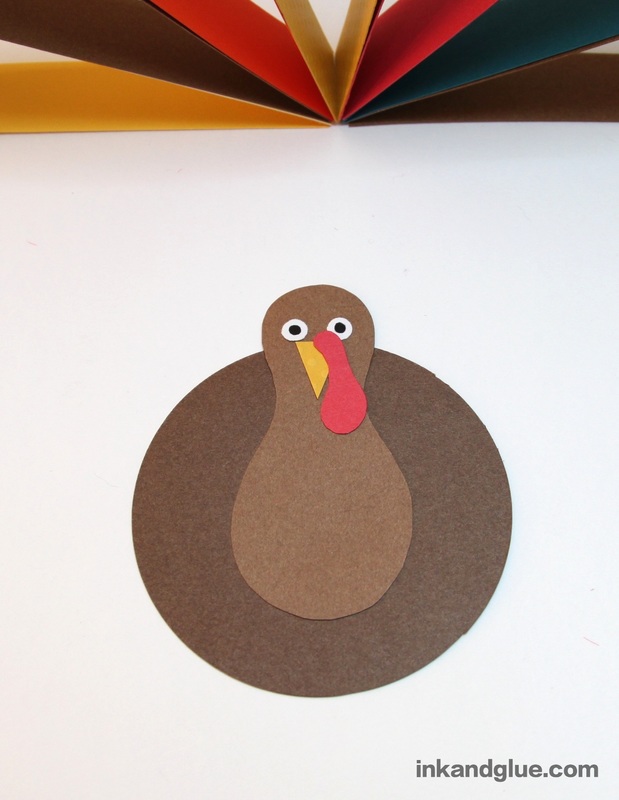
xo Franklin is still crazy for acorns. He will pick one up, toss it into the air, paw at it on the ground, bat it around like a cat, and roll joyfully all over it. For the coup de grace, he'll crack it open with his sharp molars. These pics were taken on this morning's unseasonably-warm walk. 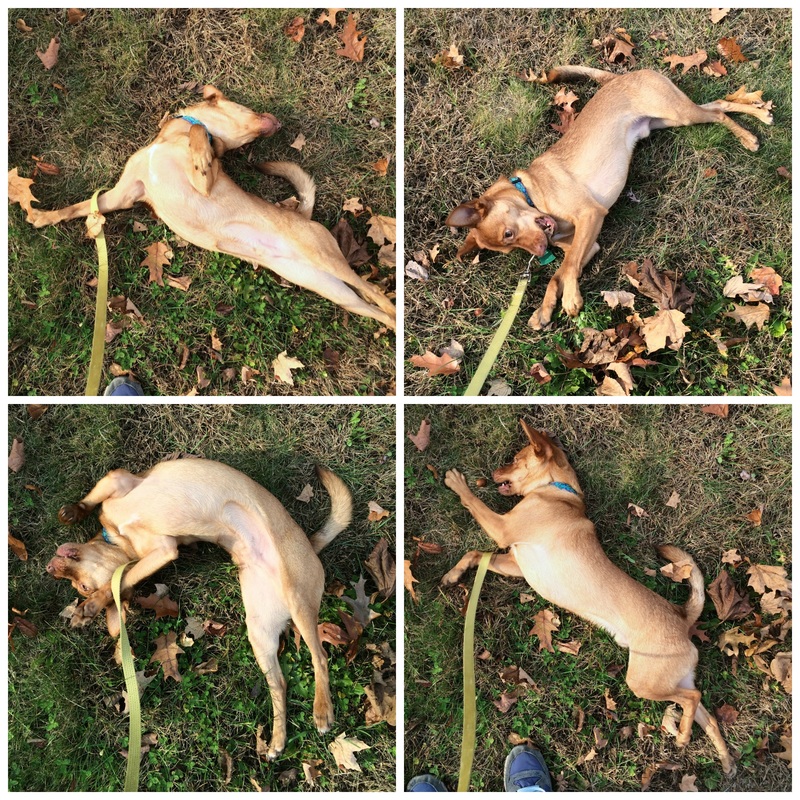 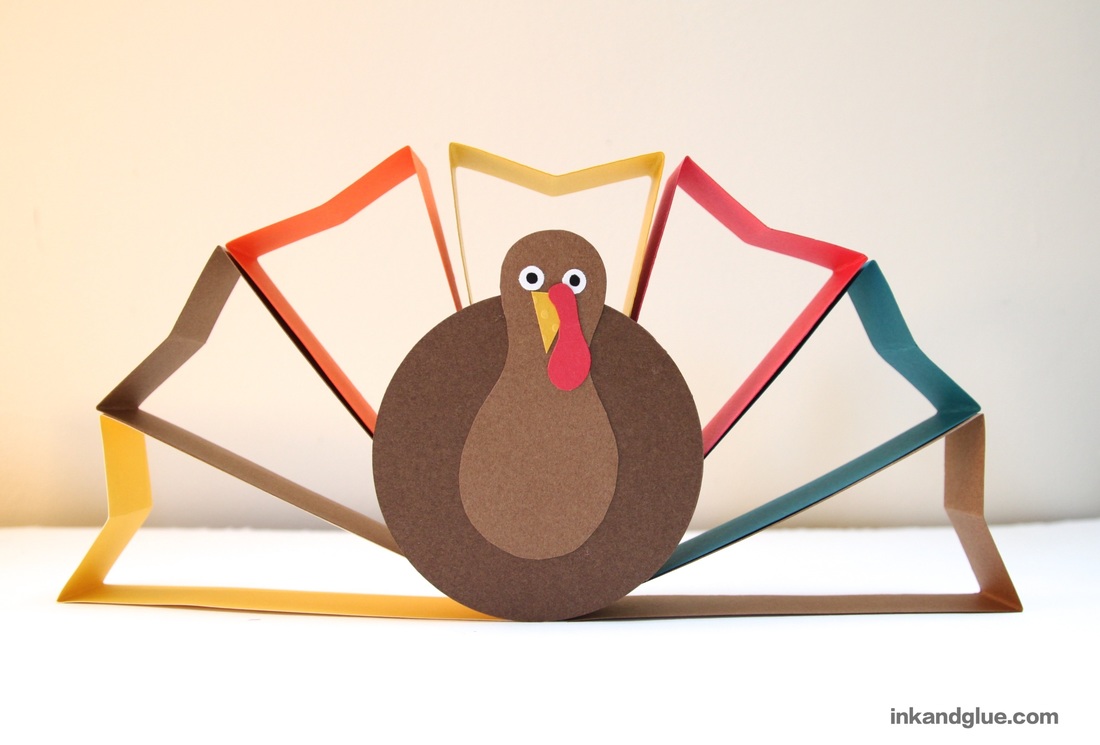 It's hard to believe Thanksgiving is just a few short weeks away. To help get into the mood, I created this turkey out of strips of paper and simple shapes. Set up this tom as a piece of decor, or make a flock and add name cards for a fun T-Giving tablescape. Start by collecting a few different colors of paper. I chose only sheets of 12-inch-square paper (the standard scrapbooking paper size) but you needn't be that particular. Later on you'll see that I abandoned the patterned one; I just liked the simplicity of the solid colors, and slightly different textures of the paper, to go along with the simple shapes of the bird. You will also see that my cutting mat is pretty dirty. (Let's just call it "well-used.") 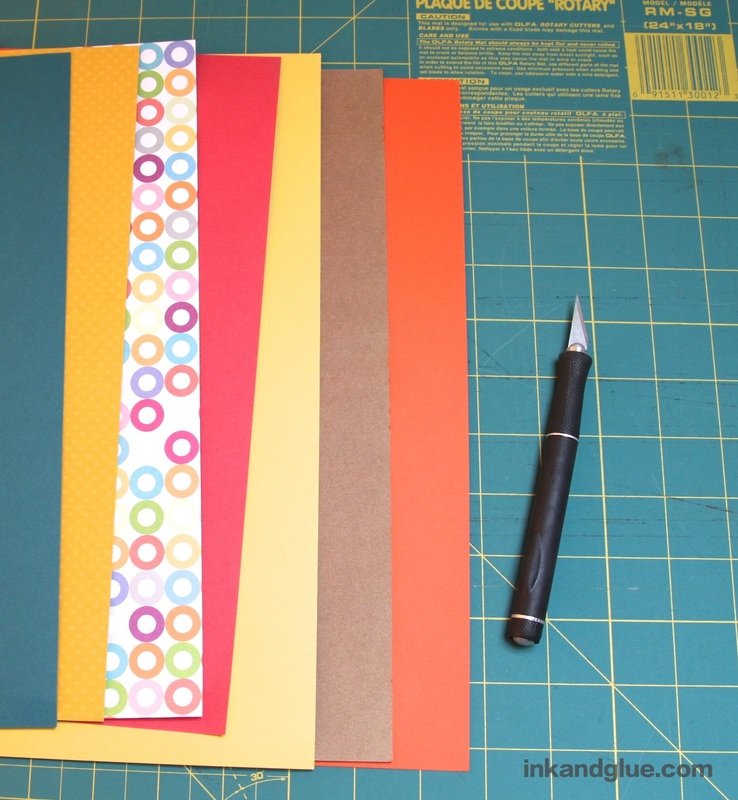 Next, you'll be cutting seven one-inch-wide strips from the paper. If you have a surface with ruled lines, use them to square up your paper and to place the ruler an inch from one edge. (If you don't have a ruled mat, use a ruler to make a tiny pencil mark one inch in along the top and bottom edges. Align the ruler with these two points.) Then, use a craft knife to cut the strip. You can lightly draw a line in pencil and use scissors, if you're anti-craft knife; but it is way faster to use a knife, and you end up with a neater, straighter edge.
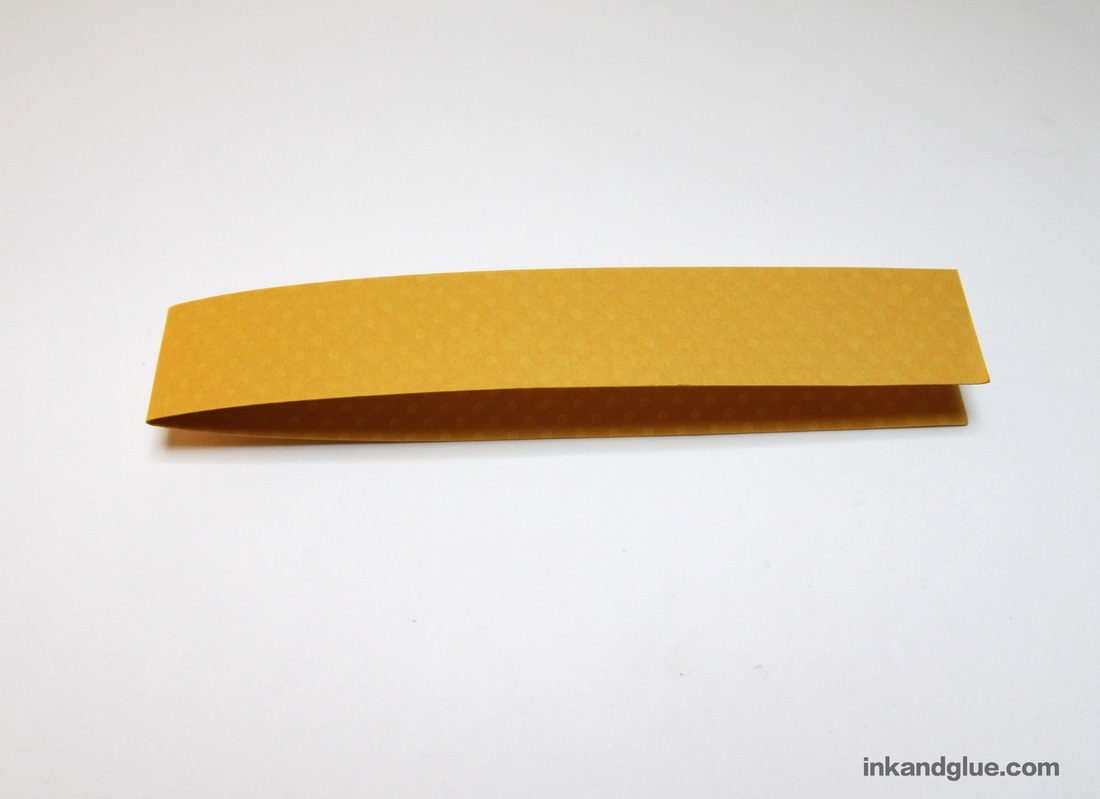
Once you've cut seven strips, it's time to fold! Fold a strip in half, with the patterned/printed side on the inside. Then fold the strip back the other way, an inch from the first fold. Flip over the strip and do the same with the other side.
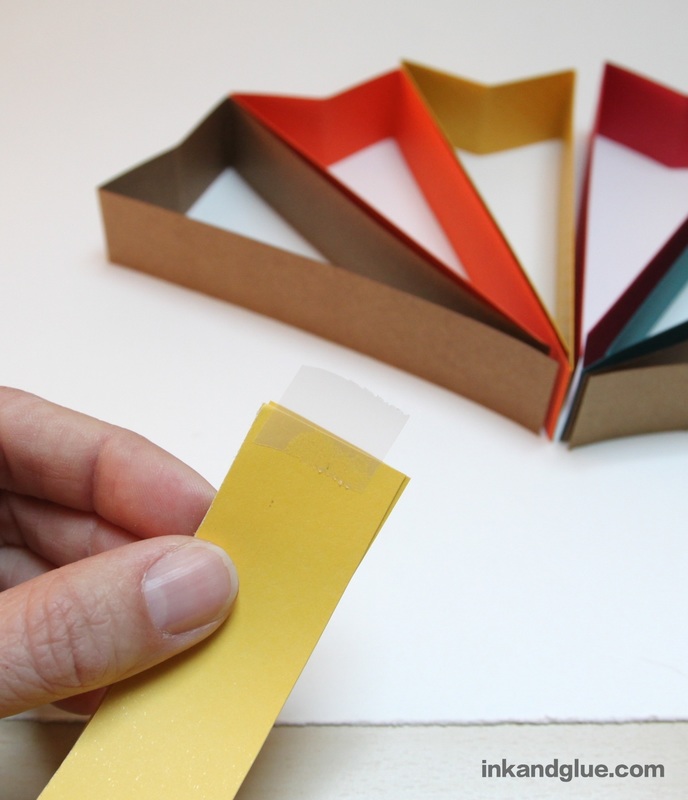
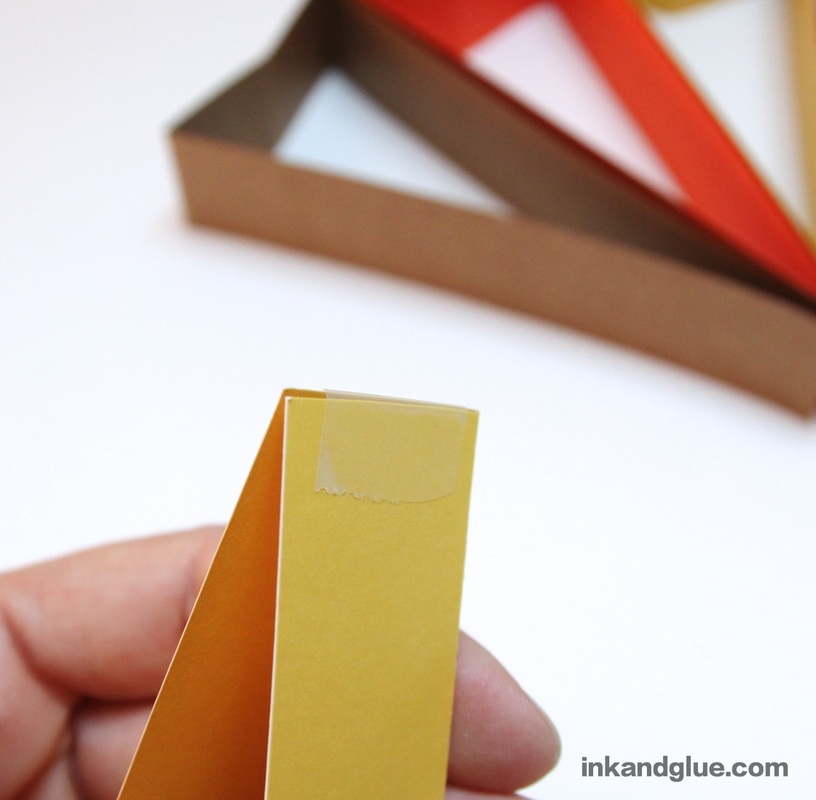
Do the same with each strip. Flatten the center folds so you get a bunch of skinny triangles with slightly dented short sides. 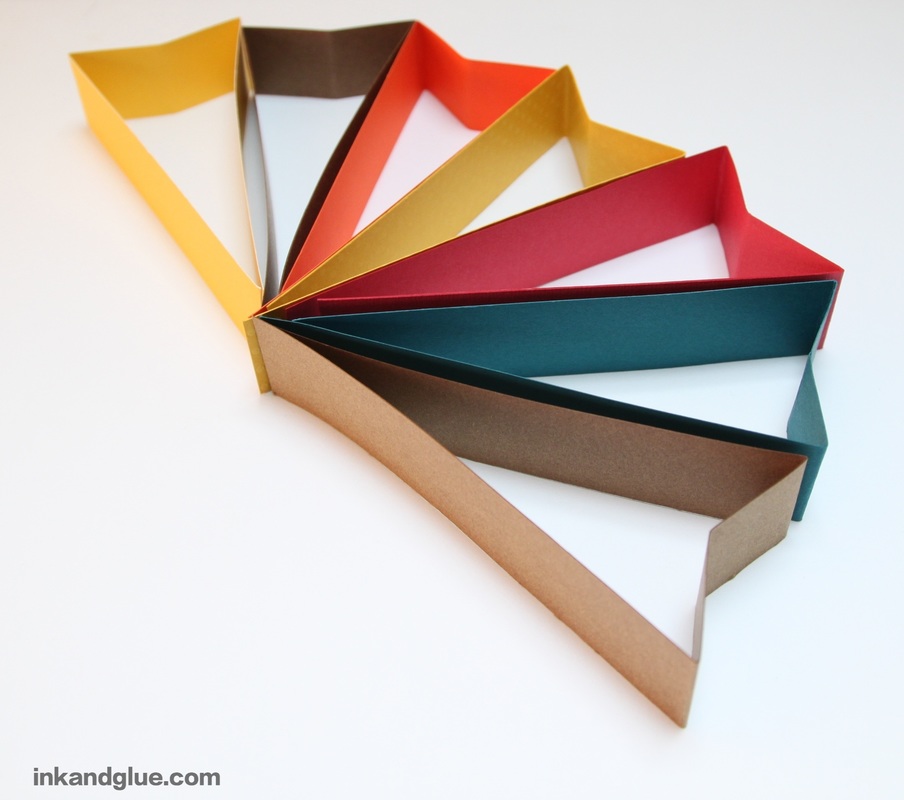 Tape the ends of each folded strip together at the tip, as shown.
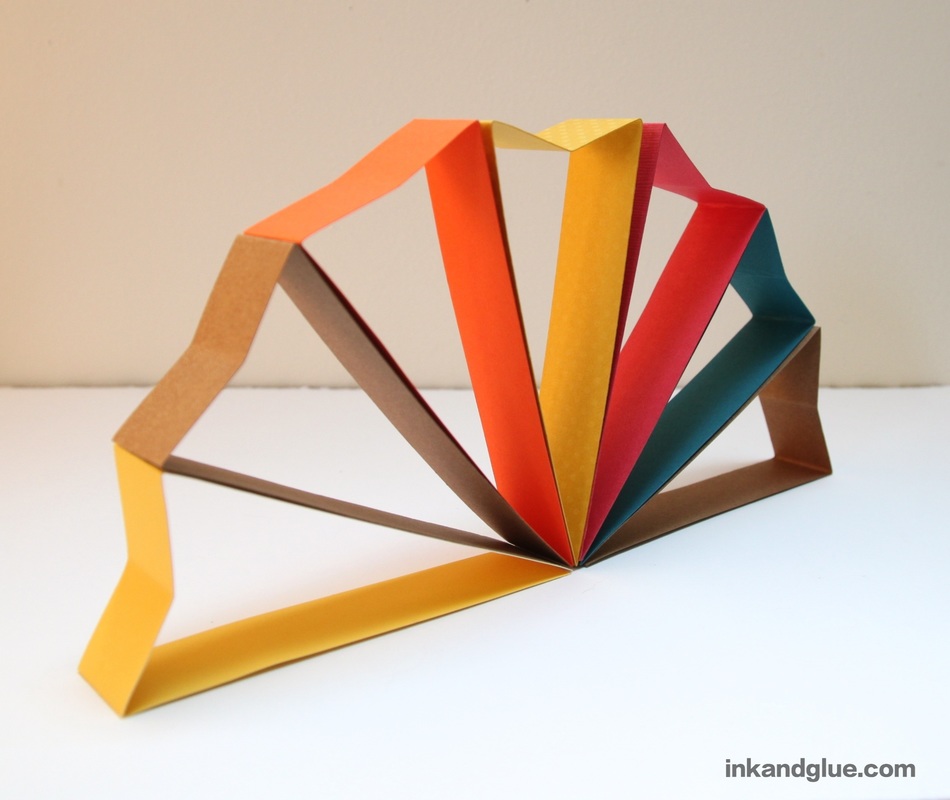
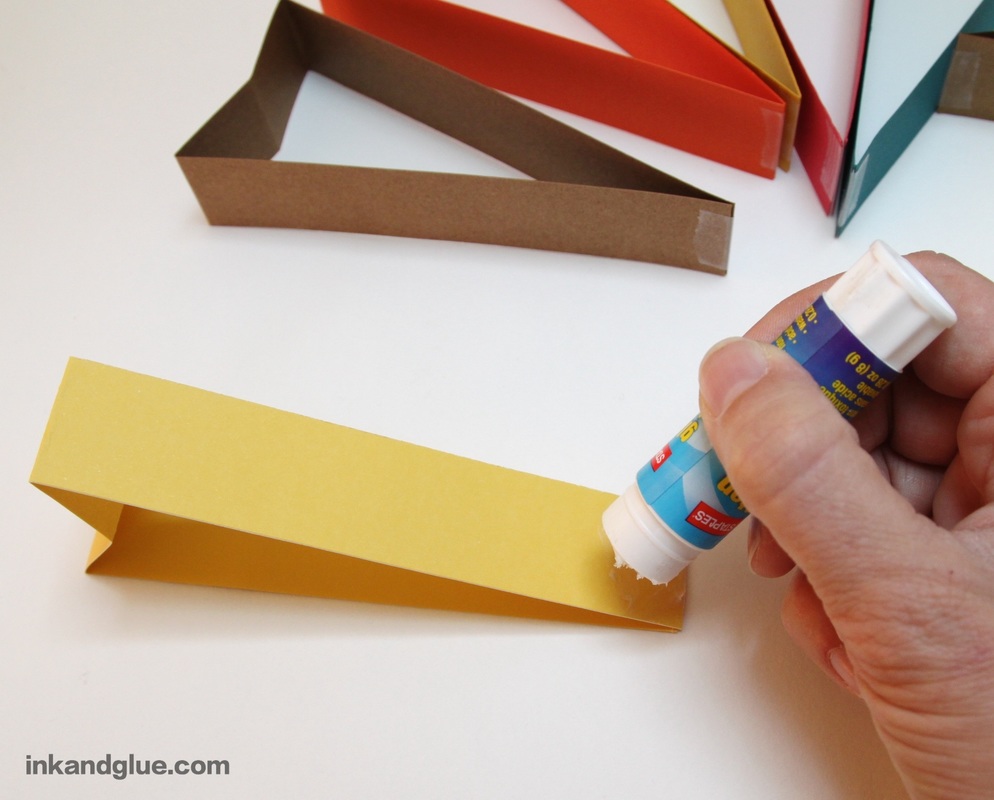
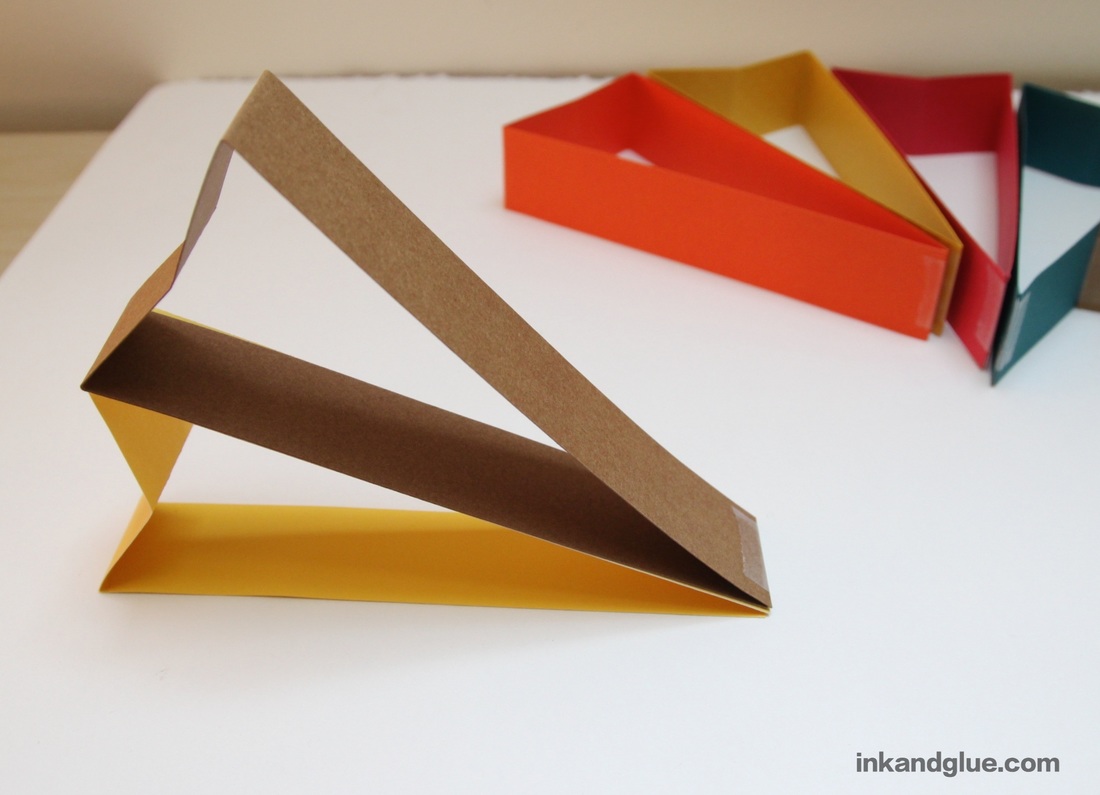
Now you'll be gluing the triangles together to form the tail. Spread glue stick on one side of the pointy end of a triangle, then press the next triangle on top, with edges aligned. Repeat until all are attached to each other.
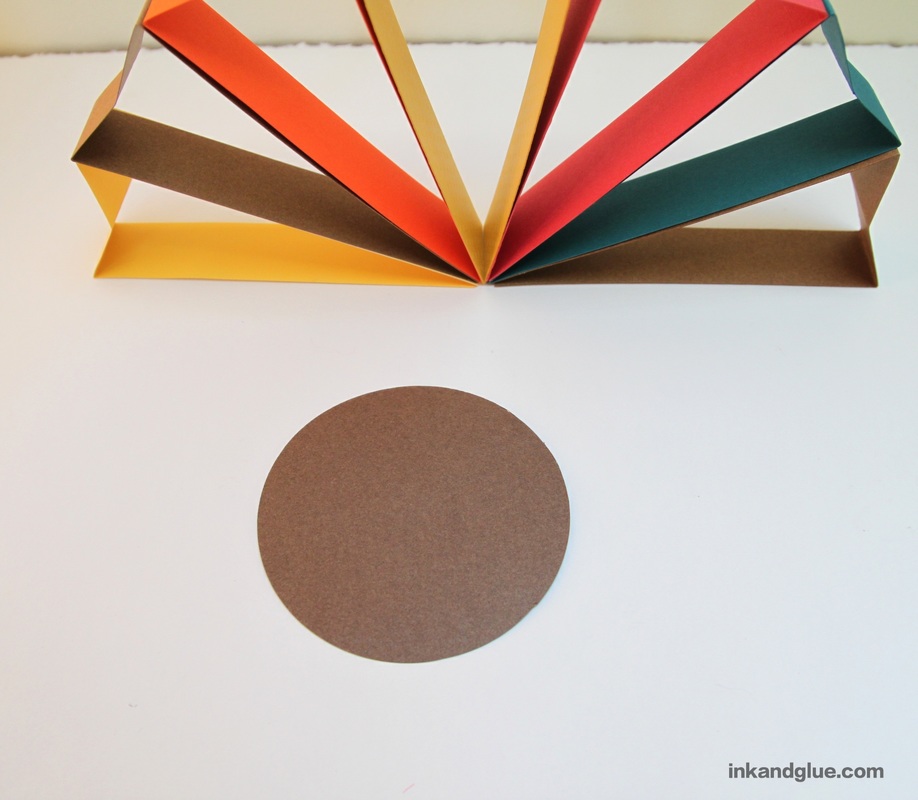
 On to the body! On a sheet of brown paper, use a circle cutter (link goes to the one I use), or trace something round and cut it out.
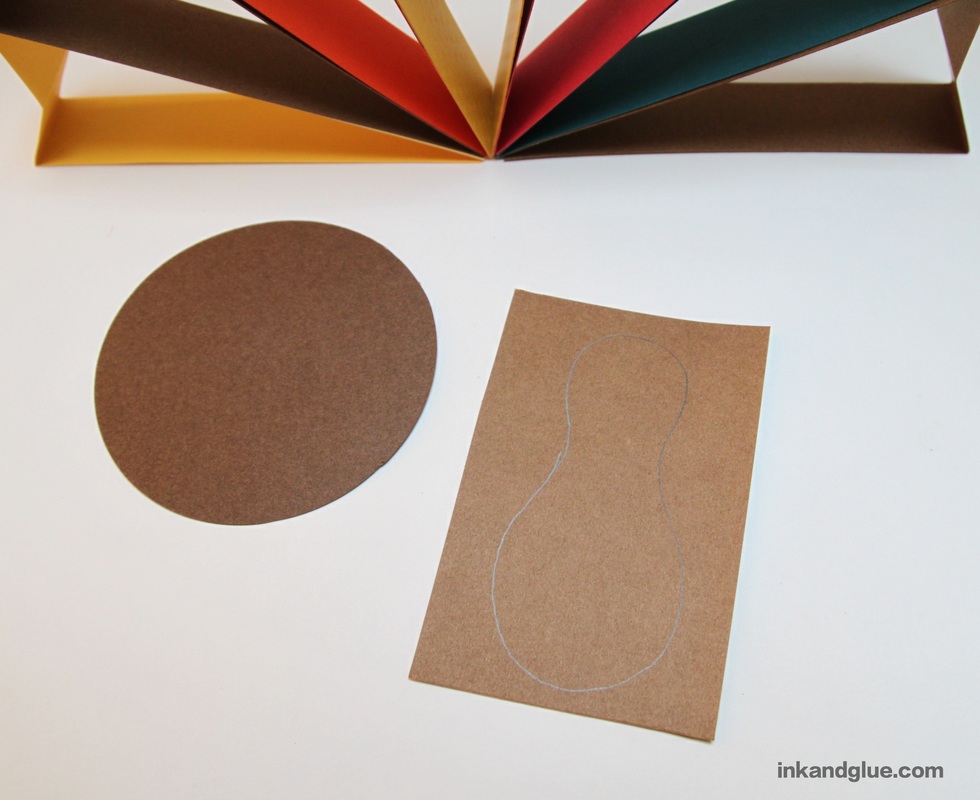
With pencil, draw a rounded bowling pin shape onto a sheet of light brown paper, and cut it out. (Why pencil for all of these marks? So you can erase them after you cut the paper.)
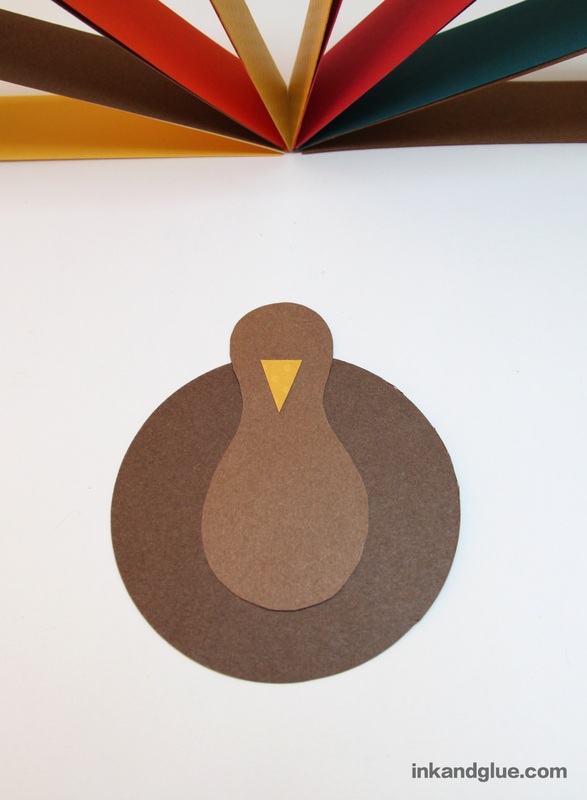
Glue-stick the head/neck shape to the body. Cut out an orange triangle for a beak, and glue that on as well. Use a hole punch to cut out two white paper eyes, and add pupils with marker. Glue those on. Cut out a snood (the proper term for that red blobby thing that hangs from a turkey's nose) from red paper, and attach with glue.
Cut a couple of bits from a glue dot (or a glue strip, which is what I have). Stick 'em on the edges of the tail assembly, roughly near the center. 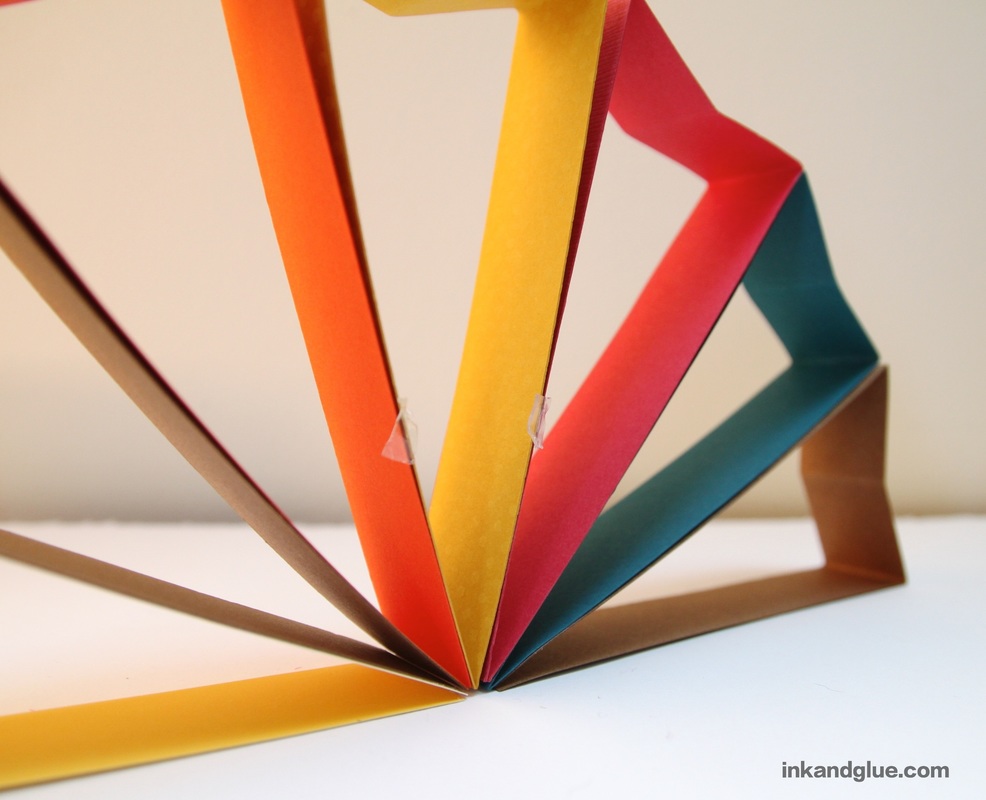 Press the body onto the glue dots, and you have your turkey! To add a name tag, simply slide it under the tip of his beak. I Use a little glue stick as needed to secure it. 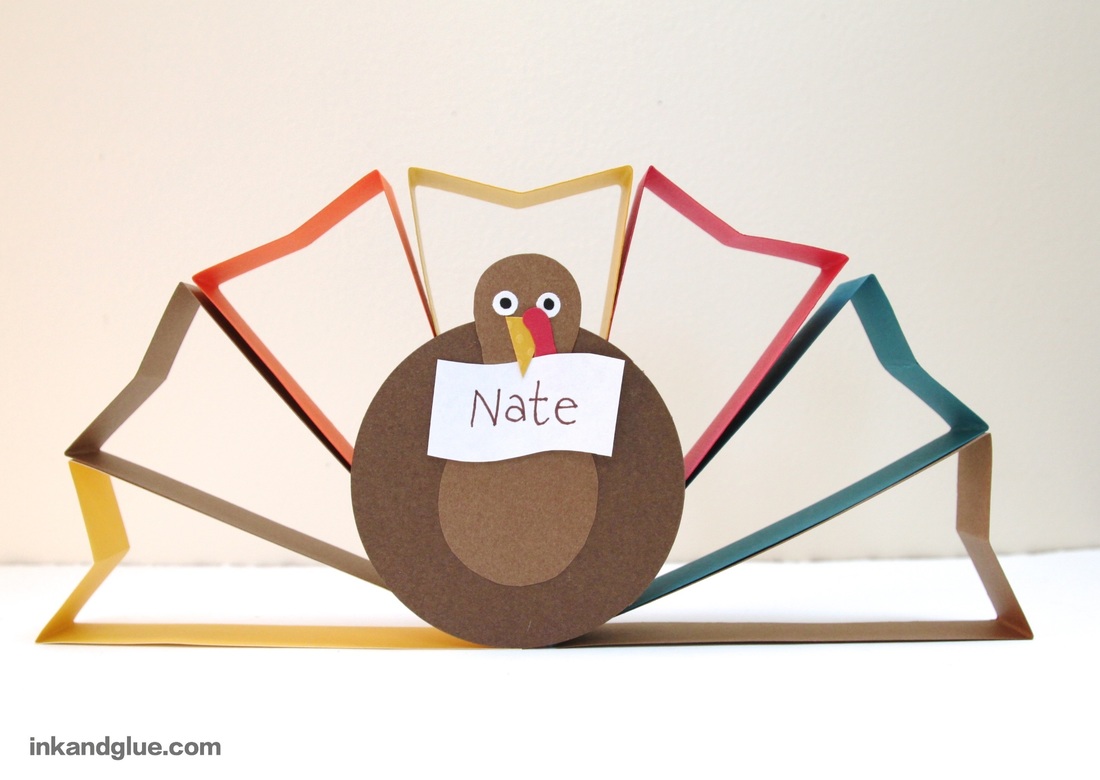 I'm thankful for you, my readers! xo
Have you met Jennifer Davis? She's a painter in Minneapolis, and she depicts animals and people in dreamy, quiet, sometimes surreal situations. 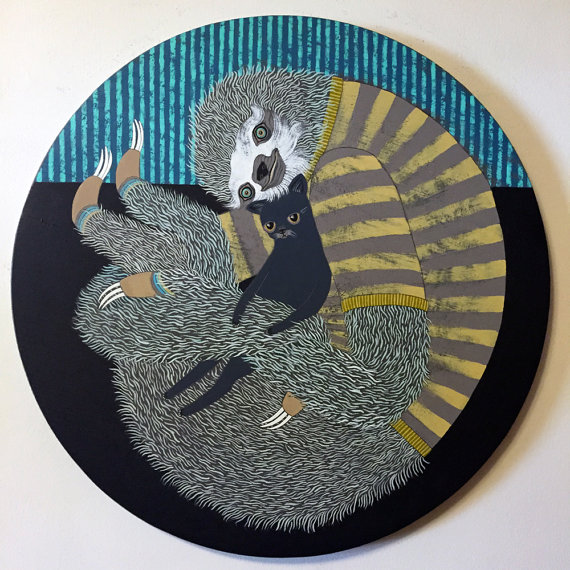 "Sloth and cat" has been sold, but clicking on this image (and any of the others) takes you to its Etsy listing, which has some nice up-close detail photos. 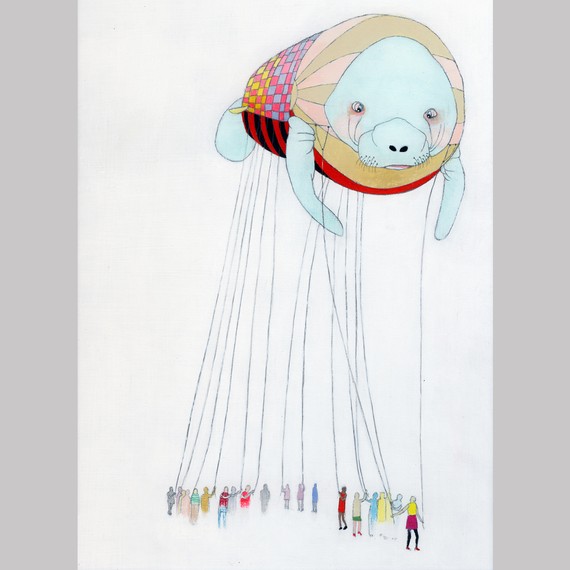 The wonderful "Float" is available to purchase as a print. So is "Party Dress":  Davis is adept at creating patterns and using color. Check out "Stripes and Circles":  She also re-paints found knick-knacks. I love this idea as an art experience to do with kids: Go to thrift store, buy <$1 tchotchkes, take home and repaint in wild, vivid colors and patterns. It's like a DIY version of those paint-your-own plaster places. (I am shocked to discover that they still exist.)
Go browse Jennifer Davis's online gallery: It's inspiring!
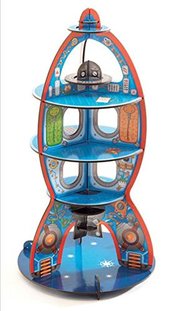
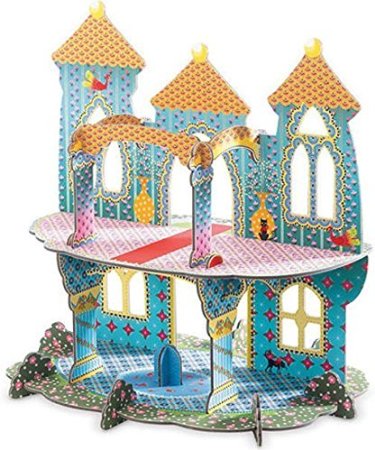
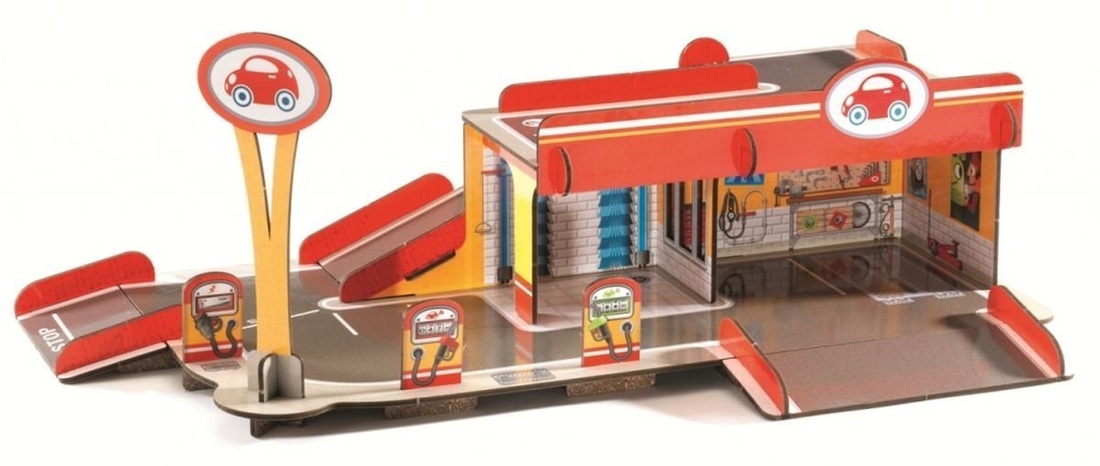
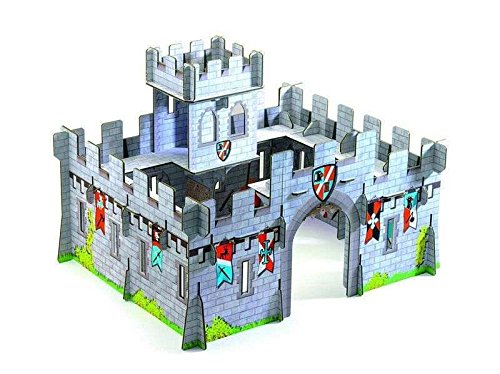
xo It's not totally accurate to call Djeco's Pop to Play structures "dollhouses." They're more like stage sets, or play spaces for action figures. They're cleverly designed, super affordable (each is under $20, and some are under $15!), and look great. And I very much appreciate a toy that's not branded (that is, not tied to a TV show or a movie franchise). Made of sturdy paperboard, the set's pieces slot together easily and cleverly, and can be taken apart for storage. Sweet! Disclosure: Links to each product go through my Amazon Affiliate site, and I'll get a few cents if you make a purchase after clicking through. But I'd be posting about these even if they weren't sold on Amazon.
Can they make a life-sized one of these for me- uh, I mean, for my niece and nephew?
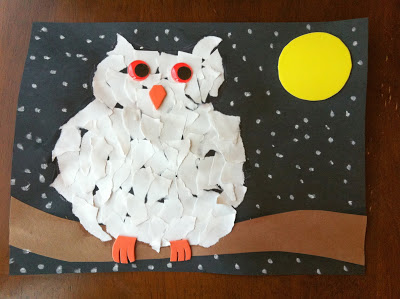
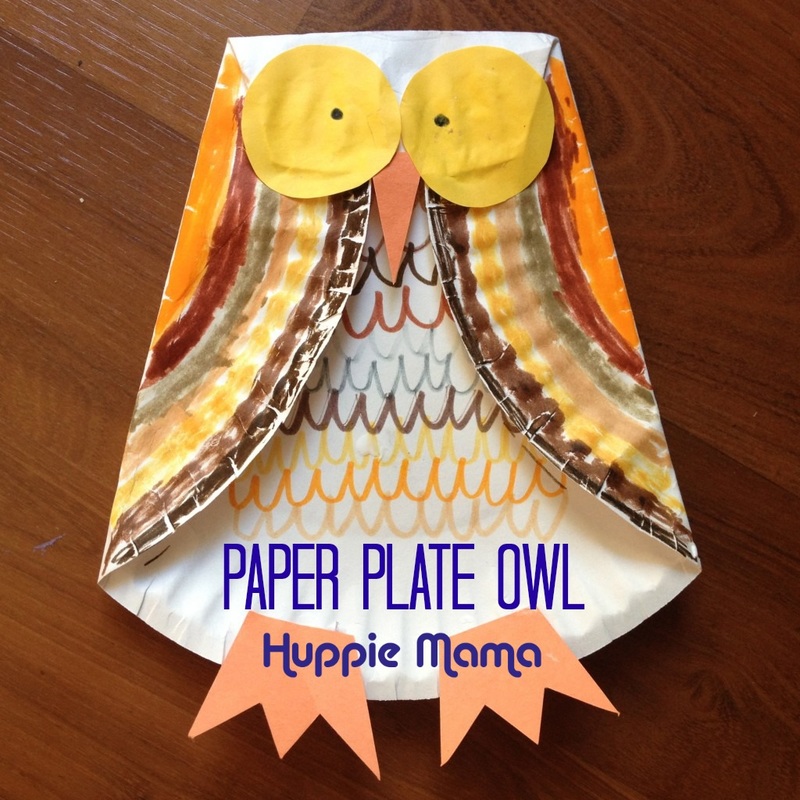
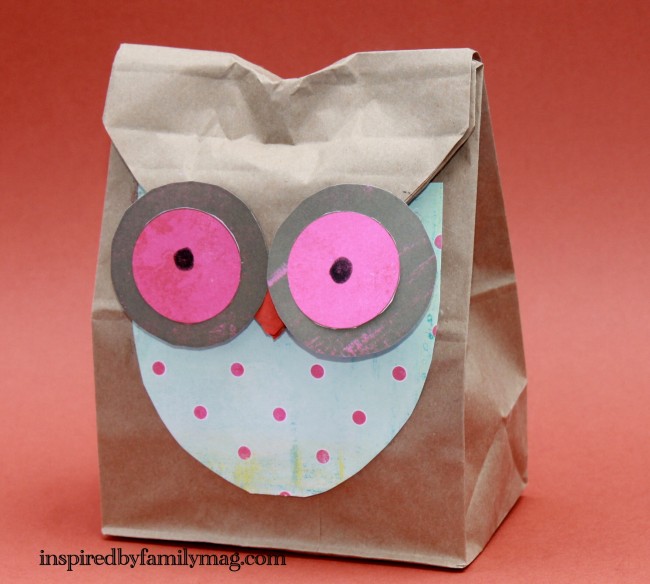
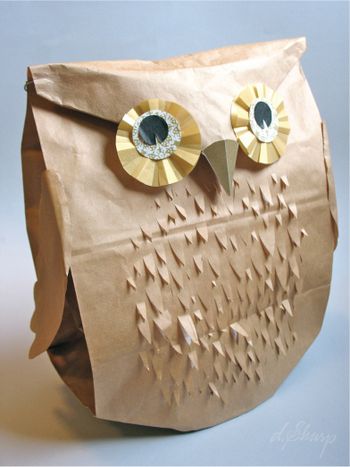
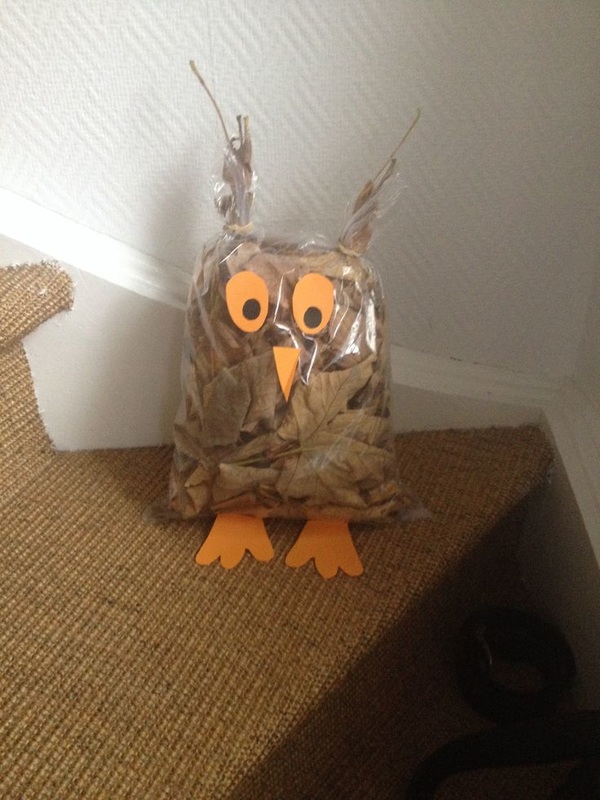
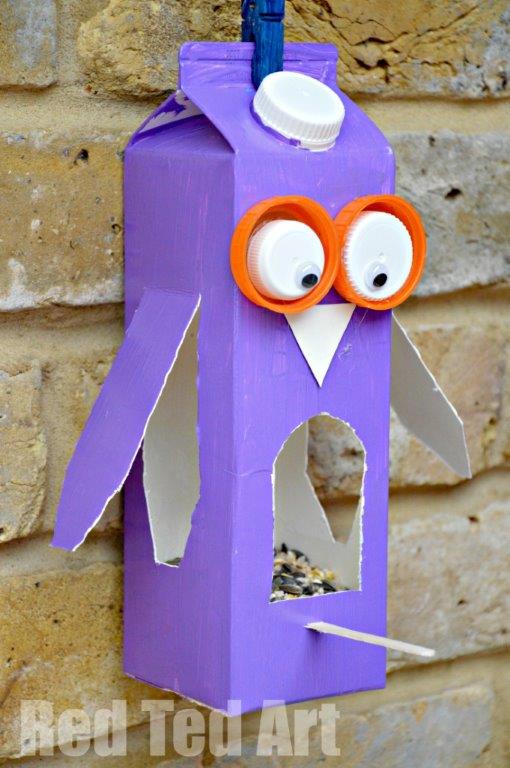
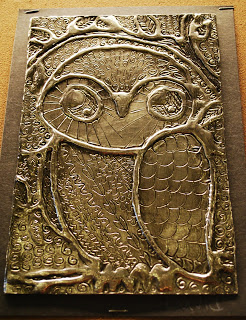
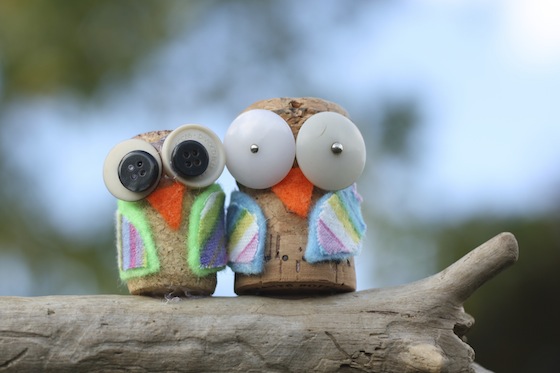
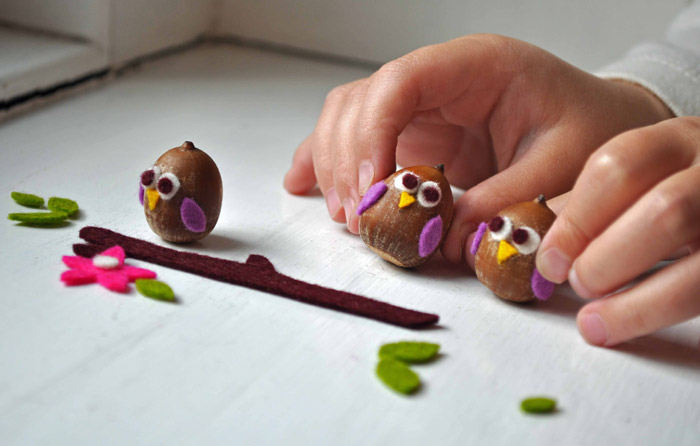
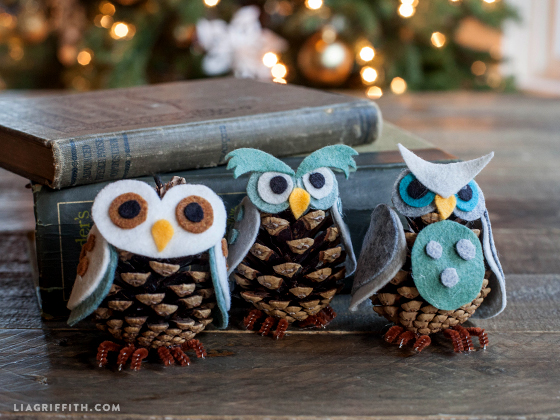
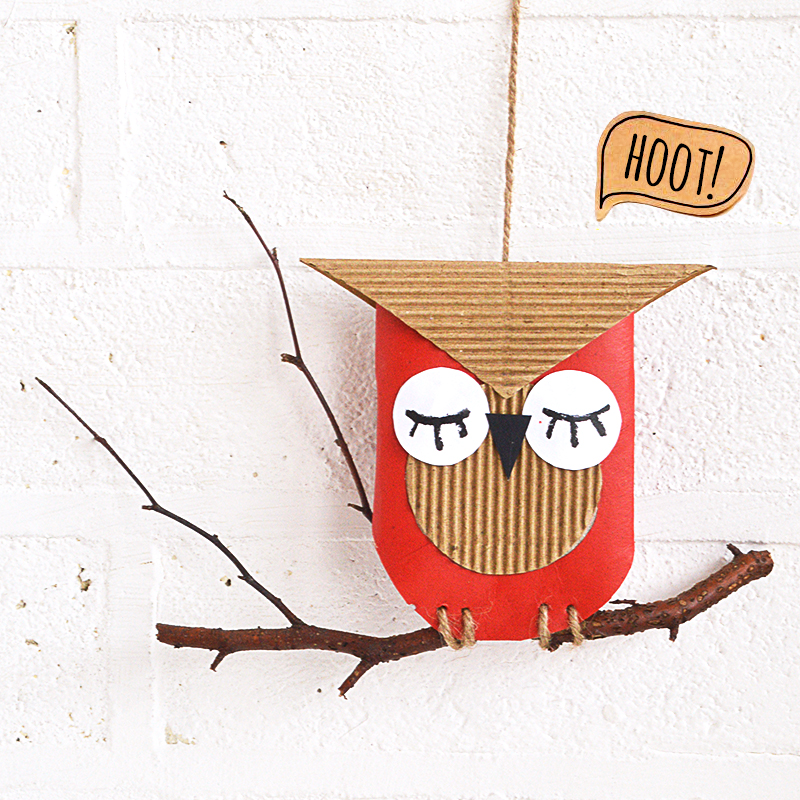
xo 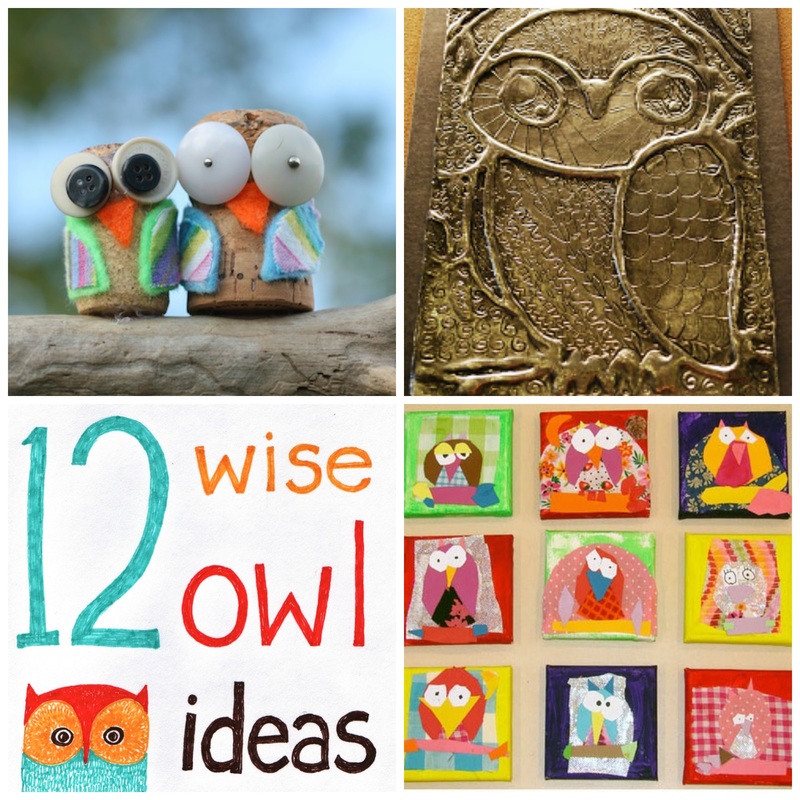 Today I've rounded up some cool owl projects! Owls are a popular kids' craft motif, and here's my theory why: You can simplify an owl's form into a few basic shapes and still recognize it as an owl. There are no other birds that look quite like them. Plus, they are simply majestic, intriguing animals. I encountered a barred owl on a walk a couple of weeks ago, and though apparently it had been perched in a tree very close to the path, I didn't see it until it was flying away. It was incredible to watch this huge bird fly without making any sound, no rustling of feathers or whoosh of wings. Celebrate the owl with these twelve crafts, hand-plucked from the internet! I choose these crafts carefully for ease of making, accessibility of materials, and overall design. I present them in order from easiest/youngest crafter to harder/older crafter, very roughly. On with the owls!
Owl be looking forward to hearing about any wonderful crafts I missed!
xo |
Categories
All
Archives
March 2017
AuthorI'm Debbie Way, an artist and writer who enjoys making things. |


 RSS Feed